Copyright TheBeachcats.com

Please Support
TheBeachcats.com
This article will explain the step-by-step method of repairing soft spots in your beach catamaran hulls. This technique uses the method of injecting thickened epoxy into a catamaran hull using a syringe.
This method is well suited to repairing soft spots in catamaran hulls. The soft spots can be found by pressing carefully with your fingers on the hull. Usually they are on the top or upper side of a hull. When you apply pressure to a soft spot, the area will detent slightly and even give a "squish" sound. The soft area can be a few square inches or entire areas of a hull.
The typical catamaran hull consists of an outer later of gelcoat and an inside layer of fiberglass with a foam layer in the middle. This foam layer is about 3/8" thick. When you feel this soft area from the outside, the foam inside has either deteriorated and has separated from the inside or outside layers. Some times it can even be wet.There are a few ways how these soft spots can develop. One way is to install access ports without sealing the raw edge of the hole with epoxy or silicon before the port is installed. Water in the hull vaporizes and penetrates the foam from the inside. Usually ports are installed to alleviate the build up of moisture in the hulls, but if not done properly it accelerates the same problem you were trying to avoid.
There are reports that 1979 Hobie 16 boats were vulnerable to soft spots because of the inferior foam that was used that year. I don't know if it is true or not, but I owned a 1979 Hobie 16 that had a soft spot problem in front of the forward pylons. This boat also had access ports installed by the previous owner without sealed hole edges.
Ports or no ports, water left in the hull can evaporate and penetrate the inside layer of fiberglass and damage the foam layer. You should silicon all leaks in your hulls, drain them after each sail, and remove the drain plugs prior to storage. If you can garage or cover your boat and open the access ports it would be even better.
Another way that foam is broken down is to step on the top sides of the hull. If you have to step on a hull, do so on the outside edge where it is stronger. Or better yet, crawl on it so that your weight is more distributed.
If you have very large, extremely soft, or areas that have delaminated so bad that the inside layer of fiberglass has physically separated from the foam, then you would be wise to seek the help of a professional. This technique is not suitable for severe cases of delamination.
This project was performed on my 1982 Hobie 16. I had a soft area about 4x6" between the forward pylon and an access port. It wasn't very soft, but I wanted to repair it before it had a chance to get worse.
I encourage you to read the West System literature either in paper or on-line form. The link is listed below. It will help you understand the characteristics of epoxy if you have never worked with it before.
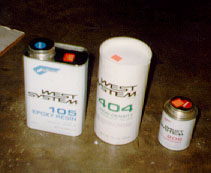
Supplies needed
|
|
Tools Needed
Other Requirements
Time Requirements
Approximate Costs Involved
Relevant Web Sites (with dealer locators)
Preparation Clean the soft area of the hull. Apply 2" masking tape (or wider if you have it) to the general area. This will help our cleanup tremendously. Overlap the strips and extend a few extra inches in each direction. Mark on the masking tape the approximate boundary of the soft spot. Chuck the 1/8" drill bit into your drill. Create a "safety stop" on the bit by applying the 3/4" masking tape to the bit. Wrap it around the bit several times at the tip so that only about 3/16" is exposed. This will allow us to drill through the top gelcoat layer and into the foam without drilling through the inside fiberglass layer. |
 |
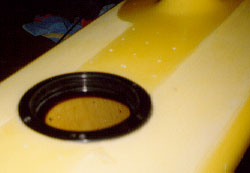
Take a deep breath and drill a series of holes in the soft spot. Space the holes about 2" from each other. Do not be tempted to drill into the adjacent firm areas, just in the soft area that you marked earlier. If it appears that the inside foam is wet, you may want to let the holes dry for a few days. Some people like to take a bent nail and rotate it inside of the holes to create areas for the epoxy to enter. I didn't have any problems injecting into the holes without clearing the foam with a nail. Examine your syringe for the fit into the drilled holes. Adjust the syringe tip by cutting off the end so that it mates with the holes properly. |
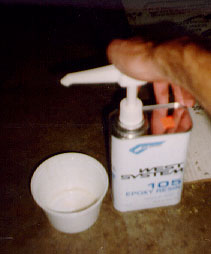
Epoxy Mix Mix up a batch of epoxy in a container. You will need to estimate how many pumps epoxy you will need. I would start with about 8 pumps of epoxy and resin for a 6" diameter area. If you are using the Maxi Repair Kit, empty the contents of one or two packets of resin and hardener according to directions. Stir the mixture for at least 1 minute. Add in 404 high density filler about a tablespoon at a time until the mixture is the consistency of catsup (it won't be as smooth). This filler is what gives the epoxy its strength. |
|
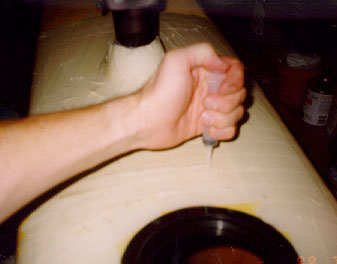
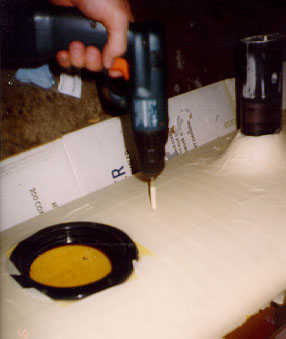
Epoxy Inject |
Draw the thickened epoxy into the syringe and inject into each hole. Start at the lower holes. Mark each one so that you don't forget any. Inject until either you can't push any more or it starts to ooze out of other holes. You can also plug an adjacent hole that the epoxy is exiting from to force it in another direction. Wipe off any excess epoxy as you progress. |
Epoxy Cure Allow the epoxy to cure for about an hour so that the tops of the holes are still soft but firm. Remove the masking tape. Push in any epoxy that is above the surface of the gelcoat. Allow to cure 24 to 48 hours. |
|
Test and Admire After the epoxy has cured. Perform the same finger pressure test. Your soft spot should be hard as a rock. If you wanted to make the holes look better, we could fill in the tops of the holes with gelcoat from a gelcoat repair kit. But for me and my '82 boat, all I care is that she is strong and seaworthy. I'm going sailing.
Gary Willcox
Cincinnati, Ohio Disclaimer: Attempt this project at your own risk. Every boat is different and poses different problems when attempting a project such as this. The author or OTW in no way assumes responsibility, express or implied, in the outcome of this project. Always wear eye protection when working with drills, epoxy, etc. Perform in well ventilated area. Do not breathe dust from 404 filler. Follow all precautions, warnings, and directions on all tools, supplies, epoxy, and hardeners. |