

But wait, spinning free while under load. OK, So you know I torched the one block. I forgot I had a petzel mountain cllimbing pulley in the garage. It's rated to hold more than enough lbs. So I hung that on there to complete the total blocks on the boom. I don't know if it will work or not but why not use something you already have. It's aluminum with an approximate 2" plastic wheel. I think I paid $18 for it back in the day.
http://www.petzl.com/en/P…RESCUE?l=US#.VPSumY73-iw
Edited by goodsailing on Mar 02, 2015 - 11:43 AM.
--
Goodsailing
Laser-Standard Rig (Sold 6/15)
H18 (Sold 7/15)
Building 19' Tacking Outrigger
Balt-Wash Area
--
Referbing Hobie 18 Thread

Go to page [-1] 1 - 2 - 3 - 4 ... 12 - 13 - 14 [+1 +10]:
-
- Rank: Mate
- Registered: Feb 18, 2013
- Last visit: Jul 19, 2015
- Posts: 396
 Posted: Mar 02, 2015 - 11:42 AM
-
- Rank: Mate
- Registered: Feb 18, 2013
- Last visit: Jul 19, 2015
- Posts: 396
Posted: Mar 09, 2015 - 07:06 PM
What knots are used for tying mast halyard to ring. There's two knots top and bottom. Knot must not interfere with attachment to do hicky up there. Anchor bend, halyard knot etc? Thanks
--
Goodsailing
Laser-Standard Rig (Sold 6/15)
H18 (Sold 7/15)
Building 19' Tacking Outrigger
Balt-Wash Area
-- -
- Rank: Administrator
- Registered: Jul 19, 2001
- Last visit: Apr 01, 2024
- Posts: 3428
Posted: Mar 09, 2015 - 08:47 PM
"two knots top and bottom"?
I use a tight bowline to connect the aussie ring to the main halyard.
In fact with a bowline, square knot, and half hitches you can pretty much tie anything on a beachcat.
--
Damon Linkous
1992 Hobie 18
Memphis, TN
How To Create Your Signature
How To Create Your Own Cool Avatar
How To Display Pictures In The Forums.
-- -
- Rank: Mate
- Registered: Mar 19, 2004
- Last visit: Apr 12, 2024
- Posts: 960
Posted: Mar 10, 2015 - 03:44 AM
The best way to go about it is to get one of the halyard rings that has a small hoop welded to the top of the main ring. 1/4" diameter halyard line goes through the hoop and is tied off with a basic overhand knot. When rigging, the knot faces the mast. This is the simplest and lowest profile system available and is ultimately what became standard on all Hobies that use the hook and ring system.

sm
Edited by Dogboy on Mar 10, 2015 - 03:45 AM. -
- Rank: Mate
- Registered: Feb 18, 2013
- Last visit: Jul 19, 2015
- Posts: 396
Posted: Mar 10, 2015 - 06:19 AM
Oops. The rope is a closed loop with bent shackle & ring. So there's a knot on the ring and a knot on the shackle that is attached to the ring. I gather the shackle is attached to the clue of the sail by which the sail is hoisted, or rather used to take up slack as sail is manually pushed up with both hands etc, per directions. Ring is only used to set on hook. Dogboy suggests using ring with smaller ring. Not sure dia of smaller ring but my halyard is 1/4." This brings up the question of using a small dia halyard to decrease knot profile on both the shackle and ring to forgo the Hobie ring/small ring part?
While on the topic of hoisting main sail. Can this be done while on the water?
--
Goodsailing
Laser-Standard Rig (Sold 6/15)
H18 (Sold 7/15)
Building 19' Tacking Outrigger
Balt-Wash Area
-- -
- Rank: Mate
- Registered: Mar 19, 2004
- Last visit: Apr 12, 2024
- Posts: 960
Posted: Mar 10, 2015 - 08:09 AM
The bottom end of the halyard is only tied to the shackle for storage/trailering. It should be disconnected for hoisting the sail, gathered on the tramp, and then coiled and stored in the tramp pocket once the sail is hoisted and the halyard ring engaged on the hook. The twist shackle is connected to the grommet in the head plate.
You can try using the standard ring (or any of the many variations there of). I've been sailing these boats for a lot of years and IMO, the ring I referenced in my prior post is the best. Tie off the halyard to the small hoop using an overhand knot. The knot faces the mast. In theory the sail could be hoisted on the water. In practice, it will be much more difficult than doing so on dry land. The trick to getting the ring to engage the hook easily is to have the boat pointed directly into the wind and this will be difficult while drifting around on the water. It is also easiest to hoist the main by standing behind the boat. If your boat has the old style halyard hook with the little flapper, I recommend removing this. It causes a whole other level of frustration with engaging the ring. With the boat pointed properly and the correct ring installed properly, it is possible to raise the sail and engage/disengage the ring with ease.
sm -
- Rank: Mate
- Registered: Feb 18, 2013
- Last visit: Jul 19, 2015
- Posts: 396
Posted: Mar 10, 2015 - 08:25 AM
Gosh what am I thinking. Of course it's tied together for travel. On page 14 of the Hobie 18 manual shows sail is connected to the twisted shackle for hoisting.
The flapper right, not the hook? I can dremel the post and remove the flapper, if in fact the flapper/lock causes problems getting the ring on the hook. I realize mast rotation is key in the process for positioning. Cunningham I suspect will provide enough tension to keep the ring on the hook.
Once the ice melted inside the mast, and it was drained and dried out, I sealed the mast with clear silicone. You'll remember I couldn't get the caps off, so any residual moisture will have to go along for the ride.
Mast is done aside from taping bolts and fixing the plastic sail protector on the diamond wires.
--
Goodsailing
Laser-Standard Rig (Sold 6/15)
H18 (Sold 7/15)
Building 19' Tacking Outrigger
Balt-Wash Area
-- -
- Rank: Mate
- Registered: Feb 18, 2013
- Last visit: Jul 19, 2015
- Posts: 396
Posted: Mar 10, 2015 - 08:39 AM
Couldn't jib aid keeping boat in irons while main is hoisted while on the water? (Just anticipating aft wind at the put- in where aft goes in water first, where hoisting sail on land and getting boat in water with main hoisted may be problematic. Due to property owner rights and limited access to water ) Directions say, stand in front of mast and use two hands to hoist sail, means you couldn't do that on the water etc.
--
Goodsailing
Laser-Standard Rig (Sold 6/15)
H18 (Sold 7/15)
Building 19' Tacking Outrigger
Balt-Wash Area
-- -
- Rank: Mate
- Registered: Mar 19, 2004
- Last visit: Apr 12, 2024
- Posts: 960
Posted: Mar 10, 2015 - 10:23 AM
Removal of the flapper, not the hook, correct. The hook is required to keep the sail up. The flapper was intended to help with lowering the sail, but can actually make engaging the ring onto the hook more difficult. You can easily remove the flapper by either drilling out or grinding off the head of the rivet that holds it on.
The jib is not going to keep the boat in irons. The jib is going to pull the bows off the wind, so even if you go hove-to with the jib up, the boat is going to be pointed at least 45 degrees off the wind and that is going to make hoisting the main difficult. Not saying it can't or hasn't been done, but it will be significantly more difficult than with the boat pointed directly into the wind on land.
If you need to launch from an offshore beach, in many cases the easiest way is to sail out backwards. Release the mainsheet, lock the rudders up, and push the boat off the beach stern first. Sit on the bows so the sterns are clear of the water and the boat will track straight downwind. Continue backwards until you have enough depth and space to put the rudders down, bear off, and start heading forward.
Back to hoisting the mainsail. The easiest is with two people. One person stands in front of the front crossbar and guides/feeds the mainsail into the luff track. The other person stands behind the rear crossbar and hoists. Once the sail is all the way up, the person in front can operate the rotator arm as needed to engage the ring. If you're doing this solo, you will have to stand by the rear crossbar to hoist and walk forward on the trampoline as needed to guide the sail and operate the rotator.
sm -
- Rank: Mate
- Registered: Feb 18, 2013
- Last visit: Jul 19, 2015
- Posts: 396
Posted: Mar 10, 2015 - 11:07 AM
I hope you know I know that. I know too that being specific regarding the written word trumps vagueness. Thanks for your insight regarding hoisting and launching the boat.
Edited by goodsailing on Mar 10, 2015 - 11:08 AM.
--
Goodsailing
Laser-Standard Rig (Sold 6/15)
H18 (Sold 7/15)
Building 19' Tacking Outrigger
Balt-Wash Area
-- -
- Rank: Mate
- Registered: Feb 18, 2013
- Last visit: Jul 19, 2015
- Posts: 396
Posted: Mar 10, 2015 - 11:15 AM
OK, now that the mast and boom are done, on to the boat. The hiking strap threads that held the straps to the tramp have weathered to the point that the straps came off. Those that were worn I just pulled off. Since the tramp is in relative good shape I intend on keeping it. So, all that is needed is new lacing and new hiking straps. I thought I'd do the straps first so I went to junk yard and got 10' of seat belt webbing for $6. I have some heavy duty thread and leather working needles. The question now is: should I put a twist in the strap so that it would be easy to get your feet under, or should I just keep it flat? It would look nice flat but I'm into performance and trying to get your feet under the strap could be problematic with booties on if flat etc.
--
Goodsailing
Laser-Standard Rig (Sold 6/15)
H18 (Sold 7/15)
Building 19' Tacking Outrigger
Balt-Wash Area
-- -
- Rank: Mate
- Registered: Aug 18, 2003
- Last visit: Dec 13, 2023
- Posts: 880
Posted: Mar 10, 2015 - 09:27 PM
The thread should also resist UV, otherwise it won't last. same thing than with the thread of the sails. -
- Rank: Mate
- Registered: Feb 18, 2013
- Last visit: Jul 19, 2015
- Posts: 396
Posted: Mar 11, 2015 - 04:56 PM
Ok it appears the port stern deck is crunchy soft. But I can't figure out the instructions to get the epoxy in there. Drill through outer shell then drill through core? Through the same hole? Isn't this the same as drill a hole straight through the deck? If you put epoxy in, won't it just drip straight through not go between layers? Also, suppose the separation is between the deck and foam, not between foam and inner layer. Wouldn't it be better to only drill down through the hull without touching the foam and fill the space between the foam and deck? I'm not getting this.
Any ideas? Thanks
http://www.thebeachcats.c…ctures/?g2_itemId=101527
Edited by goodsailing on Mar 11, 2015 - 04:59 PM.
--
Goodsailing
Laser-Standard Rig (Sold 6/15)
H18 (Sold 7/15)
Building 19' Tacking Outrigger
Balt-Wash Area
-- -
- Rank: Administrator
- Registered: Jul 19, 2001
- Last visit: Apr 01, 2024
- Posts: 3428
Posted: Mar 11, 2015 - 06:05 PM
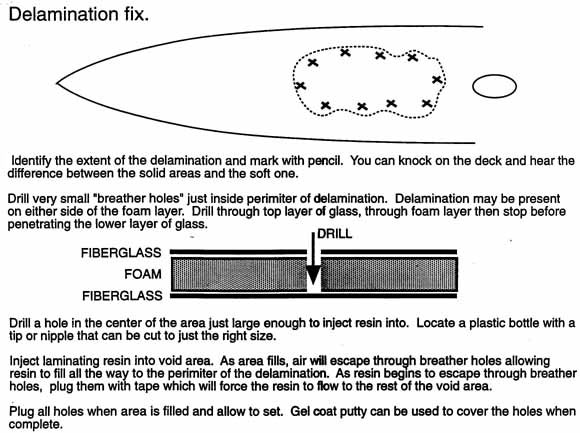
This has been discussed and written about a lot, the problem is called delamination. See the picture below.
Also here is a very old article that give good instructions.
http://www.thebeachcats.c…ion-repair-instructions/
and another version
http://www.thebeachcats.c…ws/400/Soft-Deck-Repair/
--
Damon Linkous
1992 Hobie 18
Memphis, TN
How To Create Your Signature
How To Create Your Own Cool Avatar
How To Display Pictures In The Forums.
-- -
- Rank: Mate
- Registered: Mar 19, 2004
- Last visit: Apr 12, 2024
- Posts: 960
Posted: Mar 11, 2015 - 06:23 PM
The hull construction of the main deck area is gelcoat, outside layer of fiberglass, foam, inside layer of fiberglass. This is what is known as "sandwich construction". If there is just fiberglass with no foam core, then that would be "solid laminate". The keels, flanges, and crossbar areas of the hull are solid laminate. The deck and sides are sandwich.
Most soft spots in sandwich areas result from either the inside or the outside layer of fiberglass separating from the foam. (Note that a soft spot can also result from fracturing either the inside or outside layer of glass.) The easiest way to repair small areas of delamination is by injecting epoxy into the sandwich. The epoxy will bond the separated skin back to the core. The trick is to carefully drill through the outside layer of glass and through the core, but NOT through the inside layer of glass. The best way I find to do this is to put a drill stop or piece of tape on your drill bit about 1/8" to 3/16" from the tip. This will prevent you from punching all the way through the deck. Once you've drilled the hole to your mark, remove the bit from your drill and finish up by spinning the bit the rest of the way through the core by hand. You should easily be able to feel when the bit hits the inner layer of glass and that is when you stop.
If you do happen to punch through the deck all the way, then you've go a bigger project on your hands because you will need to plug that hole before injecting or allyour epoxy will drain into the hull.
sm -
- Rank: Mate
- Registered: Feb 18, 2013
- Last visit: Jul 19, 2015
- Posts: 396
Posted: Mar 11, 2015 - 07:20 PM
Thanks for clairfying. Drill through top layer. Hand drill through core and stop when hitting inner fiberglass. Got it. Thanks
Where do the screws go and how deep are they. Do the screws stay or once removed are you faced with plugging holes?
--
Goodsailing
Laser-Standard Rig (Sold 6/15)
H18 (Sold 7/15)
Building 19' Tacking Outrigger
Balt-Wash Area
-- -
- Rank: Mate
- Registered: Feb 18, 2013
- Last visit: Jul 19, 2015
- Posts: 396
Posted: Mar 12, 2015 - 06:41 AM
Out of the 2 techniques mentioned, one with screws, one without screws, which technique is best to eliminate voids and provide best result, or would both do the same result. Tks
--
Goodsailing
Laser-Standard Rig (Sold 6/15)
H18 (Sold 7/15)
Building 19' Tacking Outrigger
Balt-Wash Area
-- -
- Rank: Administrator
- Registered: Jul 19, 2001
- Last visit: Apr 01, 2024
- Posts: 3428
Posted: Mar 12, 2015 - 10:28 AM
Without screws is most common and probably best for small areas.
The screw technique is more for extreme "floppy" delamination and solves the problem where the two fiberglass layers are forced apart due to the pressure of the injection. Usually that's not a problem if you take it slow and gentle and don't try to inject thickened epoxy.
Both ways will work if you very carefully follow ALL the directions. Don't freelance your own original technique.
--
Damon Linkous
1992 Hobie 18
Memphis, TN
How To Create Your Signature
How To Create Your Own Cool Avatar
How To Display Pictures In The Forums.
-- -
- Rank: Mate
- Registered: Feb 18, 2013
- Last visit: Jul 19, 2015
- Posts: 396
Posted: Mar 12, 2015 - 10:45 AM
Yes: Best to follow what others have done... tks.
--
Goodsailing
Laser-Standard Rig (Sold 6/15)
H18 (Sold 7/15)
Building 19' Tacking Outrigger
Balt-Wash Area
-- -
- Rank: Mate
- Registered: Feb 18, 2013
- Last visit: Jul 19, 2015
- Posts: 396
Posted: Mar 12, 2015 - 05:55 PM
d
Edited by goodsailing on Mar 13, 2015 - 12:23 PM.


Go to page [-1] 1 - 2 - 3 - 4 ... 12 - 13 - 14 [+1 +10]:
Users on-line
- 0 users
This list is based on users active over the last 60 minutes.