
Ok here it is, the master thread. With as many older Hobie cat 18's that may be worked on to renew to safe sailing condition, let's just use this link.
We've discussed righting lines and systems, mast leaking and booms and by all means one may put any question here regarding fixing up their boat including topics already discussed. Initially I had asked if one thread would work, but getting no answer I proceeded to list multiple threads about individual subjects and as a result of learning others have similar questions and answers, perhaps one place would serve to handle all of it.
We were discussing boom cars. The car I was referring to slides in a track between the two rope jams closest to the gooseneck. The piece of metal is the same fitting that is used to screw the the rope jams down yet is not as high. It moves freely back and forth between the two rope jam cleats bulkheads, which stops it's movement at both cleats. It has a hole in the center and two holes that run parallel to the track. There's already a bungie at the aft end of the boom with the same fitting. What does the inner car do? And is there something that comes out of the hole, a pulley etc.? I'd post a pic but do not have an external photo account to post a link.
Edited by goodsailing on Feb 25, 2015 - 09:38 AM.
--
Goodsailing
Laser-Standard Rig (Sold 6/15)
H18 (Sold 7/15)
Building 19' Tacking Outrigger
Balt-Wash Area
--
Referbing Hobie 18 Thread
- Rank: Mate
- Registered: Feb 18, 2013
- Last visit: Jul 19, 2015
- Posts: 396
- Rank: Mate
- Registered: Feb 18, 2013
- Last visit: Jul 19, 2015
- Posts: 396
Correction: there is not the same fitting that slides freely between the outer outhaul jam cleats. The outer bungie is tied off through the holes in the bulkheads that the jam cleats are screwed into, aft end of the middle jam cleat
--
Goodsailing
Laser-Standard Rig (Sold 6/15)
H18 (Sold 7/15)
Building 19' Tacking Outrigger
Balt-Wash Area
--
- Rank: Mate
- Registered: Mar 19, 2004
- Last visit: Sep 03, 2025
- Posts: 968
Without a picture of what you are describing, it is hard to know for sure, but I would say it is either one of two things:
1) Something custom that a previous owner created (possibly some type of mast rotation device or other gizmo). Definitely not something stock.
2) A barber hauler system. The very, very, very early Hobie 18s had a "barber hauler" system for the jib. The system had lines that were connected near the midpoint of the boom at one end with a cleat, and each end of the line had a stainless ring that ran out to the jib sheets (between the jib blocks). This allowed you to pull the jib sheet farther inboard (i.e., close the slot).
I don't recall ever seeing this system in person as it was quickly abandoned and no one uses this system anymore. If your boat is from the '70s, I would guess that is probably what the part is you're referring to. If this is what's on your boat, I would remove it. As I said, it is something that was quickly abandoned by Hobie.
sm
- Rank: Mate
- Registered: Feb 18, 2013
- Last visit: Jul 19, 2015
- Posts: 396
In the hobie 18 manual they show a pully there. It must have been used for increasing torque on the outhaul. I take it that now, there's only one main sail outhaul at the aft sail foot which utilizes the bungie to spring the sail towards the gooseneck when loosening the outhaul line. Correct?
--
Goodsailing
Laser-Standard Rig (Sold 6/15)
H18 (Sold 7/15)
Building 19' Tacking Outrigger
Balt-Wash Area
--
--
Goodsailing
Laser-Standard Rig (Sold 6/15)
H18 (Sold 7/15)
Building 19' Tacking Outrigger
Balt-Wash Area
--
- Rank: Mate
- Registered: Feb 18, 2013
- Last visit: Jul 19, 2015
- Posts: 396
deleted
Edited by goodsailing on Feb 25, 2015 - 02:17 PM.
--
Goodsailing
Laser-Standard Rig (Sold 6/15)
H18 (Sold 7/15)
Building 19' Tacking Outrigger
Balt-Wash Area
--
Edited by goodsailing on Feb 25, 2015 - 02:17 PM.
--
Goodsailing
Laser-Standard Rig (Sold 6/15)
H18 (Sold 7/15)
Building 19' Tacking Outrigger
Balt-Wash Area
--

- Rank: Mate
- Registered: Nov 02, 2004
- Last visit: Jul 11, 2025
- Posts: 627
http://shop.mariner-sails.com/media/h1803c(1).jpg
.jpg)
Is this what your looking for?
--
Ron
Nacra F18
Reservoir Sailing Assn.
Brandon, Mississippi
--
Is this what your looking for?
--
Ron
Nacra F18
Reservoir Sailing Assn.
Brandon, Mississippi
--
- Rank: Mate
- Registered: Feb 18, 2013
- Last visit: Jul 19, 2015
- Posts: 396
No that's on the aft end of the boom. The little gismo slides between the rotator outhaul jam cleat, which is the first cleat from the gooseneck and slides to the middle boom jam cleat. The photo I displayed is the gooseneck side of the boom not the aft end of the boom. The outhaul featured is in the cleat closest to the mast and that outhaul goes through the old style pulley located on the mast rotator. Nice illustration though. Thanks!
Edited by goodsailing on Feb 25, 2015 - 01:40 PM.
--
Goodsailing
Laser-Standard Rig (Sold 6/15)
H18 (Sold 7/15)
Building 19' Tacking Outrigger
Balt-Wash Area
--
- Rank: Mate
- Registered: Nov 02, 2004
- Last visit: Jul 11, 2025
- Posts: 627
Your link takes me to a google page with a message saying I don't have permission to view it and has a button to request permission.
--
Ron
Nacra F18
Reservoir Sailing Assn.
Brandon, Mississippi
--
--
Ron
Nacra F18
Reservoir Sailing Assn.
Brandon, Mississippi
--
- Rank: Mate
- Registered: Feb 18, 2013
- Last visit: Jul 19, 2015
- Posts: 396
Try this one
http://tinyurl.com/pjv5zjy
--
Goodsailing
Laser-Standard Rig (Sold 6/15)
H18 (Sold 7/15)
Building 19' Tacking Outrigger
Balt-Wash Area
--
http://tinyurl.com/pjv5zjy
--
Goodsailing
Laser-Standard Rig (Sold 6/15)
H18 (Sold 7/15)
Building 19' Tacking Outrigger
Balt-Wash Area
--
- Rank: Mate
- Registered: Nov 02, 2004
- Last visit: Jul 11, 2025
- Posts: 627
Here's how to create your own photo albums and post pictures in the forum.
http://www.thebeachcats.c…/how-do-i-upload-photos/
--
Ron
Nacra F18
Reservoir Sailing Assn.
Brandon, Mississippi
--
http://www.thebeachcats.c…/how-do-i-upload-photos/
--
Ron
Nacra F18
Reservoir Sailing Assn.
Brandon, Mississippi
--
- Rank: Mate
- Registered: Nov 02, 2004
- Last visit: Jul 11, 2025
- Posts: 627
http://www.shop.mariner-s…Hobie-18-HC-61711000.htm
This may be what your seeing?
--
Ron
Nacra F18
Reservoir Sailing Assn.
Brandon, Mississippi
--
This may be what your seeing?
--
Ron
Nacra F18
Reservoir Sailing Assn.
Brandon, Mississippi
--
- Rank: Mate
- Registered: Feb 18, 2013
- Last visit: Jul 19, 2015
- Posts: 396
I read through all this but it points you to outside vendors for posting pics. What I need is the upload form for here to create an album at this domain.
Yes that is the part but what does it do in there? It's sliding back and forth between the two jam cleats.
--
Goodsailing
Laser-Standard Rig (Sold 6/15)
H18 (Sold 7/15)
Building 19' Tacking Outrigger
Balt-Wash Area
--
- Rank: Mate
- Registered: Nov 02, 2004
- Last visit: Jul 11, 2025
- Posts: 627
In the menu at the top of this page go to Photo Albums, member personal albums.
Click on add album in the left border above the search all albums bar.
That takes you to the setup.
This is what the clamcleats are bolted to. 2 per cleat.
--
Ron
Nacra F18
Reservoir Sailing Assn.
Brandon, Mississippi
--
- Rank: Mate
- Registered: Feb 18, 2013
- Last visit: Jul 19, 2015
- Posts: 396
I wonder why there's a spare one in there running around as all the cleats have them?
Edited by goodsailing on Feb 25, 2015 - 03:03 PM.
--
Goodsailing
Laser-Standard Rig (Sold 6/15)
H18 (Sold 7/15)
Building 19' Tacking Outrigger
Balt-Wash Area
--


- Rank: Administrator
- Registered: Jul 19, 2001
- Last visit: Sep 07, 2025
- Posts: 3460
Someone might have lost one in there and didn't want to drill the end caps off again so just left it. When you are dealing with 40 years of boat history you never know what went on.
For your Hobie 18 repair project pictures, feel free to create albums in the Beachcat Technical album. Give each album descriptive titles like "Hobie 18 Boom Rebuild" etc. to help the next guy.
Instructions are in my signature and here.
http://www.thebeachcats.c…/how-do-i-upload-photos/
Let me know if you have trouble. One thing these days is that although there is no specified limit for the size of the the pictures you upload, they will be re-sized after upload, pictures straight out of a camera these days can be over 4,000 pixels wide and several megabytes each. So if you can learn how to resize you pics down to 1600 max pixels everything will go more smoothly.
I use a good free tool for quick resizes,
http://www.irfanview.com/
it even does batch resizes and renames the resulting files. That way you can change a bunch of images from 3mb files with names like img3232323.jpg to 300k files with descriptive names like mast-rebuild-1.jpg, mast-rebuild-2.jpg etc. Makes it a lot easier on you when you need to find the files later on your computer.
--
Damon Linkous
1992 Hobie 18
Memphis, TN
Join the discussion at the all new TheBeachcats.com Forums HERE.
https://thebeachcats.temp…l.host/forums/site-talk/
--
- Rank: Mate
- Registered: Feb 18, 2013
- Last visit: Jul 19, 2015
- Posts: 396
I have the opportunity to buy Cat trax for hobie 16. Will the that work for hobie 18? If not can you get extensions. I'm not sure the beam of both 16 and 18. Thanks in advance.
--
Goodsailing
Laser-Standard Rig (Sold 6/15)
H18 (Sold 7/15)
Building 19' Tacking Outrigger
Balt-Wash Area
--
--
Goodsailing
Laser-Standard Rig (Sold 6/15)
H18 (Sold 7/15)
Building 19' Tacking Outrigger
Balt-Wash Area
--
- Rank: Mate
- Registered: Mar 19, 2004
- Last visit: Sep 03, 2025
- Posts: 968
Yes, they will work fine. You may want to get some hull cradles if not included with the trax.
sm
sm
- Rank: Mate
- Registered: Feb 18, 2013
- Last visit: Jul 19, 2015
- Posts: 396
Cool, thanks for the info...
--
Goodsailing
Laser-Standard Rig (Sold 6/15)
H18 (Sold 7/15)
Building 19' Tacking Outrigger
Balt-Wash Area
--
- Rank: Mate
- Registered: Feb 18, 2013
- Last visit: Jul 19, 2015
- Posts: 396
Here's the aft end of the boom. Note corrosion has eaten through. The end cap, which was aluminum is really corroded on the inside. I'm not sure if it is salvageable or not. New one's are $58 special order from Murry's. I plan on patching holes with epoxy micro balloons and will use small fiber on the end as backing. Sand then paint. It will look new when finished.
http://www.thebeachcats.c…ictures?g2_itemId=113043
--
Goodsailing
Laser-Standard Rig (Sold 6/15)
H18 (Sold 7/15)
Building 19' Tacking Outrigger
Balt-Wash Area
--
http://www.thebeachcats.c…ictures?g2_itemId=113043
--
Goodsailing
Laser-Standard Rig (Sold 6/15)
H18 (Sold 7/15)
Building 19' Tacking Outrigger
Balt-Wash Area
--
- Rank: Mate
- Registered: Mar 19, 2004
- Last visit: Sep 03, 2025
- Posts: 968
For the corrosion at the end of the boom, I would probably just nip 1/2" off the end of the boom by carefully cutting it with a sharp hack saw blade. The boom on the 18 is a bit longer than it needs to be, so I don't think this would be a problem.
For the holes in the body of the boom, I would just sail it like it is. The 18 boom is pretty bomb proof, so I think you'll be OK. The boom on my 18 has had one fairly large corrosion hole similar to yours for a long time and it has been OK.
I would recommend you pull off the stainless block hangers and check to make sure there's no corrosion at the rivet holes or under the straps. If there is, clean it up really well, and re-assemble with a barrier between the stainless and aluminum (either electrical tape or tef-gel grease). Also, if you plan to upgrade to a single triple block on the boom, you should angle the middle boom bale forward about 15-20 degrees, and you could do that at the same time.
sm
- Rank: Mate
- Registered: Feb 18, 2013
- Last visit: Jul 19, 2015
- Posts: 396
Thanks for the tip to trim the tip. Hadn't thought of that, but need chop saw which I have to make it square so end cap will fit flush.
Couldn't you just drill out the rivets of 3 boom blocks and use through bolts to make it into a tripple? Hate to pay $ for tripple...
http://www.thebeachcats.c…ictures?g2_itemId=113043
Edited by goodsailing on Feb 27, 2015 - 12:17 PM.
--
Goodsailing
Laser-Standard Rig (Sold 6/15)
H18 (Sold 7/15)
Building 19' Tacking Outrigger
Balt-Wash Area
--
- Rank: Mate
- Registered: Feb 18, 2013
- Last visit: Jul 19, 2015
- Posts: 396
Nope, driving the pins from one of the boom blocks busted the plastic. Hence not a good idea to make a tripple from 3 single blocks. Seaways have seen better days. I'll try the 2 boom block technique as shown here on different thread.
--
Goodsailing
Laser-Standard Rig (Sold 6/15)
H18 (Sold 7/15)
Building 19' Tacking Outrigger
Balt-Wash Area
--
--
Goodsailing
Laser-Standard Rig (Sold 6/15)
H18 (Sold 7/15)
Building 19' Tacking Outrigger
Balt-Wash Area
--
- Rank: Mate
- Registered: Feb 18, 2013
- Last visit: Jul 19, 2015
- Posts: 396
I took Dogboy's recommendation and hacked off the end of the boom and refreshed the out hull with new line and bungie. Even though the end cap had considerable corrosion it cleaned up OK. Fortunately I scribed lines on the boom before the hack off to ensure I could drill holes that matched holes in cap. I was dead on for rivets with no additional material taken from cap. I used silicone to patch the holes. Since I broke one of the pulley's (it wasn't working anyway) I wonder if this configuration of the main sheet would work using only 2 boom pulley's. I'm not sure about the amount of torque needed as this has a rachet and jam. My main concern is ease at letting out etc. Not a kid. But not a weight lifter either.
Thanks for any responses...
You can see pics in my gallery. Here are the blocks...
http://www.thebeachcats.c…ictures?g2_itemId=113062
--
Goodsailing
Laser-Standard Rig (Sold 6/15)
H18 (Sold 7/15)
Building 19' Tacking Outrigger
Balt-Wash Area
--
Thanks for any responses...
You can see pics in my gallery. Here are the blocks...
http://www.thebeachcats.c…ictures?g2_itemId=113062
--
Goodsailing
Laser-Standard Rig (Sold 6/15)
H18 (Sold 7/15)
Building 19' Tacking Outrigger
Balt-Wash Area
--


- Rank: Master Chief
- Registered: Jun 20, 2006
- Last visit: Dec 04, 2024
- Posts: 7090
i got rid of my sea-way's and purchased harken carbo triple tops and only used the center bale (if i recall correctly - whichever one hung most inline with the beam)
- Rank: Mate
- Registered: Feb 18, 2013
- Last visit: Jul 19, 2015
- Posts: 396
Yea Yea Yea, I know. I've been eyeing all the bling. I'm not sure how the whole rig will fly so I'm being a tad conservative with parts until I sail it to learn if any major work needs done before springing for items. I've barely looked at the sail yet..etc. I was in tractor supply today looking at wheels and tires 20x10 for up and coming cat trax project and happened to see pulleys at $9.99 each. They spun pretty freely and at what it cost for Harkins, you could have new pulleys every year for the next 10 years or so! Rated at 400lbs and pretty shinny. But I held off...
--
Goodsailing
Laser-Standard Rig (Sold 6/15)
H18 (Sold 7/15)
Building 19' Tacking Outrigger
Balt-Wash Area
--
- Rank: Administrator
- Registered: Jul 19, 2001
- Last visit: Sep 07, 2025
- Posts: 3460
goodsailing, believe me I completely understand avoiding buying stuff, but sometimes...
To replace your broken single block just buy a used one. They should be easy to find and cost less than the postage to mail them. There is nothing much to do with them once you go to a multiblock system so they get put in the parts box we all have.
On making home-made beach wheels, it's really a non-starter, knock yourself out if you enjoy learning your own lessons but no, you can't make your own beach wheels that work anywhere as good as the real thing for any cheaper than you can buy a used set. For that reason used ones sell quick, so keep your eye out.
There have been some good attempts over many years but even the ones that did the best versions came to the conclusion that it wasn't worth it. The only exceptions are those building wheels to only roll on hard surfaces (not sand) that can get away with using wheel barrel or ATV wheels and tires or tires made of plastic barrels etc.
I need to gather all the home-made versions in one folder sometime.
Also, any chance you could share an actual name with us? Even just a first name, all the code-names get to me sometimes. Unless of course your mother named you goodsailing which would be quite a coincidence.
- Rank: Administrator
- Registered: Jul 19, 2001
- Last visit: Sep 07, 2025
- Posts: 3460
If you happen to own a machine shop check out this thread on building your own beach wheels.
http://www.thebeachcats.c…nc=viewtopic&topic=14435
http://www.thebeachcats.c…nc=viewtopic&topic=14435
- Rank: Mate
- Registered: Feb 18, 2013
- Last visit: Jul 19, 2015
- Posts: 396
You need a 20 x 10 lawn saver wheel and tire. Club Cadet. The only problem is that inside the hole of the wheel is a lip that prohibits a round steel tube, axle, from going all the way through. I gather a drill or reamer could cut it out, opening up the hole so that the tube can run through. This is the only quick solution I'm investigating at the moment. Wheels and tires are $85 each. Tubing, washers, pins $20. Then there's welding the bracket for the hull rests that will include the pvc pipe. I'm looking at less than $200 total build. No wheel bearings. I weld. BB if you need a name.
--
Goodsailing
Laser-Standard Rig (Sold 6/15)
H18 (Sold 7/15)
Building 19' Tacking Outrigger
Balt-Wash Area
--
--
Goodsailing
Laser-Standard Rig (Sold 6/15)
H18 (Sold 7/15)
Building 19' Tacking Outrigger
Balt-Wash Area
--
- Rank: Mate
- Registered: Feb 18, 2013
- Last visit: Jul 19, 2015
- Posts: 396
Also need beach wheels for my tri. So I could use different length axle for that as the main hull is only 18" wide at the bottom. Cat/Tri traks so to speak. BB
--
Goodsailing
Laser-Standard Rig (Sold 6/15)
H18 (Sold 7/15)
Building 19' Tacking Outrigger
Balt-Wash Area
--
--
Goodsailing
Laser-Standard Rig (Sold 6/15)
H18 (Sold 7/15)
Building 19' Tacking Outrigger
Balt-Wash Area
--
- Rank: Mate
- Registered: Mar 19, 2004
- Last visit: Sep 03, 2025
- Posts: 968
For the mainsheet system, you're going to want an absolute minimum of 6:1 purchase (unless you're built pike a gorilla). I'm no beefcake, but at 6'-3", 200lbs, I use every bit of my harken 7:1 mainsheet system when the wind is up. I realize that dropping a lot of cash on an older boat may not make a lot of sense, but trying to sail with junk gear doesn't make sense either. Your mainsheet and your rudder system are your connections to the boat. If you're going to plunk down any money or put any effort into your boat, tbis is where you want to do it.
sm
sm
- Rank: Mate
- Registered: Aug 18, 2003
- Last visit: Jul 22, 2025
- Posts: 885
Meanwhile try to loose only one length of sheet instead of two ( reduce purchase in1x instead of 2x) by using the missing block as becket and start threading the sheet from there. (I am assuming that the becket is in the lower part of your system)
- Rank: Master Chief
- Registered: Jun 20, 2006
- Last visit: Dec 04, 2024
- Posts: 7090
I wasn't suggesting you blow money on bling, i was just saying i was able to use 1 bale on my h18 boom
There is a reason why harken can charge $40 for a 57mm block
this block is rated double the one you saw (Max. working load (lb) = 792)
higher quality parts that are "marine grade", with a history of not failing under load
it is extremely UV stable and come with a warranty that can't be touched
I would really hate to have a main sheet block fail on me - those kinda things seem to happen at the worst time (i.e. while under heavy load from wind or flying crew /skipper landing in the (capsized) sail
- Rank: Mate
- Registered: Feb 18, 2013
- Last visit: Jul 19, 2015
- Posts: 396
Excluding sheet breaking, the only breaking point is the bail. So, having several bails, not just one, adds a level of safety. Ooops, the gooseneck can fail... had that happen on the Laser 
--
Goodsailing
Laser-Standard Rig (Sold 6/15)
H18 (Sold 7/15)
Building 19' Tacking Outrigger
Balt-Wash Area
--
--
Goodsailing
Laser-Standard Rig (Sold 6/15)
H18 (Sold 7/15)
Building 19' Tacking Outrigger
Balt-Wash Area
--
- Rank: Mate
- Registered: Feb 18, 2013
- Last visit: Jul 19, 2015
- Posts: 396
Do I order fixed or swivel triple with becket for boom?
--
Goodsailing
Laser-Standard Rig (Sold 6/15)
H18 (Sold 7/15)
Building 19' Tacking Outrigger
Balt-Wash Area
--
--
Goodsailing
Laser-Standard Rig (Sold 6/15)
H18 (Sold 7/15)
Building 19' Tacking Outrigger
Balt-Wash Area
--
- Rank: Mate
- Registered: Aug 18, 2003
- Last visit: Jul 22, 2025
- Posts: 885
I'd say swivel, but if you get a fixed one and you get it wrong, you can still change the angle in 90° with a twisted shackle.
For a triple with becket in the boom you need 4 blocks in the lower part, if you have only three then the becket is likely in the lower part and you don't need the becket in the boom part.
If you happen to have 4 blocks + becket in the lower part, then you could get 4 blocks for the boom and make an 8:1 setup.
I did that to upgrade my 7:1 setup, it was like this one.
- I interchanged the triple blocks to have the becket in the lower part
- I changed the upper triple with becket for a 4-block w/o becket.
- I'm happy with it.
Edited by Andinista on Mar 01, 2015 - 04:11 PM.
- Rank: Mate
- Registered: Feb 18, 2013
- Last visit: Jul 19, 2015
- Posts: 396
i have the seaway blocks, 3 singles, one on top with becket, triple on boat with ratchet cleat. Are you using 40mm or 57mm blocks. Does your 4 pulley system effect mast rotation not being more lateral on top?
Edited by goodsailing on Mar 01, 2015 - 05:20 PM.
--
Goodsailing
Laser-Standard Rig (Sold 6/15)
H18 (Sold 7/15)
Building 19' Tacking Outrigger
Balt-Wash Area
--
Edited by goodsailing on Mar 01, 2015 - 05:20 PM.
--
Goodsailing
Laser-Standard Rig (Sold 6/15)
H18 (Sold 7/15)
Building 19' Tacking Outrigger
Balt-Wash Area
--
- Rank: Mate
- Registered: Aug 18, 2003
- Last visit: Jul 22, 2025
- Posts: 885
40 or 57? I guess 57, not sure. The triples that i removed were smaller.
No weird rotation.. no boom on my boat either...
On the upper blocks i have a hook insetad of a shackle, for fast setup. It can be set up as swivelling or fixed with a removabke little piece. Yo can choose along or across orientation. I use it fixed, don' remember which orientation.
No weird rotation.. no boom on my boat either...
On the upper blocks i have a hook insetad of a shackle, for fast setup. It can be set up as swivelling or fixed with a removabke little piece. Yo can choose along or across orientation. I use it fixed, don' remember which orientation.
- Rank: Master Chief
- Registered: Jun 20, 2006
- Last visit: Dec 04, 2024
- Posts: 7090
57 are standard for mainsheets on beachcats
I use 40's for my jib blocks, and i am waiting to see if they explode
Harkens (used to) come with a swivel and removable "stop" that prevents them from swiveling
if your not getting harkens, i would get a swivel. the blocks give the most "leverage" when the blocks are reeved straight in line with the lowers and a swivel allows this to find it's most effective angle possible
- Rank: Mate
- Registered: Aug 18, 2003
- Last visit: Jul 22, 2025
- Posts: 885
Regarding price and quality of blocks, I don't have much experience with different brands and models, but I guess that friction is a relevant consideration for a mainsheet system.
- Rank: Mate
- Registered: Mar 19, 2004
- Last visit: Sep 03, 2025
- Posts: 968
You can say that again. The amount of rolling resistance (friction) is what separates good blocks from cheap junk. A $10 pulley from a tractor supply house may roll freely in the store, but I guarantee that when you stack enough of them together to build a 7:1 system and then put a load on them, they're not going to work nearly as nicely as the blocks from a high quality, marine grade equipment manufacturer. Do you really want to be dealing with poorly functioning blocks that seize up or explode every other outing? The Harken (or Ronstan, or Lewmar, or other quality manufacturer) are designed for the task and last just short of forever with virtually zero maintenance. Well worth the money IMO.
sm
- Rank: Mate
- Registered: Feb 18, 2013
- Last visit: Jul 19, 2015
- Posts: 396
But wait, spinning free while under load. OK, So you know I torched the one block. I forgot I had a petzel mountain cllimbing pulley in the garage. It's rated to hold more than enough lbs. So I hung that on there to complete the total blocks on the boom. I don't know if it will work or not but why not use something you already have. It's aluminum with an approximate 2" plastic wheel. I think I paid $18 for it back in the day.
http://www.petzl.com/en/P…RESCUE?l=US#.VPSumY73-iw
Edited by goodsailing on Mar 02, 2015 - 11:43 AM.
--
Goodsailing
Laser-Standard Rig (Sold 6/15)
H18 (Sold 7/15)
Building 19' Tacking Outrigger
Balt-Wash Area
--
http://www.petzl.com/en/P…RESCUE?l=US#.VPSumY73-iw
Edited by goodsailing on Mar 02, 2015 - 11:43 AM.
--
Goodsailing
Laser-Standard Rig (Sold 6/15)
H18 (Sold 7/15)
Building 19' Tacking Outrigger
Balt-Wash Area
--
- Rank: Mate
- Registered: Feb 18, 2013
- Last visit: Jul 19, 2015
- Posts: 396
What knots are used for tying mast halyard to ring. There's two knots top and bottom. Knot must not interfere with attachment to do hicky up there. Anchor bend, halyard knot etc? Thanks
--
Goodsailing
Laser-Standard Rig (Sold 6/15)
H18 (Sold 7/15)
Building 19' Tacking Outrigger
Balt-Wash Area
--
--
Goodsailing
Laser-Standard Rig (Sold 6/15)
H18 (Sold 7/15)
Building 19' Tacking Outrigger
Balt-Wash Area
--
- Rank: Administrator
- Registered: Jul 19, 2001
- Last visit: Sep 07, 2025
- Posts: 3460
"two knots top and bottom"?
I use a tight bowline to connect the aussie ring to the main halyard.
In fact with a bowline, square knot, and half hitches you can pretty much tie anything on a beachcat.
--
Damon Linkous
1992 Hobie 18
Memphis, TN
Join the discussion at the all new TheBeachcats.com Forums HERE.
https://thebeachcats.temp…l.host/forums/site-talk/
--
- Rank: Mate
- Registered: Mar 19, 2004
- Last visit: Sep 03, 2025
- Posts: 968
The best way to go about it is to get one of the halyard rings that has a small hoop welded to the top of the main ring. 1/4" diameter halyard line goes through the hoop and is tied off with a basic overhand knot. When rigging, the knot faces the mast. This is the simplest and lowest profile system available and is ultimately what became standard on all Hobies that use the hook and ring system.

sm
Edited by Dogboy on Mar 10, 2015 - 03:45 AM.
sm
Edited by Dogboy on Mar 10, 2015 - 03:45 AM.
- Rank: Mate
- Registered: Feb 18, 2013
- Last visit: Jul 19, 2015
- Posts: 396
Oops. The rope is a closed loop with bent shackle & ring. So there's a knot on the ring and a knot on the shackle that is attached to the ring. I gather the shackle is attached to the clue of the sail by which the sail is hoisted, or rather used to take up slack as sail is manually pushed up with both hands etc, per directions. Ring is only used to set on hook. Dogboy suggests using ring with smaller ring. Not sure dia of smaller ring but my halyard is 1/4." This brings up the question of using a small dia halyard to decrease knot profile on both the shackle and ring to forgo the Hobie ring/small ring part?
While on the topic of hoisting main sail. Can this be done while on the water?
--
Goodsailing
Laser-Standard Rig (Sold 6/15)
H18 (Sold 7/15)
Building 19' Tacking Outrigger
Balt-Wash Area
--
- Rank: Mate
- Registered: Mar 19, 2004
- Last visit: Sep 03, 2025
- Posts: 968
The bottom end of the halyard is only tied to the shackle for storage/trailering. It should be disconnected for hoisting the sail, gathered on the tramp, and then coiled and stored in the tramp pocket once the sail is hoisted and the halyard ring engaged on the hook. The twist shackle is connected to the grommet in the head plate.
You can try using the standard ring (or any of the many variations there of). I've been sailing these boats for a lot of years and IMO, the ring I referenced in my prior post is the best. Tie off the halyard to the small hoop using an overhand knot. The knot faces the mast. In theory the sail could be hoisted on the water. In practice, it will be much more difficult than doing so on dry land. The trick to getting the ring to engage the hook easily is to have the boat pointed directly into the wind and this will be difficult while drifting around on the water. It is also easiest to hoist the main by standing behind the boat. If your boat has the old style halyard hook with the little flapper, I recommend removing this. It causes a whole other level of frustration with engaging the ring. With the boat pointed properly and the correct ring installed properly, it is possible to raise the sail and engage/disengage the ring with ease.
sm
- Rank: Mate
- Registered: Feb 18, 2013
- Last visit: Jul 19, 2015
- Posts: 396
Gosh what am I thinking. Of course it's tied together for travel. On page 14 of the Hobie 18 manual shows sail is connected to the twisted shackle for hoisting.
The flapper right, not the hook? I can dremel the post and remove the flapper, if in fact the flapper/lock causes problems getting the ring on the hook. I realize mast rotation is key in the process for positioning. Cunningham I suspect will provide enough tension to keep the ring on the hook.
Once the ice melted inside the mast, and it was drained and dried out, I sealed the mast with clear silicone. You'll remember I couldn't get the caps off, so any residual moisture will have to go along for the ride.
Mast is done aside from taping bolts and fixing the plastic sail protector on the diamond wires.
--
Goodsailing
Laser-Standard Rig (Sold 6/15)
H18 (Sold 7/15)
Building 19' Tacking Outrigger
Balt-Wash Area
--
- Rank: Mate
- Registered: Feb 18, 2013
- Last visit: Jul 19, 2015
- Posts: 396
Couldn't jib aid keeping boat in irons while main is hoisted while on the water? (Just anticipating aft wind at the put- in where aft goes in water first, where hoisting sail on land and getting boat in water with main hoisted may be problematic. Due to property owner rights and limited access to water  ) Directions say, stand in front of mast and use two hands to hoist sail, means you couldn't do that on the water etc.
--
Goodsailing
Laser-Standard Rig (Sold 6/15)
H18 (Sold 7/15)
Building 19' Tacking Outrigger
Balt-Wash Area
--
--
Goodsailing
Laser-Standard Rig (Sold 6/15)
H18 (Sold 7/15)
Building 19' Tacking Outrigger
Balt-Wash Area
--
- Rank: Mate
- Registered: Mar 19, 2004
- Last visit: Sep 03, 2025
- Posts: 968
Removal of the flapper, not the hook, correct. The hook is required to keep the sail up. The flapper was intended to help with lowering the sail, but can actually make engaging the ring onto the hook more difficult. You can easily remove the flapper by either drilling out or grinding off the head of the rivet that holds it on.
The jib is not going to keep the boat in irons. The jib is going to pull the bows off the wind, so even if you go hove-to with the jib up, the boat is going to be pointed at least 45 degrees off the wind and that is going to make hoisting the main difficult. Not saying it can't or hasn't been done, but it will be significantly more difficult than with the boat pointed directly into the wind on land.
If you need to launch from an offshore beach, in many cases the easiest way is to sail out backwards. Release the mainsheet, lock the rudders up, and push the boat off the beach stern first. Sit on the bows so the sterns are clear of the water and the boat will track straight downwind. Continue backwards until you have enough depth and space to put the rudders down, bear off, and start heading forward.
Back to hoisting the mainsail. The easiest is with two people. One person stands in front of the front crossbar and guides/feeds the mainsail into the luff track. The other person stands behind the rear crossbar and hoists. Once the sail is all the way up, the person in front can operate the rotator arm as needed to engage the ring. If you're doing this solo, you will have to stand by the rear crossbar to hoist and walk forward on the trampoline as needed to guide the sail and operate the rotator.
sm
- Rank: Mate
- Registered: Feb 18, 2013
- Last visit: Jul 19, 2015
- Posts: 396
I hope you know I know that.
Edited by goodsailing on Mar 10, 2015 - 11:08 AM.
--
Goodsailing
Laser-Standard Rig (Sold 6/15)
H18 (Sold 7/15)
Building 19' Tacking Outrigger
Balt-Wash Area
--
- Rank: Mate
- Registered: Feb 18, 2013
- Last visit: Jul 19, 2015
- Posts: 396
OK, now that the mast and boom are done, on to the boat. The hiking strap threads that held the straps to the tramp have weathered to the point that the straps came off. Those that were worn I just pulled off. Since the tramp is in relative good shape I intend on keeping it. So, all that is needed is new lacing and new hiking straps. I thought I'd do the straps first so I went to junk yard and got 10' of seat belt webbing for $6. I have some heavy duty thread and leather working needles. The question now is: should I put a twist in the strap so that it would be easy to get your feet under, or should I just keep it flat? It would look nice flat but I'm into performance and trying to get your feet under the strap could be problematic with booties on if flat etc.
--
Goodsailing
Laser-Standard Rig (Sold 6/15)
H18 (Sold 7/15)
Building 19' Tacking Outrigger
Balt-Wash Area
--
--
Goodsailing
Laser-Standard Rig (Sold 6/15)
H18 (Sold 7/15)
Building 19' Tacking Outrigger
Balt-Wash Area
--
- Rank: Mate
- Registered: Aug 18, 2003
- Last visit: Jul 22, 2025
- Posts: 885
The thread should also resist UV, otherwise it won't last. same thing than with the thread of the sails.
- Rank: Mate
- Registered: Feb 18, 2013
- Last visit: Jul 19, 2015
- Posts: 396
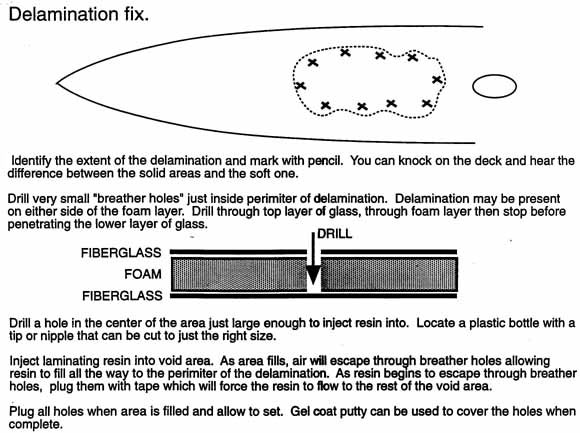
Ok it appears the port stern deck is crunchy soft. But I can't figure out the instructions to get the epoxy in there. Drill through outer shell then drill through core? Through the same hole? Isn't this the same as drill a hole straight through the deck? If you put epoxy in, won't it just drip straight through not go between layers? Also, suppose the separation is between the deck and foam, not between foam and inner layer. Wouldn't it be better to only drill down through the hull without touching the foam and fill the space between the foam and deck? I'm not getting this.
Any ideas? Thanks
http://www.thebeachcats.c…ctures/?g2_itemId=101527
Edited by goodsailing on Mar 11, 2015 - 04:59 PM.
--
Goodsailing
Laser-Standard Rig (Sold 6/15)
H18 (Sold 7/15)
Building 19' Tacking Outrigger
Balt-Wash Area
--
Any ideas? Thanks
http://www.thebeachcats.c…ctures/?g2_itemId=101527
Edited by goodsailing on Mar 11, 2015 - 04:59 PM.
--
Goodsailing
Laser-Standard Rig (Sold 6/15)
H18 (Sold 7/15)
Building 19' Tacking Outrigger
Balt-Wash Area
--
- Rank: Administrator
- Registered: Jul 19, 2001
- Last visit: Sep 07, 2025
- Posts: 3460
This has been discussed and written about a lot, the problem is called delamination. See the picture below.
Also here is a very old article that give good instructions.
http://www.thebeachcats.c…ion-repair-instructions/
and another version
http://www.thebeachcats.c…ws/400/Soft-Deck-Repair/
--
Damon Linkous
1992 Hobie 18
Memphis, TN
Join the discussion at the all new TheBeachcats.com Forums HERE.
https://thebeachcats.temp…l.host/forums/site-talk/
--
- Rank: Mate
- Registered: Mar 19, 2004
- Last visit: Sep 03, 2025
- Posts: 968
The hull construction of the main deck area is gelcoat, outside layer of fiberglass, foam, inside layer of fiberglass. This is what is known as "sandwich construction". If there is just fiberglass with no foam core, then that would be "solid laminate". The keels, flanges, and crossbar areas of the hull are solid laminate. The deck and sides are sandwich.
Most soft spots in sandwich areas result from either the inside or the outside layer of fiberglass separating from the foam. (Note that a soft spot can also result from fracturing either the inside or outside layer of glass.) The easiest way to repair small areas of delamination is by injecting epoxy into the sandwich. The epoxy will bond the separated skin back to the core. The trick is to carefully drill through the outside layer of glass and through the core, but NOT through the inside layer of glass. The best way I find to do this is to put a drill stop or piece of tape on your drill bit about 1/8" to 3/16" from the tip. This will prevent you from punching all the way through the deck. Once you've drilled the hole to your mark, remove the bit from your drill and finish up by spinning the bit the rest of the way through the core by hand. You should easily be able to feel when the bit hits the inner layer of glass and that is when you stop.
If you do happen to punch through the deck all the way, then you've go a bigger project on your hands because you will need to plug that hole before injecting or allyour epoxy will drain into the hull.
sm
- Rank: Mate
- Registered: Feb 18, 2013
- Last visit: Jul 19, 2015
- Posts: 396
Thanks for clairfying. Drill through top layer. Hand drill through core and stop when hitting inner fiberglass. Got it. Thanks
Where do the screws go and how deep are they. Do the screws stay or once removed are you faced with plugging holes?
--
Goodsailing
Laser-Standard Rig (Sold 6/15)
H18 (Sold 7/15)
Building 19' Tacking Outrigger
Balt-Wash Area
--
Where do the screws go and how deep are they. Do the screws stay or once removed are you faced with plugging holes?
--
Goodsailing
Laser-Standard Rig (Sold 6/15)
H18 (Sold 7/15)
Building 19' Tacking Outrigger
Balt-Wash Area
--
- Rank: Mate
- Registered: Feb 18, 2013
- Last visit: Jul 19, 2015
- Posts: 396
Out of the 2 techniques mentioned, one with screws, one without screws, which technique is best to eliminate voids and provide best result, or would both do the same result. Tks
--
Goodsailing
Laser-Standard Rig (Sold 6/15)
H18 (Sold 7/15)
Building 19' Tacking Outrigger
Balt-Wash Area
--
--
Goodsailing
Laser-Standard Rig (Sold 6/15)
H18 (Sold 7/15)
Building 19' Tacking Outrigger
Balt-Wash Area
--
- Rank: Administrator
- Registered: Jul 19, 2001
- Last visit: Sep 07, 2025
- Posts: 3460
Without screws is most common and probably best for small areas.
The screw technique is more for extreme "floppy" delamination and solves the problem where the two fiberglass layers are forced apart due to the pressure of the injection. Usually that's not a problem if you take it slow and gentle and don't try to inject thickened epoxy.
Both ways will work if you very carefully follow ALL the directions. Don't freelance your own original technique.
--
Damon Linkous
1992 Hobie 18
Memphis, TN
Join the discussion at the all new TheBeachcats.com Forums HERE.
https://thebeachcats.temp…l.host/forums/site-talk/
--
- Rank: Mate
- Registered: Feb 18, 2013
- Last visit: Jul 19, 2015
- Posts: 396
Yes: Best to follow what others have done... tks.
--
Goodsailing
Laser-Standard Rig (Sold 6/15)
H18 (Sold 7/15)
Building 19' Tacking Outrigger
Balt-Wash Area
--
- Rank: Mate
- Registered: Feb 18, 2013
- Last visit: Jul 19, 2015
- Posts: 396
d
Edited by goodsailing on Mar 13, 2015 - 12:23 PM.
Edited by goodsailing on Mar 13, 2015 - 12:23 PM.
- Rank: Mate
- Registered: Feb 18, 2013
- Last visit: Jul 19, 2015
- Posts: 396
My pumps for epoxy broke so I was forced to make another type of percentage mixing process. Take waxed paper cups, push, push pin trough cup for 1 part hardner. Now with cup, use water to make up your percentage in another cup. Dry cups, and push pin in to make up your non-hardner. Take sharpie and dot the raised surface of paper of holes made by puch pin on inside of the cups, so that you can see how high to pour liquids, hardner first, then resin. You should now have 2 colored dots. Try to keep them lined up. Place tape over holes and cut down cups to size, if you're using large cups. Take strip of paper and used this to make a guide from top to bottom where holes in cups should go. Use this guide to mark other cups. Now, you can pour hardner in several cups, based upon what you'll need, and as you spread resin, you'll only have to add resin to cups that already have hardner. Make sure you mix good for about a minute bringing plastic knife from bottom to top. Plastic knives are good as you can spatula all the goo out of cups. I use plastic from all types of plactic bottles for spreading resin. Just cut them up and round corners before starting. When you are done, throw everything in the trash including cups, knives, squeege, and plastic gloves. Easy. Oh, use dry cheap Home Depot 2-3" paint brush to spread cloth. U can also use brush to push resin into corners, using a dab method.
I'll never buy pumps again as you are confined to the percentages of pumps. Cups can to done for any volume you need with method above.
Edited by goodsailing on Mar 13, 2015 - 12:43 PM.
--
Goodsailing
Laser-Standard Rig (Sold 6/15)
H18 (Sold 7/15)
Building 19' Tacking Outrigger
Balt-Wash Area
--
I'll never buy pumps again as you are confined to the percentages of pumps. Cups can to done for any volume you need with method above.
Edited by goodsailing on Mar 13, 2015 - 12:43 PM.
--
Goodsailing
Laser-Standard Rig (Sold 6/15)
H18 (Sold 7/15)
Building 19' Tacking Outrigger
Balt-Wash Area
--
- Rank: Mate
- Registered: Mar 19, 2004
- Last visit: Sep 03, 2025
- Posts: 968
Graduated plastic or paper mixing cups work best in my experience. They have the most versatility and you're not at the mercy of the hand pump dispenser volumes. Plastic cups can be reused several times if you clean them out when the epoxy is wet. A few bucks will get you a sleeve of cups. I would not recommend using waxed paper cups. The wax will inevitably be scraped off into the epoxy as you mix.
sm
sm
- Rank: Mate
- Registered: Feb 18, 2013
- Last visit: Jul 19, 2015
- Posts: 396
The cups I get hardly have any wax. I've actually put saw dust in epoxy, lots of saw dust, from sander and micro balloons when filling gaps so any microscopic wax if any will hardly be noticed using straight resin. And those graduated cups... at nearly a buck a piece, that you can clean if you want. No thanks. Besides, paper cups are renewable resources, plastic cups are not.
http://www.resinobsession…-Cups---Quantity-10.html
I used 8 paper cups today purchased at grocery store by the 40 pack, 2 plastic knives, one sqeegie cut from detergent bottle and one pair of plastic gloves bought at beauty store for $9 per hundred and spread approximately 18 sq ft over 4oz FB cloth for a particular project and everything went into the trash when finished. No solvents, no rags, no smell no clean up.
--
Goodsailing
Laser-Standard Rig (Sold 6/15)
H18 (Sold 7/15)
Building 19' Tacking Outrigger
Balt-Wash Area
--
- Rank: Mate
- Registered: Mar 19, 2004
- Last visit: Sep 03, 2025
- Posts: 968
To each his own. I prefer not to risk contaminating a batch of epoxy with wax or screwing up the mix ratio, both of which can be avoided by using a $0.25 graduated plastic mixing cup.
sm
sm
- Rank: Mate
- Registered: Feb 18, 2013
- Last visit: Jul 19, 2015
- Posts: 396
OK, I'm about to raise the mast on this boat to finish rigging starting with the trap wires. I have bungie. Where do I attach the bungie. Are there two section? The bungie I took off had two sections. The static line coming from the trapeze wire was tied to the bungie. So it appeared an inverted v shape would have been formed hanging from it? It seems best to tie the static to the back of the boat up to first hole, then up to static line for aft trapeze. The opposite for the front trapzee. But I'm not sure the elasticity will extend from all the way back to where it's tied of as the center hole will restrict movement? Anyone know how to tie these? Thanks.
--
Goodsailing
Laser-Standard Rig (Sold 6/15)
H18 (Sold 7/15)
Building 19' Tacking Outrigger
Balt-Wash Area
--
--
Goodsailing
Laser-Standard Rig (Sold 6/15)
H18 (Sold 7/15)
Building 19' Tacking Outrigger
Balt-Wash Area
--
- Rank: Administrator
- Registered: Jul 19, 2001
- Last visit: Sep 07, 2025
- Posts: 3460
I'm not clear what you are calling the two sections or what you mean by "inverted v".
But the standard bungee setup on the H18 is very simple. Look under the deck lip near the bow and stern about 7 feet forward and back from the two holes on each side of the shroud. you will find a small stainless eyestrap rivited to the deck lip.
You tie the trap bungee to the eye strap, then route it to the closest "deck hole", up through the hole and tie it to the adjustment line on the trap wire.
Have you got the assembly manual? There isn't much detail about the trapeze rigging but there is a good picture on page 11 (figure 23) of the bungee to trap connection.
Download the manual here.
http://static.hobiecat.co…sets/H18%26SX_Manual.pdf
--
Damon Linkous
1992 Hobie 18
Memphis, TN
Join the discussion at the all new TheBeachcats.com Forums HERE.
https://thebeachcats.temp…l.host/forums/site-talk/
--
- Rank: Mate
- Registered: Feb 18, 2013
- Last visit: Jul 19, 2015
- Posts: 396
Thanks. The way the previous owner had it rigged had me wonder about proper rigging.
--
Goodsailing
Laser-Standard Rig (Sold 6/15)
H18 (Sold 7/15)
Building 19' Tacking Outrigger
Balt-Wash Area
--
--
Goodsailing
Laser-Standard Rig (Sold 6/15)
H18 (Sold 7/15)
Building 19' Tacking Outrigger
Balt-Wash Area
--
- Rank: Mate
- Registered: Feb 18, 2013
- Last visit: Jul 19, 2015
- Posts: 396
I'm preparing to fix the aft port deck and since I've had problems in the past with epoxy setting up too quick in a horse syringe I was wondering if simply pouring epoxy over the holes and using a squeege to squish the epoxy into the holes would work. I'd use a thin welding rod bent at tip to finesse the foam/ epoxy to remove air via the holes. Also, gravity will help the process as well. This is my back up method but since I'm out of syringes thought I posed the question before going over to Southern States to get the needles.
--
Goodsailing
Laser-Standard Rig (Sold 6/15)
H18 (Sold 7/15)
Building 19' Tacking Outrigger
Balt-Wash Area
--
--
Goodsailing
Laser-Standard Rig (Sold 6/15)
H18 (Sold 7/15)
Building 19' Tacking Outrigger
Balt-Wash Area
--
- Rank: Mate
- Registered: Oct 20, 2011
- Last visit: Apr 03, 2023
- Posts: 167
I have tried attempting to "push" the epoxy into the holes with squeegee, and it is not as foolproof as using the syringes. The syringe really gets the liquid into the sandwich, whereas the squeegee method is hit or miss
I would use the syringe if at all possible
--
Supercat 15
Windrider 17
Several Sunfish and Sunfish clones
Ratboat built from Zuma and Sunfish parts
Shallow water sailor in the Delaware Bay
--
I would use the syringe if at all possible
--
Supercat 15
Windrider 17
Several Sunfish and Sunfish clones
Ratboat built from Zuma and Sunfish parts
Shallow water sailor in the Delaware Bay
--
- Rank: Mate
- Registered: Mar 19, 2004
- Last visit: Sep 03, 2025
- Posts: 968
Pouring the epoxy into the holes is not going to work at all - it's going to create a huge mess. The epoxy needs to be forced between the layers of the deck, gravity is not going to me sufficient. Use a quality epoxy in conjunction with a the proper hardener for the temperature and working time you need and you shouldn't have any problems. But, if you're still concerned about exotherm (cooking off the epoxy), then you can mix the epoxy in a large container and only pull a small amount into the syringe at a time.
The other important thing is to mask off the entire area you're working on. Cover the whole area with masking tape first and then drill your holes (thru the masking tape). Epoxy is inevitably going to ooze out of the holes and if it gets into the non-skid, it will create a mess. Do all your injecting and when the epoxy goes green (semi-cured), peel off the masking tape. Have some paper towels and acetone ready just in case the epoxy does get on the hull you want to wipe it off immediately.
sm
- Rank: Mate
- Registered: Feb 18, 2013
- Last visit: Jul 19, 2015
- Posts: 396
I got the syringes this morning 90mm horse tubes. Good idea on taping. (If you roughed up the deck first wouldn't the epoxy adhear to the deck. Then you throw in a little sand to make it really non skid.?
--
Goodsailing
Laser-Standard Rig (Sold 6/15)
H18 (Sold 7/15)
Building 19' Tacking Outrigger
Balt-Wash Area
--
--
Goodsailing
Laser-Standard Rig (Sold 6/15)
H18 (Sold 7/15)
Building 19' Tacking Outrigger
Balt-Wash Area
--
- Rank: Master Chief
- Registered: Jun 20, 2006
- Last visit: Dec 04, 2024
- Posts: 7090
not sure where you are repairing but that sounds painful (and bloody) if its in an area you may slide around on your boat
- Rank: Mate
- Registered: Feb 18, 2013
- Last visit: Jul 19, 2015
- Posts: 396
Rear deck behind the aft xbar. I did this to a stand up paddle board I made and rowed a considerable distance in bare feet with no problems instead of buying that sand paper material made especially for this purpose.. Not sure how that would turn out on this section. Probably better to just do what's recommend. You can always cover the repair with that spungy deck material used on jet skis and sometimes used to cover the whole decks of cat hulls.
--
Goodsailing
Laser-Standard Rig (Sold 6/15)
H18 (Sold 7/15)
Building 19' Tacking Outrigger
Balt-Wash Area
--
--
Goodsailing
Laser-Standard Rig (Sold 6/15)
H18 (Sold 7/15)
Building 19' Tacking Outrigger
Balt-Wash Area
--
- Rank: Master Chief
- Registered: Jun 20, 2006
- Last visit: Dec 04, 2024
- Posts: 7090
Gotcha.
on a SUP, you aren't tacking or gybing (or capsizing) at 20+knots and the effect of some grit on your deck (and skin) may have very different results when inertia is applied,
i personally would purchase that spongy material (and need to for my new cat thats imron paint is pretty darn slippery ) -
- Rank: Mate
- Registered: Feb 18, 2013
- Last visit: Jul 19, 2015
- Posts: 396
As an avid motorcycle rider too, effect of inertia is duly noted. Spongy soft material might work better indeed. 
--
Goodsailing
Laser-Standard Rig (Sold 6/15)
H18 (Sold 7/15)
Building 19' Tacking Outrigger
Balt-Wash Area
--
--
Goodsailing
Laser-Standard Rig (Sold 6/15)
H18 (Sold 7/15)
Building 19' Tacking Outrigger
Balt-Wash Area
--
- Rank: Mate
- Registered: Feb 18, 2013
- Last visit: Jul 19, 2015
- Posts: 396
Looks like the bracket with the deadeye that holds the main sheet is about to pop rivets. How much stress is on this that I might drill out and re-rivet. I suspect that even if it did pop out you would still have a main sheet that you could back back to shore.
--
Goodsailing
Laser-Standard Rig (Sold 6/15)
H18 (Sold 7/15)
Building 19' Tacking Outrigger
Balt-Wash Area
--
--
Goodsailing
Laser-Standard Rig (Sold 6/15)
H18 (Sold 7/15)
Building 19' Tacking Outrigger
Balt-Wash Area
--
- Rank: Master Chief
- Registered: Jun 20, 2006
- Last visit: Dec 04, 2024
- Posts: 7090
I don't know if that would be a matter of life or death but it could be a PITA
if you capsize all your line could pay out, or you come "off the cleat" while anchored ... your boat could try to sail away, etc
i would definitely fix that before I sailed with gear like that
I failed to change a "little thing" last weekend, and i almost went swimming because of it
- Rank: Administrator
- Registered: Jul 19, 2001
- Last visit: Sep 07, 2025
- Posts: 3460
I don't know if anyone has actually had one of those rip loose, but there can be a LOT of force on it. There is forward force from working the traveler, and then sometimes large sideways force during a jibe when the sail slams over to the new side.
If it did break off, all the force would be transferred to the traveler which would probably immediately fail and now you've got five pounds of metal flinging around trying to take your teeth out. Of course this would happen during a sudden storm or when you are in the path of a ship.
--
Damon Linkous
1992 Hobie 18
Memphis, TN
Join the discussion at the all new TheBeachcats.com Forums HERE.
https://thebeachcats.temp…l.host/forums/site-talk/
--
- Rank: Mate
- Registered: Mar 19, 2004
- Last visit: Sep 03, 2025
- Posts: 968
Most likely it is not just that the rivets have worked loose, but that the aluminum crossbar material has corroded away due to galvanic reaction with the stainless rivets and mainsheet bracket. Simply replacing the rivets will not solve the problem if the holes in the crossbar have eroded to the point that the rivets won't grab.
I had this issue on my 1985 H18. The aft rivets for the bracket had pulled out and would not grab the crossbar. My solution was to drill through to the top of the crossbar and then thru bolt the bracket at the effected holes using #10 machine screws and nuts. I also bedded the bracket in epoxy where it contacts the crossbar to act as a galvanic barrier and help prevent further corrosion.
sm
- Rank: Mate
- Registered: Feb 18, 2013
- Last visit: Jul 19, 2015
- Posts: 396
It's not that bad. There's only a 1/64 gap showing on the rivets. It's stable, not loose to the touch. I'll might try drilling out. If riveting does not secure it, then the through bolt idea might work. Does it matter if it is dead center? What if I moved the bracket over an inch into fresh metal.
--
Goodsailing
Laser-Standard Rig (Sold 6/15)
H18 (Sold 7/15)
Building 19' Tacking Outrigger
Balt-Wash Area
--
- Rank: Master Chief
- Registered: Jun 20, 2006
- Last visit: Dec 04, 2024
- Posts: 7090
i misunderstood - i thought you meant the eyestrap at the bottom of the main blocks
losing you mainsheet attachment point would be about the same as your steering wheel falling off your car and your gas and brake peddles breaking off at the same time
losing you mainsheet attachment point would be about the same as your steering wheel falling off your car and your gas and brake peddles breaking off at the same time
- Rank: Mate
- Registered: Mar 19, 2004
- Last visit: Sep 03, 2025
- Posts: 968
You could also move the bracket over slightly, but then you are adding another four holes in close proximity to the existing holes in the bottom of the crossbar. If those holes eventually corrode, then you're really in a fix. Plus the dead eye would obviously be off center.
Another option, which would be more difficult but not impossible, would be to add washers to the inside of the crossbar so the rivets have something to grab onto with the current holes. To me, thru-bolting seemed like the easiest and strongest option. If you sail in salt water, I would definitely also look into galvanically isolating the bracket/fasteners from the crossbar because it will eventually corrode. This could be as simple as placing a few pieces of electrical tape between the crossbar and bracket and installing the fasteners with Tefgel.
sm
- Rank: Administrator
- Registered: Jul 19, 2001
- Last visit: Sep 07, 2025
- Posts: 3460
If it's not loose, you can't wiggle it around even when pull it hard up and down side to side then just leave it alone and monitor, you've got other projects.
--
Damon Linkous
1992 Hobie 18
Memphis, TN
Join the discussion at the all new TheBeachcats.com Forums HERE.
https://thebeachcats.temp…l.host/forums/site-talk/
--
- Rank: Master Chief
- Registered: Jun 20, 2006
- Last visit: Dec 04, 2024
- Posts: 7090
why not drill and go to the next size rivet (up)?
(if and when needed)
Edited by MN3 on Mar 18, 2015 - 12:10 PM.
(if and when needed)
Edited by MN3 on Mar 18, 2015 - 12:10 PM.
- Rank: Mate
- Registered: Feb 18, 2013
- Last visit: Jul 19, 2015
- Posts: 396
Good idea.
Alright, got the boat out and set it up to hoist the mast, this after watching the 2 part "How to rig a Hobiecat 18" on Youtube. No friggin luck. Nearly less than 1/4 of the mast is all you have for leverage standing on the tramp which is not nearly enough for me to hoist it. The diamond wires getting in the way made it more awkward. Not sure if the late 70's boat masts were made heavier but... I'm no weight lifter, but I'm not a slouch either. Is the mast in the video lighter. It looks thinner than mine. So the question is: am I confined to having crew to get the mast hoisted? Is there a technique I'm missing. Do you heave up, and get it on your shoulder, then up? I was hoping to solo this rig to get it in the water. Thanks for your help.
--
Goodsailing
Laser-Standard Rig (Sold 6/15)
H18 (Sold 7/15)
Building 19' Tacking Outrigger
Balt-Wash Area
--
- Rank: Master Chief
- Registered: Jun 20, 2006
- Last visit: Dec 04, 2024
- Posts: 7090
yes until you master question #2
yes (see question #1)
no
why? you need at least 2 other people.
1 to help step the mast
and
1 to video tape it when / as it goes wrong for youtube and this site
That being said:
solo stepping an h18 (or any cat) is all about technique and leverage
I park my boat so i can take advantage of any angle i can along the beach (every degree helps)
I use my trailer mast yoke (that is about 6' in the air) to hold my (pinned) mast at an angle

then i get my shoulder against the mast and push off with the back foot on the back crossbar
i walk it up as i move forward...
then i sheet in my spinnaker halyard that i have attached to my Portuguese turnbuckle to secure the mast in the upright position as i walk the forestay foreward, and attach it to the Portuguese turnbuckle.
not sure how your gonna do that last part solo - getting someone to help is much easier
- you could put a shackle on your bridal furler, run a safety line from your forestay - through it - and back to the mast. After you step, you could snug up that line and walk forward... but ..... thats a lot of leverage working against you.
If you elevate the sterns a few feet somehow... once you have the mast "up" it will stay have gravity holding it forward
When i had my h18 - i started with an easy-step jinpole
Edited by MN3 on Mar 18, 2015 - 02:35 PM.

- Rank: Mate
- Registered: Sep 29, 2012
- Last visit: Jan 10, 2018
- Posts: 441
https://www.youtube.com/watch?v=DO4RxwvjKtM
https://www.youtube.com/watch?v=aBqqouG9azY
HTH
Edited by the-renovator on Mar 18, 2015 - 02:45 PM.
https://www.youtube.com/watch?v=aBqqouG9azY
HTH
Edited by the-renovator on Mar 18, 2015 - 02:45 PM.
- Rank: Master Chief
- Registered: Jun 20, 2006
- Last visit: Dec 04, 2024
- Posts: 7090
The first video is a h16 - it uses a tilted trailer for leverage on a smaller and lighter mast that has no diamond wires
the second video uses a ginpole to assist on a heavier and longer mast with diamond wires
Edited by MN3 on Mar 18, 2015 - 02:52 PM.
the second video uses a ginpole to assist on a heavier and longer mast with diamond wires
Edited by MN3 on Mar 18, 2015 - 02:52 PM.
- Rank: Mate
- Registered: Sep 29, 2012
- Last visit: Jan 10, 2018
- Posts: 441
Yep!
- Rank: Mate
- Registered: Feb 18, 2013
- Last visit: Jul 19, 2015
- Posts: 396
Neighbor's must have had a gas watching my fail to get it up. HA. Yes, having at least one extra person to video tape a crash is a good idea. But I doubt seriously I'll have anyone to to help. So ... I've seen both of these videos.. thanks. I don't have tilt, and the one gin pole shown is a tad klugee. So here's what I found. I can build this for hardly any money.
I have a winch on the trailer (Y post that holds mast) so I don't think I'll need one on this pole. pretty simple set up. See his note that he added a T at the base to keep the post from moving up or down the mast. I could trace the mast shape on piece of 2x4 to shape wood. Adding only two blocks to each side of main beam should keep it stable. No need to shape forward end near winch.
http://skipmeisch.com/slo…grades/tips-GinPole.html lso
Also , if you put your boat on trailer bow facing rear, you could place a block on aft part of trailer. Using the winch at car end will pull gin pole down, towards rear of trailer perhaps taking care of the problem mentioned above.by MN3. Actually, this could be much better as mast is elevated at start using y post on trailer. Winch line runs under boat in this case.
Edited by goodsailing on Mar 18, 2015 - 06:26 PM.
--
Goodsailing
Laser-Standard Rig (Sold 6/15)
H18 (Sold 7/15)
Building 19' Tacking Outrigger
Balt-Wash Area
--
- Rank: Master Chief
- Registered: Jun 20, 2006
- Last visit: Dec 04, 2024
- Posts: 7090
if there is a will, there is a way
not sure how your gonna prevent side to side sway with his setup
the E-Z mast system i had back in the day used the front trap wires as guy lines
http://static.hobiecat.co…_attachments/3151z52.pdf
- Rank: Mate
- Registered: Mar 19, 2004
- Last visit: Sep 03, 2025
- Posts: 968
A couple suggestions on mast raising....
Having a helper with you, at least for the first few times, is invaluable. Even if the weight of the mast isn't an issue, having someone there to free a fouled wire or connect the forestay is a huge help. The 18 mast is pretty heavy, so lifting with two people makes things a lot easier, especially if there's a cross breeze.
That being said, if you're strong enough, raising the mast solo is certainly doable. Some things that will make it easier- Take the boat off the trailer and put it on the ground before raising the mast. If this is an option, it makes things a lot easier. The boat is more stable when on the ground. You can also start hoisting the mast from behind the boat and walk forward up onto the tramp, raising the mast as you go.
Another thing you can do that helps with solo mast raising is to bring a 6 foot ladder with you. Put the ladder about 10 feet behind the boat. Pin the mast base to the mast step and then lift the mast up on to the ladder. This will prop the mast up at a higher angle so it is easier to start your lift - you won't have to bend over as far to pick up the mast. Then make sure all of the shrouds and trap wires are routed inside the rudders and clear of any snags before you lift.
sm
- Rank: Mate
- Registered: Feb 18, 2013
- Last visit: Jul 19, 2015
- Posts: 396
I built Skips gin pole. 8' long with teepee end comprised with channel that will fit mast to a T, no pun intended. $12 total cost including metal. I had to add some pieces of 2x4 to the 2x4 to stiffen it as, single 2x4 seemed to springy. Yes, having help at first is good idea, but I don't have help. Crew is in Aruba at the moment and wouldn't help anyway as they flew the coup;;; KIDS--spring break ta da. . Thanks for the EZ diagram. I had already determined to sling the hulls on both sides but couldn't figure out the blocks to ensure tension is equal on both sides of the gin pole to keep it from swaying, plus to keep the gin pole vertical until I can tension the raising line. Yes, fix gin pole, jump down to reel in raising line etc.
I want to get the mast up to fix the lines for the traps. Can't adjust unless it's up. I'll let you know how it goes, the gin pole that is... it's wood and I'm now thinking steel tubing would be more compact. I could have welded it in less time than what it took fooling with wood. And it looks like it needs paint.
--
Goodsailing
Laser-Standard Rig (Sold 6/15)
H18 (Sold 7/15)
Building 19' Tacking Outrigger
Balt-Wash Area
--
- Rank: Mate
- Registered: Feb 18, 2013
- Last visit: Jul 19, 2015
- Posts: 396
Well it's snowing so ... I'm going to fix the trap lines once the snow melts provided my gin pole works.  They sell rope grabs for $25 @x4=$100 for adjustable on the fly trap line. I'm thinking Blakes Hitch. Basically a prusick knot. With two lines, one is attached to the eye and used to tie a blakes hitch to the second line that is attached to the dog bone. You basically lean back and the line connected to the eye with the Blakes Hitch grabs the rope connected to the line that has the dog bone arresting your traveling backward. To adjust, you simple put your left hand on the knot and move it, while holding the other line. No hardware needed. Anyone use this knot? Remember, before all the technology, only ropes were used. Hardware replaced knots.
--
Goodsailing
Laser-Standard Rig (Sold 6/15)
H18 (Sold 7/15)
Building 19' Tacking Outrigger
Balt-Wash Area
--
--
Goodsailing
Laser-Standard Rig (Sold 6/15)
H18 (Sold 7/15)
Building 19' Tacking Outrigger
Balt-Wash Area
--
- Rank: Mate
- Registered: Feb 18, 2013
- Last visit: Jul 19, 2015
- Posts: 396
Fail: The wooden gin pole didn't seem substantial enough. I'm not sure the amount of force that is created but it was enough that caused the gin pole to bend away from the centerline of mast. Once the mast was under tow it began to swing. I felt like a crane operator wondering if 1. the gin pole would break, 2 the mast would cant and break off from the mast step. I disassembled the contraption and got out ladder. I heaved the mast up on a ladder placed near the transom. I got up on the boat and attempted to lift the mast. It was harder to lift the mast from this elevated position than having the mast lay flat. This means, that not even using a ladder, when you hoist the mast up to that point, is where it becomes harder. I got out the aluminum motorcycle ramp and placed that on the rear xbar and attempted to walk the mast up the ramp... but nearly half way up I felt the ramp was too unstable, let alone the mast was unwieldy, the thought of coming down the ramp, de-masting would have been impossible.
The idea to to deal with this boat by myself on the ground is becoming ever more sketchy. If I can't get the mast up, I'm pretty much dead in the water so to speak. Let alone, de-masting. Then there is the physical aspects that once the mast is wrestled up, you're too exhausted to sail the boat! If in fact I really Umph it up, risking injury.
Any ideas?
Get help?
Join club where help might be available?
Scrap the project?
Sell the Hobie?
Concentrate on finishing the Proa that will have an easier mast set up.
Buy a Hobie Kayak with a sail--- (I know now why that's a trend.)
Also, if two people raise the mast, where do they stand and what do they do as I really don't see where a second person can help. I already had the mast up as high as a person could hold with the ladder and still couldn't get the mast up past my shoulder while standing on the tramp. Could the foam in the mast be holding water? I drained water out but perhaps the foam is water logged making the mast heavier than what I've seen in the two part video Rigging Hobiecat 18 on Youtube?
Thanks for any help... as I'm somewhat defeated at the moment.
--
Goodsailing
Laser-Standard Rig (Sold 6/15)
H18 (Sold 7/15)
Building 19' Tacking Outrigger
Balt-Wash Area
--
- Rank: Mate
- Registered: Feb 18, 2013
- Last visit: Jul 19, 2015
- Posts: 396
Not defeated yet:
I looked at this video
https://www.youtube.com/watch?v=ca_n9F7pwuY
I noticed the receiver in the mast for the gin pole. I've decided to use my boom as the gin pole. So I've made a female receiver for my boom goose neck. If it slips I'll tack weld it, but I looks pretty sturdy. I'll complete the rigging like this video using the tramp lines and extending two lines down from the end of the boom (gin pole) etc. I'll let you know how it works. Oh, I'll use the wooded gin pole as a crutch for the back of the boat to lift the mast up to get it started.
http://www.thebeachcats.c…ictures?g2_itemId=113139
--
Goodsailing
Laser-Standard Rig (Sold 6/15)
H18 (Sold 7/15)
Building 19' Tacking Outrigger
Balt-Wash Area
--


- Rank: Lubber
- Registered: Apr 24, 2014
- Last visit: Apr 09, 2017
- Posts: 98
You should be able to life the mast by yourself. Easy way is to put cat on beach wheels so that it's nose down. Place a ladder (at least 6') behind the boat and lay mast on it. Crouch at rear crossbar and put mast on your shoulder. Stand up with mast on your should, turn and face front of boat. Walk forward on the tramp, using your arms to "walk" the mast into the upright position. Once it's all the way forward, the raised rear of the cat will help hold the mast up. At this point I was have two trap wires run forward and tied together with a rope. Run the rope through a block somewhere on your trailer, and back through a jib cleat. Cleat the rope off to hold the mast while you pin the forestay.
I can heave up the 30' stick on my Nacra, so you should be able to get yours up too. Other option is to rig up a winch on your trailer. You can pick one up for
--
Tim
81 Hobie 16
87 Nacra 5.7
Austin, TX
--
I can heave up the 30' stick on my Nacra, so you should be able to get yours up too. Other option is to rig up a winch on your trailer. You can pick one up for
--
Tim
81 Hobie 16
87 Nacra 5.7
Austin, TX
--
- Rank: Master Chief
- Registered: Jun 20, 2006
- Last visit: Dec 04, 2024
- Posts: 7090
+1
my 6.0 (31') mast was solo stepped using a homemade wooden ginpole (6"x2") for a year before i purchased it
it's all about technique
my 6.0 (31') mast was solo stepped using a homemade wooden ginpole (6"x2") for a year before i purchased it
it's all about technique
- Rank: Mate
- Registered: Feb 18, 2013
- Last visit: Jul 19, 2015
- Posts: 396
I get putting the cat on the ground but I've not built beech wheels yet. So when the nose is down and you step up on the back of the boat holding the mast, won't the back of the boat go down. Unless of course the wheels are all the way in the back? I'm going to try my boom as gin pole today and will let you know what happens.
Also, are you putting a milk crate on the ground to jump up with the mast, 22" or more the height of beach wheels to get on the tramp while walking up the mast?
Edited by goodsailing on Mar 23, 2015 - 07:30 AM.
--
Goodsailing
Laser-Standard Rig (Sold 6/15)
H18 (Sold 7/15)
Building 19' Tacking Outrigger
Balt-Wash Area
--
- Rank: Master Chief
- Registered: Jun 20, 2006
- Last visit: Dec 04, 2024
- Posts: 7090
you put the wheels almost all the way back to prevent ANY chance of you teeter tottering with a 28' stick in your hands/shoulders
this can also be done with a trailer. put the bows down and rest the sterns on the trailer wheels (Trailer must be attached to car or other static object)
you should be standing on your tramp
if your not using the yoke of a trailer you need to use the ladder to get the angle of the mast working in your favor
crude photoshop work here....

Edited by MN3 on Mar 23, 2015 - 08:33 AM.
- Rank: Mate
- Registered: Feb 18, 2013
- Last visit: Jul 19, 2015
- Posts: 396
I installed my goose neck to the mast and rigged everything. The mast rested on a big cooler. Boom was on the tramp. I put the rope that went through the block on the trailer on the tramp. While on the tramp, I hosted the gin pole, (boom) that had all lines connected. I had the side guides connected to the bungie on both sides. I got up on the tramp and hoisted the boom up and put it in the hole of the part I described above. While trying to juggle holding the boom there I tensioned the guide lines so both were equal. The boom was vertical and aligned with the hull. The tramp lines were attached at a point where the side lines were attached. I started to tension the blocks and as soon as everything was tight, my hand still on the boom (gin pole) I gave a little tug. I felt the power of the block start to take purchase. I eased back further.... and as I was looking at the boom position I hadn't noticed the mast lifted off the cooler but began to rotate to starboard. Then the boom tilted. Here I was on the tramp trying to hole the pole verticle and the mast was swinging to the side. The mast hinge broke on one arm and the mast further rotated. It was now laying on the rudder. I lifted the gin pole up and lowered it. Got the mast back on the tramp then the other hinge arm broke. Fortunately I had placed a huge garbage can under the mast. So now the mast was resting on the garbage yet laying unfixed on the front xbeam. I disconnected all the lines and put the boat away.
There is absolutely no way one can lift this mast up without some type of rear rigging to keep the mast swinging. Attaching the tramp lines added no value. The boom, blocks and my little goosneck appeared to work. No gin pole needed to be build. Lifting off the cooler works.
Now, after I get the hinge replacement at $50 I'll attempt this again. I'll tie the mast between the hull at the transom to keep the mast from swinging laterally while I get the boom in position and get tension on it to keep it in place. I believe you'll need 2 lines. To hoist, the main line that does the lifting, and another line that will keep the mast aligned at the back of the boat. While pulling the block line to hoist, you'd have to let out the line in the back as the mast goes up etc.
Then there is the consideration of the mast crutch taking all the stress. I've seen pictures where base of crutch gave way.... perhaps bottom block needs attached to main bottom beam of trailer, not boom crutch above the crank.
Needless to say this is going to take a lot of rope. I had 90' for the main hoist line. Perhaps I could handle the mast with one hand at the rear, keeping it steady, while using the teeth/ hand method to yank the hoist line. This way would eliminate effort, just touching the mast to keep it straight. Much of this is technique... I guess.
This is turning into a time consuming and now costly experiment.
Thanks for all your help. I'm investigating beach wheels so that I can possible work at this while boat is on the ground as suggest above, but carrying a ladder too?
--
Goodsailing
Laser-Standard Rig (Sold 6/15)
H18 (Sold 7/15)
Building 19' Tacking Outrigger
Balt-Wash Area
--
There is absolutely no way one can lift this mast up without some type of rear rigging to keep the mast swinging. Attaching the tramp lines added no value. The boom, blocks and my little goosneck appeared to work. No gin pole needed to be build. Lifting off the cooler works.
Now, after I get the hinge replacement at $50
Then there is the consideration of the mast crutch taking all the stress. I've seen pictures where base of crutch gave way.... perhaps bottom block needs attached to main bottom beam of trailer, not boom crutch above the crank.
Needless to say this is going to take a lot of rope. I had 90' for the main hoist line. Perhaps I could handle the mast with one hand at the rear, keeping it steady, while using the teeth/ hand method to yank the hoist line. This way would eliminate effort, just touching the mast to keep it straight. Much of this is technique... I guess.
This is turning into a time consuming and now costly experiment.
Thanks for all your help. I'm investigating beach wheels so that I can possible work at this while boat is on the ground as suggest above, but carrying a ladder too?
--
Goodsailing
Laser-Standard Rig (Sold 6/15)
H18 (Sold 7/15)
Building 19' Tacking Outrigger
Balt-Wash Area
--
- Rank: Mate
- Registered: Nov 02, 2004
- Last visit: Jul 11, 2025
- Posts: 627
Foam in the mast? And water? Probably mud too. The mast needs to be clean, dry and water tight. If you do get the mast stepped and get on the water, when you flip, if the mast weighs as much as you say, you will never right the boat especially solo. THIS IS DANGEROUS. Fix your mast before you go any further.
--
Ron
Nacra F18
Reservoir Sailing Assn.
Brandon, Mississippi
--
- Rank: Mate
- Registered: Aug 18, 2003
- Last visit: Jul 22, 2025
- Posts: 885
About the angle of the boat: It's quite a lot harder to lift the mast if the bows are point up as in the second picture rather than down. This is because you would be holding the mast from a lower point, closer to the base. As you are so close to the lower end of the mast, the difference in lever arm is very significant, more than you would probably think. I learned the hard way lowering the mast on an inclined spot.
Edited by Andinista on Mar 23, 2015 - 01:21 PM.
- Rank: Master Chief
- Registered: Jun 20, 2006
- Last visit: Dec 04, 2024
- Posts: 7090
it is possible
i did it all the time with the ez step
the mast did swing until it was dialed in for me (you use the trap lines, not a tramp line)
and a friend took out his front window before he had his dialed in
- Rank: Mate
- Registered: Aug 18, 2003
- Last visit: Jul 22, 2025
- Posts: 885
About getting help to raise or lower the mast, I think that the best option is to have someone pulling a trap wire from the front. Two from each side is a bad idea, one is good help, the same that helps you grab the mast and get started, goes forward and help you raise it. I think it's described this way in the old nacra or prindle manual.
Another advantage of raising or lowering the mast with the boat on a significant angle (bows down) is that it can be held up just by gravity while you get donw and pin the forestay
Edited by Andinista on Mar 23, 2015 - 01:28 PM.
Another advantage of raising or lowering the mast with the boat on a significant angle (bows down) is that it can be held up just by gravity while you get donw and pin the forestay
Edited by Andinista on Mar 23, 2015 - 01:28 PM.
- Rank: Mate
- Registered: Feb 18, 2013
- Last visit: Jul 19, 2015
- Posts: 396
Not available: Incline the boat forward, and additional help. Yes Trapeze lines. They produced no value in keeping the end, top of mast from swinging. At least that is my experience. Here's my next option: run a static line between two rear hulls with a block dead center. Attached by butterfly knot etc. Attach a retrievable line to the mast somehow as you need to get it off there to raise the sail, plus you need to get it back on there, when the mast is up to lower the mast, through the block on the line then forward through the main sheet cleat: Main fact is: there needs to be enough tension on the mast and the pole to keep everything lined up and stable prior to raising. Mast can't rotate and neither can gin pole. The whole rig must just stand there, without movement, prior to lift. Mast needs elevated prior to lift, otherwise downward pressure of front line will push gin pole to the side. That's what happened, then without the mast tethered at the rear it swung.
If you had two people holding the trapeze lines perpendicular to the mast on each side might, and I say might, keep the mast from swinging pending if two people could keep constant equal pressure, otherwise if one pulled more than the other, mast would swing. Being away from the end of the mast, one might not see lateral movement etc. The mast hinge broke at less than half distance from hull to center hull cleat so it must stay absolutely straight. I supposed you must have worked for the circus putting up tents and trapeze wires to know all about what the heck is going on here.
Not including wind forces.
Thanks for you help and your following along. We'll get there.. believe me. Work stopped until mast hinge shows up.
--
Goodsailing
Laser-Standard Rig (Sold 6/15)
H18 (Sold 7/15)
Building 19' Tacking Outrigger
Balt-Wash Area
--
- Rank: Mate
- Registered: Feb 18, 2013
- Last visit: Jul 19, 2015
- Posts: 396
And he must have broke the hinge because it can't go that far. Lucky I didn't break the ears off the bottom plug. As you'll remember: I couldn't get the plug out! I wonder if the hinge metal is softer than plug. That hinge was bubble gum metal, that flaky silvery stuff.
Edited by goodsailing on Mar 23, 2015 - 03:47 PM.
--
Goodsailing
Laser-Standard Rig (Sold 6/15)
H18 (Sold 7/15)
Building 19' Tacking Outrigger
Balt-Wash Area
--
Edited by goodsailing on Mar 23, 2015 - 03:47 PM.
--
Goodsailing
Laser-Standard Rig (Sold 6/15)
H18 (Sold 7/15)
Building 19' Tacking Outrigger
Balt-Wash Area
--
- Rank: Master Chief
- Registered: Jun 20, 2006
- Last visit: Dec 04, 2024
- Posts: 7090
His was a supercat 17
my mast would swing the more i raised it.
i would lower it and adjust the guy lines (whatever side it swung to was too tight
0nly took me about 4 hours to dial it in in the fl sun
but once it was set up it was fine
PS if you can get a helper.. i think the easiest is to have him/her get on the tramp with you (boat can be on ground or trailer) and both of you pick up the mast and walk it fowrard
when it is up, one of you go forward and pin (or secure) the forstay
on our beach when we get a helper, we tie a bowline around the forestay and give them a long line to help PULL when we lift the mast out of the trailer craddle (sterns towards trunk on trailer)
- Rank: Administrator
- Registered: Jul 19, 2001
- Last visit: Sep 07, 2025
- Posts: 3460
Goodsailing,
I feel for you I really do. Trying to get this figured out completely alone by random people's written suggestions and some videos is tough.
And just to let you know, in the 20+ years I've sailed Hobie 18's I've broken quite a few mast hinge castings. The local Hobie dealer jokes they have a standing order for them just for me.
I really wish you had someone who could walk you through this in person, with an experienced hand around you'd have it figured out in no time, rather than trying to invent a method for something that's been done untold numbers of times before.
I'll share my first time mast raising story, the say misery loves company.
I'd never owned a catamaran before I bought that first Hobie 18. I bought it well-used but good sailing shape from the local dealer. The dealer gives me a copy of the Hobie 18 Assembly Manual (or I think sold it to me) and away I go to the lake on a Wednesday.
There is no one else around and I've never even seen a Hobie 18 fully rigged.
Five hours later I've got things put together (I think) and ready to raise the mast.
Did I mention there was no one else around?
I went through this whole mental process of how it would go and ended up "inventing" this method to raise the mast alone. (it didn't actually occur to me that I should have help, since the dealer assured me I could single hand the boat)
1. Drove the boat over to the steep launch ramp and pointed the boat down the ramp.
2. Used a PFD to cushion rear beam and connected mast hinge to mast base, that leaves 20 feet of the mast unsupported behind the boat, quite a bit of pressure on the hinge pin, but doable if you are gentle.
3. Tied an extra line onto the end of the forestay, and ran it forward around something on my vehicles trailer hitch and back onto the tramp where I could get to it.
3. Stood on the tramp beside the mast, next to the rear beam.
4. Dead lifted the mast up to shoulder height (about six feet) and then walked forward pushing the mast the rest of the way doing my best imitation of the Iwo Jima Memorial. Here is where the severe bow-down angle of the boat really paid off because once I got the mast past 45 degrees it got easier instead of harder to raise. And once it was up it was actually leaning naturally forward against the shrouds.
5. With mast up I simply reached down and reeled in the line that was attached to the fore-stay and tied it off loosely to the mast. So now the boat had a temporary fore-stay and I could climb down.
6. Now comes the hard part... I completely underestimated how difficult it is for one person to connect the forestay adjuster to the roller furler. With the furler already attached to the bows you have to use one hand to raise the furler to height, one hand to bring the forestay adjuster down to it, and the other hand to insert the clevis pin.
7. Drop the clevis pin and then the ring ding, spend quite a bit of time looking for it since it rolled down the hill and blends in with the rough asphalt launch ramp.
8. Finally give up and wave down a ranger cruising through the area and get him to provide the extra hands needed. It was getting dark so I think he just wanted me out of the area.
That's all there is to it!
--
Damon Linkous
1992 Hobie 18
Memphis, TN
Join the discussion at the all new TheBeachcats.com Forums HERE.
https://thebeachcats.temp…l.host/forums/site-talk/
--
- Rank: Mate
- Registered: Feb 18, 2013
- Last visit: Jul 19, 2015
- Posts: 396
Helpers not available.
Incline not available.
Objective: raise mast by oneself, with common materials. The less common materials the better: ladder, y support etc. Cooler works, diy gooseneck for boom pin works.
The existing boom and blocks work. The sheet is too short so you need longer line. Lucky as former climber I have rope.
An arborist, who deals with falling limbs above would know how to construct this...,
The oscillation of the mast top will be most dramatic the lower it is, when shrouds have less effect. It is this point that the mast needs controlled. If you run with the sheet, hauling the gin pole down, the oscillation diminishes as the mast is raised. I'm almost thinking straddling mast , or tying it off, while you fix the pole, then handle the mast to keep it straight, and you pull the sheet/teeth-it , while holding the mast I would be most effective. I can lift the mast. I can't lift he mast to my shoulder while standing on the tramp. The diamond wires are in the way etc. Bounciness of the tramp cause ill footing. So if I can provide mechanical leverage to get the mast up high enough to shoulder it, then I'm home free, I just push it up. I probably won't need the leverage once I get it on my shoulder. I suppose I'm looking at 30 degrees travel that I need help, hence the gin pole.
I think the video up there of the Hobie 21 show he ran with the sheet... the faster it raises the faster the oscillation diminishes. Hinge would probable never break when mast is up 45 degrees. Only break below that. The mast becomes more stable the higher it gets. At low point is most problematic. You've see cranes, little happens up high, its when weights are swinging wildly down low the problems occur. No doubt proper lines, and technique, are sought.
The mast is stable on your shoulder. Getting to that point is the problem.
Yea, getting it dialed in...
Edited by goodsailing on Mar 23, 2015 - 07:10 PM.
--
Goodsailing
Laser-Standard Rig (Sold 6/15)
H18 (Sold 7/15)
Building 19' Tacking Outrigger
Balt-Wash Area
--
- Rank: Administrator
- Registered: Jul 19, 2001
- Last visit: Sep 07, 2025
- Posts: 3460
Funny, just stumbled across this Hobie 18 mast raising video, not sure if it's been posted in this thread yet or now. It's pretty much how I describe above.
https://www.youtube.com/watch?v=dl7kZOQ5WQk
My story about raising a mast solo for the first time (and nearly the last) above happened in 1991, (before Youtube and even before the Web) this video is from 2010. Some things get invented over and over. He does it in a flat parking lot, it helps to start with a really loose rig, put the shroud in the very top hole of their adjusters to give yourself as much break as possible.
Thing is, in his video there are lots of people walking around in the background, I'd just grab a few strangers to help.
--
Damon Linkous
1992 Hobie 18
Memphis, TN
Join the discussion at the all new TheBeachcats.com Forums HERE.
https://thebeachcats.temp…l.host/forums/site-talk/
--
- Rank: Mate
- Registered: Feb 18, 2013
- Last visit: Jul 19, 2015
- Posts: 396
I can tell you I'm really appreciative of all the tips.
I've watched the video you posted a lot. It's the heave part and getting around the diamond wire to put the mast on the shoulder is the crux. Yes an incline would help, after through the crux, but it's the crux that is the stumbling point. The life jacket was worthless for me. You will note in the video the mast is still on the rudder bar anyway. I tied a cooler there as it will move out of position if not tied to the tramp. I've also left the roller furling unit attached to the chain plate so that it is already held up to hook the two side wires once I got the mast up should that occur. Everything but the crux, can be accomplished pretty easy. Finding a dropped pin, not so easy. Then there are safety issues. Would you get under a suspended beam just above the crux held there by a gin pole arrangement. To push the mast up the rest of the way. I don't think so. Consequently, once the gin pole technique is started, you have to take it all the way.
So the matter for me is, if the gin pole doesn't work, then I absolute need a helping hand to get it up.
IF that is the case, where's the video showing 2 or 3 people getting this mast up. I have no clue how to instruct a helper. Where do they stand, what do they do. Where do I stand, what do I do. It's still impossible to pull wires through the crux IMHO. For instance, no two people could hold the mast at the crux by holding wires.... unless of course if the two people where 40 ft in the air on ladders above the mast. I'm not driving a fire truck to the water. So even needing help, I have to know how to direct someone to give the help I need... getting past the crux. Hell my neighbor could help, but I don't know how he could help, quite frankly. Where is he supposed to stand, and what should he do. When he's doing what he's suppose to do, what do I do. Perhaps he could jump up there and muscle it up through the crux. If so, my job would be to WATCH him, and tie it off and pin the forestay while he holds the mast. If these questions can't be answered, then, I'm back to the gin pole. I wouldn't ask my neighbor because he might hurt himself etc... not being an experienced Hobie 18 mast raiser. I'm all for asking for help, but other than, hey jump up there, and muscle up the mast for me, I don't have a clue in asking for help. For the cost of the hinge I could have hired the guys standing around the home depot looking for work. But again: other than, muscle it up for me, what should they be told.
Glad to know breaking mast hinges is a common problem. Hence emphasis on keeping the mast straight as it is lifted by gin pole or brute strength.
I do realize putting the boat on the ground would change handling the mast. I suspect the crux would be less, as you'd already be under the mast at the crux point.
Edited by goodsailing on Mar 24, 2015 - 03:42 AM.
--
Goodsailing
Laser-Standard Rig (Sold 6/15)
H18 (Sold 7/15)
Building 19' Tacking Outrigger
Balt-Wash Area
--
- Rank: Master Chief
- Registered: Jun 20, 2006
- Last visit: Dec 04, 2024
- Posts: 7090
as i mentioned above:
PS if you can get a helper.. i think the easiest is to have him/her get on the tramp with you (boat can be on ground or trailer) and both of you pick up the (pinned) mast and walk it forward
when it is up, one of you go forward and pin (or secure) the forstay (the other stay and hold it upright)
on our beach when we get a helper, we tie a bowline around the forestay and give them a long line to help PULL when we lift the mast out of the trailer craddle (sterns towards trunk on trailer)
- Rank: Mate
- Registered: Aug 18, 2003
- Last visit: Jul 22, 2025
- Posts: 885
I usually do everything myself too, sometimes I get some help just to hold the mast up once raised, and eventually to get some initial angle at the beginning. The day when I really got away from the being in the edge of misery was when I got beachwheels. That's the single device that will help you the most. Sliding the boat out of the water, if at all possible, is a huge pain that you will avoid. Getting some independence from your trailer can be a major help too. It even enables you to get the boat off the trailer to the ground and back again, all by yourself. Not something you really need but in a few situations you might find yourself wanting to have the boat on the ground rather than on the trailer. For instance, you can use the trailer mast cradle instead of a ladder to get some initial angle. I often get the boat off the trailer to the ground instead of the water, just to avoid submerging the trailer lights. I'm probably a bit obsessed about that, don't take it as an advice.., just consider that it's not a crazy idea.
In my experience (with a different boat by the way), raising the mast from the tramp is the simplest way once you get used to it. The critical part is getting the diamond wires out of the way and having the mast on your shoulders. From there, extending your hands is the next hard part but after that you are almost there, the weight comes down very fast as the mast approaches the vertical. If you watch a few videos you will notice that some people give the mast some speed in the first pull and use the momentum to save the intermediate position (mast on shoulders) and go quickly up. If you could get a lot of initial angle to save the first part it would really make things easier. With the boat on the ground you are in better shape, so it's probably a better option to get started. Maybe you can also figure out a raising system with your winch trailer but without a gin pole, which is actually useful only on the initial part with the low angles.
On the last video, where the mast is secured up with a line that goes through the trailer winch, I have a couple comments, if you think of that option:
- The guy leaves the line on the tramp and then gets it with one hand and with the other he holds the mast. That's a very dangerous position, you better avoid it, get the line closer to your hands, a quick knot on the diamond wires or duct tape it to the mast.
- If you think of using the mainhseet or jib sheet to get some purchase on this line, or just to be able to lock it easily, be very careful that it can be uncleated, the angle to uncleat may be wrong and if you get stuck in the middle of the process (i.e. side stay caught on the transoms, very typical), you will be in deep sheets.. you can't raise nor lower the mast and cannot even get out of there...
- Rank: Mate
- Registered: Mar 19, 2004
- Last visit: Sep 03, 2025
- Posts: 968
Raising the mast solo is doable but difficult. Raising the mast solo without ever having raised the mast before successfully is nearly impossible as you are finding out. There are techniques that make raising the mast easier but these come with experience. You live near Baltimore, right? Why not just bring your boat to the Hobie regatta this May at Gunpowder Park? It should not to be too long of a trip for you and there will be people there who can not only help you raise your mast but also show you how to fully rig your boat properly. You will learn more about your boat in one or two days than you possibly can learn after weeks of posting on the forums.
Just something to consider.
sm
- Rank: Administrator
- Registered: Jul 19, 2001
- Last visit: Sep 07, 2025
- Posts: 3460
And the choir said, AMEN!
- Rank: Mate
- Registered: Feb 18, 2013
- Last visit: Jul 19, 2015
- Posts: 396
Dogboy: If your going to help me, where are you standing and what are you doing? And what would I be doing as you are doing your thing. Watching you?
I expect to attend some sailing groups near me, but this problem shouldn't be too hard to figure out. The question is: should I continue with the gin pole idea or concentrate on lifting technique.
Andinista identified the crux as I have. Dead lifting the mast up to where you can get underneath it to lift it. Think Olympic weight lifting. The problem is small platform where your stance is compromised, including having to change hands on the bar. You will note in the video the person actually lets go of the mast, holds the mast in one hand, to change hand positions around the wire. Its already been mentioned that momentum is used just as in weight lifting to get the weight up to the point where you can change positions. This is a matter of technique. Where you put your feet, hands, and what body movements are needed to get the mast on your shoulder. I've mentioned too, because I've been up there, as the mast is raised it become more difficult off the deck a ft and becomes harder, due to the fulcrum how the mast is attached adding to the problem of shifting hands, feet, body etc. The center of gravity shifts as you lift.
Now if this is the ONLY way you guys raise masts, then it's pretty simply. Jerk the mast up with both hands, at apex, let go with one hand, get it around the wire, stoop, get under, get hand back on mast and it's on your shoulder.
1. If I can't muscle it up, then
2. Gin pole
3. If not gin pole
4. then someone else must stand up there.
What technique is used lowering the mast. I can just see myself after a rough day of sailing holding a lowering mast with one hand, trying to get my other hand around the wire and off my shoulder.
I ordered the hinge. Nothing much more to talk about until the hinge gets here.
Edited by goodsailing on Mar 24, 2015 - 01:58 PM.
--
Goodsailing
Laser-Standard Rig (Sold 6/15)
H18 (Sold 7/15)
Building 19' Tacking Outrigger
Balt-Wash Area
--
- Rank: Mate
- Registered: Aug 18, 2003
- Last visit: Jul 22, 2025
- Posts: 885
Never tried it, just thinking out loud:
Have your boat on the ground instead of trailer. If yor cooler is strong enough, put it behind the rear beam and use it as a step. Start lifting the mast from the ground to avoid changing position
Have your boat on the ground instead of trailer. If yor cooler is strong enough, put it behind the rear beam and use it as a step. Start lifting the mast from the ground to avoid changing position
- Rank: Mate
- Registered: Aug 18, 2003
- Last visit: Jul 22, 2025
- Posts: 885
One stupid question, just in case. When you were trying with the ginpole, the trap wires wiere attached to the front beam and no further aft, right? I remember trying this long ago without the swinging you describe. I didnt use a pole, just the trailer winch, but started from an angle, i don't remember sll the details but i do remember using the trap wires without any issues.
- Rank: Mate
- Registered: Mar 19, 2004
- Last visit: Sep 03, 2025
- Posts: 968
Any of the above. There will be people there setting up their boats. You can watch how they raise their masts and observe the process. If you want assistance getting your mast up there will be people around to help. Often when there is a group of hobie sailors rigging their boats and one person is ready to hoist their mast, all they have to do is ask one person for help and three people will come over. One person grabs the back of the mast, one person raises the mast, one person pins the forestay, and others are around to clear fouled wires, help lift, or do whatever is needed. It just makes the operation run very smoothly. There are more than a few experienced "old guys" in the group that have done this for a lot of years.
sm
- Rank: Mate
- Registered: Feb 18, 2013
- Last visit: Jul 19, 2015
- Posts: 396
Yes, trap wires were attached at the same point where the guidelines to the pole where attached at the eye on the hull where the bungie is. But now, the trailer was slightly bow down hill , as people said, point bow down hill, my drive is lightly down hill, meaning as mast was lifted the end of the mast shifted DOWNHILL. Bow up hill might have helped. But trap lines never helped to keep it from shifting. Lines need to be nearly perpendicular at top of mast to keep top of mast from moving laterally.
So what does that one person do should two others not come over? Hold the the mast up so that mast lifter person can get under it? We're getting there Dogboy....
If mast lifter ties off the forestay with a line that runs through the hand crank back to the mast there is no need for one to pin forestay. Mast lifter simply jumps down and does that job himself. If you are getting help, the most critical person helping, aside from a Bulgarian Weighlifter as mast lifter, is the person who stands back there and lifts the mast so that mast lifter can get under the mast, thereby avoiding jerking the mast up to get under it. Now all this considering: boat is on trailer. I tried putting a step ladder under there, that would serve as a human helper in that capacity, but, low and behold, and as previously described: mast was even harder to lift up at an angle than it was laying flat on the cooler!
Now if the boat was off the trailer, perhaps, person holding mast up would be more effective as they'd gain more feet in mast raising ability. But I'm trying to do this with the boat on the trailer. Why? Because after getting the boat on the trailer I'm going to back it down a ramp and go sailing. Yes, i'm considering, taking the boat off the trailer onto beech wheels, put the mast up, put the boat in the water, when returning, take the boat out of the water with THE TRAILER, not the beech wheels, and then I'm faced with taking down the mast with the boat on the trailer.
If I can put up, and take down the mast on the trailer, I'll perhaps eliminate, taking the boat off the trailer to get it in the water. Since there is a ramp, there may not be a way to pull the boat out on beech wheels so I'd be faced with removing the boat from the water on the trailer, with the mast up, take the boat off the trailer to take the mast down, then put the boat back on the trailer. Plus handling the mast.... the reason, the OBJECTIVE IS: putting up the mast and taking the mast down on the trailer.
I take my laser off the trailer, put the mast on it, hand wheel it down to the water on a dolly, go sail, come back, get the dolly, pull the boat up the ramp by hand, because IT IS A LIGHT BOAT, take the mast off, then put the boat back on the road trailer. Sometimes I just leave it on the trailer, but this boat too is easier to mast with it lower. I'm not going to be able to do this with a Hobie Cat as the boat is too heavy to deal with guiding it down the ramp, it will get away from me due to its weight and I risk crashing rudder into pier, and pulling it back up the ramp on beech wheels. Perhaps this boat is simply too big. I don't know. I've not been to the boat ramp yet. But if I can't get the mast up at the house, then I'm certainly not going to get it up at the water, when there are no other cat sailors around. The reason the objective is: get the mast up and down, on the trailer, in my driveway. This way, when I get to the water, it will be no problem. So so long winded, morning coffee and I've not yet had any breakfast.
--
Goodsailing
Laser-Standard Rig (Sold 6/15)
H18 (Sold 7/15)
Building 19' Tacking Outrigger
Balt-Wash Area
--
- Rank: Master Chief
- Registered: Jun 20, 2006
- Last visit: Dec 04, 2024
- Posts: 7090
in this video the guy uses his trailer winch (with an additional pole)
the reason i am posting this is so you can watch him adjust this straps that utilize the trap cables to stableize the mast from side to side sway
https://www.youtube.com/watch?v=ytp8Tbq5yP0
- Rank: Mate
- Registered: Feb 18, 2013
- Last visit: Jul 19, 2015
- Posts: 396
Thanks MN3. I hadn't seen this video.
Further thoughts that if you don't have a human mast raiser standing up there you need mechanical help.
Notice around 3:40 as the mast lifts off his scissor stand it cants to the left, due to wind. It's caught by the guide wires. Any further than it did go, and his hinge would have broke. I think proper placement of the trap wires and a way to tension those wires for mast raising and lower is key there. Which is why my hinge broke. I've seen Y extenders for the mast crutch on other boats used for this purpose. No pole needed just the extension with the Y at the top. Key here is the crutch base must be secure; I've seen the crutch break away from trailer. That needed welded plate on base there for reinforcement. His pole is helping to provide support though. He needs strap from boat to trailer to keep boat from moving on trailer as he cranks. Notice how he takes up slack periodically as needed as there's not a full take up or let out tensioning system. Which is what is really needed, guided from where you are cranking if you could configure a system. This way no stopping and walking around to attach point. (Some boats have this system already installed. I think the video of the 21 up there has this as a feature)
I'm going to rethink using boom as pole and my little gooseneck and go to something on the trailer... a pole like this one or weld tubing to form V frame that's hinged bolted to trailer that can simply be raised and lowered. It would lay flat on trailer nearly the same shape of the Y of the trailer. You simply stand it up and tie your lines to mast. No need for side wires or line as ^ is steel.
Thanks for posting.
Also, I did research prior to buying this boat. The 2 part video how to rig an 18 led me believe that I could lift the mast up there myself, the reason I bought the boat. After trying it, and it not working out so good, I have to find another way.
I appreciate all your help... we'll get there. While I wait for the hinge, perhaps I'll weld the V boom! HA The mast crutch base is shakey and bolts are rusty and I don't trust that for a raising boom... No way..
--
Goodsailing
Laser-Standard Rig (Sold 6/15)
H18 (Sold 7/15)
Building 19' Tacking Outrigger
Balt-Wash Area
--
- Rank: Master Chief
- Registered: Jun 20, 2006
- Last visit: Dec 04, 2024
- Posts: 7090
looks to me it's not the wind but the mast coming of it's cradle (or whatever he was using to hold it)
doesn't matter wind wont mess you up once the gin pole guide lines are set correctly
he had an issue of his gin pole guide lines slipping on his h16 beams
this was not an issue for me with my h18 and ez-step system.. they were fixed around the bows and didn't slip
we all want to see you succeed at this
- Rank: Mate
- Registered: Aug 18, 2003
- Last visit: Jul 22, 2025
- Posts: 885
Goodsailing, you are underestimating beachwheels. Te boat becomes a light one with them, if it's on your wishlist, you won't regret anticipating the purchase.
- Rank: Mate
- Registered: Aug 18, 2003
- Last visit: Jul 22, 2025
- Posts: 885
The reason why you need adjustment is because the attachment points of the side wires are not in line with the axis of rotation. Not just horizontal but also vertical alignment. If you could engineer that instead of the the remote adjustment system you would be fine I think. The challenge seems simpler to me, it's about finding the right spot and adding something (removable?) to compensate the measures, right? Playing at the same time with the lifting line and the two side lines seems dangerous, at some point of the above video the guy actually went a bit further than expected when releasing tension, didn't he?
- Rank: Mate
- Registered: Feb 18, 2013
- Last visit: Jul 19, 2015
- Posts: 396
See that flag waving in the wind... yet you are right it might not be the wind...
Tractor Supply has 2 20 x 10 x 8 tires that are 1,000lbs rated. I can get a 4 x4 hub with 1" bore bearing and then, 1" steel tube for axle long enough to support hulls. Cotter pins and washers. But no sense getting wheels if I can't get the mast up.
You are right, the lines need adjusting as the mast is raised. But not necessarily dangerous. Look how this accomplishes what we're talking about. Start in at 8 min.
https://www.youtube.com/watch?v=7AQ-jmoMOFg
I'll have to look at it again.. but of course hulling, and adjusting from two different locations is problematic. That's why this guy got that part figured out. The hauling line reels in the side tensioners.
--
Goodsailing
Laser-Standard Rig (Sold 6/15)
H18 (Sold 7/15)
Building 19' Tacking Outrigger
Balt-Wash Area
--
- Rank: Mate
- Registered: Feb 18, 2013
- Last visit: Jul 19, 2015
- Posts: 396
Here's the v system I'm thinking of. Notice the model he built first. He's up there to keep mast from swinging. Not a good idea in my opinion. I'd plan on putting the v frame on the trailer, not the boat, and stand at the bow between the hulls for heaving. Notice how he's not secured the v that well to the hull. A shackle holding the plate. I'd do bolted steel stand/ hinge on the steel frame trailer. Perhaps even a line tied to the main halyard running under the middle of the tramp with a block to the front would keep the top of the mast from swinging. I could handle that line with one hand while cranking the haul line, all from the front.
https://www.youtube.com/watch?v=li7SadZL8ek
--
Goodsailing
Laser-Standard Rig (Sold 6/15)
H18 (Sold 7/15)
Building 19' Tacking Outrigger
Balt-Wash Area
--
https://www.youtube.com/watch?v=li7SadZL8ek
--
Goodsailing
Laser-Standard Rig (Sold 6/15)
H18 (Sold 7/15)
Building 19' Tacking Outrigger
Balt-Wash Area
--

- Rank: Mate
- Registered: Dec 01, 2011
- Last visit: Nov 02, 2016
- Posts: 165
After reading about your struggle -- what you need is getting a smaller boat! I mean, way smaller. Perhaps Hobie Wave or H14. If this is keeping you out of water, it would be a smart move. I know this is not what you want to here, but seriously... let someone else have fun with your H18.
This will give you a much easier and safer way to learn mast stepping technique, rigging, lunching, handling, etc.
In any case, don't give up. I is worth it!
--
Jack B
Hobie 17
BC, Canada
--
This will give you a much easier and safer way to learn mast stepping technique, rigging, lunching, handling, etc.
In any case, don't give up. I is worth it!
--
Jack B
Hobie 17
BC, Canada
--
- Rank: Lubber
- Registered: Apr 24, 2014
- Last visit: Apr 09, 2017
- Posts: 98
Looking at what you'd pay for the tires to construct your own beach wheels, you need to look at first things first - getting your mast up. For the price of the tires at Tractor Supply, you can buy a 12 volt electric winch from Harbor Freight that comes with a remote. Bolt the winch to the front of your trailer, run a line up through a block on your mast support on the trailer, and out to your forestay. Tie a trap line to each front corner of the tramp frame to stabilize the mast, and then hoist away. This has been done by numerous people, and it works. It'll be the best $100 you'll spend at this point.
--
Tim
81 Hobie 16
87 Nacra 5.7
Austin, TX
--
--
Tim
81 Hobie 16
87 Nacra 5.7
Austin, TX
--
- Rank: Mate
- Registered: Aug 18, 2003
- Last visit: Jul 22, 2025
- Posts: 885
The lines need adjustment only because your boom is curved and therefore you are attaching the tramp wires to a lower point than the mast base.
The guy on that video doesn't adjust the stabilizing lines because he solved that problem with a short line to raise the attachment point on each side. Both attachment points and the mast base (or more exactly the hinge axis) are all three ON the axis of rotation of the mast when it's raised. Therefore the needed length of the stabilizing lines is constant, no need to adjust anything.
- Rank: Mate
- Registered: Feb 18, 2013
- Last visit: Jul 19, 2015
- Posts: 396
I have a laser which is a smaller boat. The 18 mast will rise. I'll enjoy the boat for sure. I'm not ready to go sailing for another 3 weeks so there's plenty of time to build a mechanical solution which is not too difficult. Once built, no reason to hire the Olympic weight lifter, or risk getting hurt trying to lift an awkward piece of metal.
I'm going to need the beech wheels for another part of the park that has a beach launch, that is, if the boat ramp doesn't work. The crank, or mechanical advantage of blocks, which I currently own will suffice over buying electric winch at the moment.
I'm not understanding that the boom or gin pole is curved.
Mast crutch base is not substantial enough that base needs welded plate, if I were to use the mast crutch as gin pole.
I've decided to buy the two sections of steel square tubing 7" long and a small steel plate to weld to the top of the ^ frame (gin pole) Once welded I'll bolt the bottoms to angle brackets to the front cross beam holding the hulls, just inside the hulls. That should give me a 5" rise to the top of the teepee. I'll drill a couple of holes in the plate to attach eyebolts for line attachments. This way the ^ will lay flat on the trailer. You simply raise it up verticle and attach your lines. This will eliminate dealing with a wobbley gin pole, boom, and loose lines and dealing with keeping tension. In addition, no fittings on the hulls etc. The steel frame will eliminate wobbliness. Yep, making the wooden scissor to hold mast up a few feet is also scheduled for production. As I await the delivery of the mast hinge.
It probably seems like this is more work, than it really is. Fact of the matter is, If I didn't type fast, typing would take longer than completing this project of raising the mast. I'll have less than an hr buying metal and welding the frame, gin pole.
Edited by goodsailing on Mar 26, 2015 - 09:39 AM.
--
Goodsailing
Laser-Standard Rig (Sold 6/15)
H18 (Sold 7/15)
Building 19' Tacking Outrigger
Balt-Wash Area
--
- Rank: Mate
- Registered: Mar 19, 2004
- Last visit: Sep 03, 2025
- Posts: 968
Yes. One person (the "primary" lifter) stands on the tramp. The second person stands at the back and picks up the mast so that it is easier for the primary lifter to hold. If the primary lifter is strong enough, he can pick the mast up the rest of the way until it's stepped. Then the second person walks over to the front of the boat and pins the forestay wires. If the primary lifter is not strong enough to do the entire lift himself, then the second person can either start cranking on a winch line connected to the trap lines to pull the mast up without a gin pole. Or the second person can just jump up onto the tramp and the two people raise the mast together like in the picture of the flag raising on Iwo Jima. We've raised the mast like this countless times. The diamond wires on the 18 mast make things tricky. As I said, there is technique to the whole process. Find someone that has done it before to help you, don't reinvent the wheel.
I am not a fan of mechanical/gin pole systems. They may be OK once they are dialed in, but IMO there is too much that can go wrong and too much potential for equipment breakage or injury. If the mast starts to swing out to the side, the hinge will break and the whole mess will come crashing down. Very dangerous. I think having two people there to stabilize the mast and lift it manually is the best way.
I've said this before, but will say it again, if you're not large enough/strong enough to lift the mast yourself, then you are probably going to have a very hard time righting the boat solo.
sm
- Rank: Mate
- Registered: Feb 18, 2013
- Last visit: Jul 19, 2015
- Posts: 396
Thanks for describing what the secondary helper does. Of course if there happens to be 2 primary lifters, one on each side of the mast, (will all that weight at the back of the boat make the bow tip up?) there would be no need to move any hand positions, hence no awkward movements and 1, 2, 3, up we go............OF COURSE. Two people can do it.
Now with the added claim that if you can't raise the mast solo, by brute force, then it would be a hard time righting the boat solo....
So basically what you are saying is: To deal with a Hobie 18 on the ground, and in the water, you need 2 people. Otherwise get a boat that one person can handle? Is this what you are saying?
I think brute force raising the mast, and righting the boat in the water are 2 separate things. It takes no brute force to right the boat, only weight on a line, or weight on a righting pole to lift the mast up. Yes holding a bag of water on your shoulder, if that is needed is brute force but climb far out on a pole and, whoosh, the mast come up while you're drinking beer.
There are plenty of examples of people safely raising masts on boats using gin poles including Hobie 18's. Which is the objective is here, because the secondary lifter is no where to be around. And where the primary lifter finds it too awkward and dangerous to injury, whereas gin pole lifting might be dangerous too. I'd rather have a broken hinge, mast, hull, instead of a broken back lifting a pole, and broken parts at the same time etc.
So that leads us to the best approach to gin pole. So the question is: at what angle should the base steel be cut and a plate welded in order for the frame base to rotate 90 degree's from a horizontal position to a vertical position at the frame hinge on the trailer. And then where and how to anchor tensioning lines to keep the mast from swinging once the STURDY Steel frame lifts the mast. (I know I can get the mast up, I've already done that with the boom (gin pole). etc.
I'm not giving up on getting the mast up by myself. I'll deal with righting the boat with a secondary boat righter, to learn if that can be done solo, first. I try to right the boat myself, they watch. If I can raise the mast, and right the boat solo, then I'm home free. Home free is the objective. Not sure I'll get there, but its worth a try. Wouldn't you like to own a Hobie 18 and go sailing all by yourself if you wanted. If so, follow along...
--
Goodsailing
Laser-Standard Rig (Sold 6/15)
H18 (Sold 7/15)
Building 19' Tacking Outrigger
Balt-Wash Area
--
- Rank: Lubber
- Registered: Oct 29, 2002
- Last visit: Jun 22, 2016
- Posts: 42
Goodsailing, you are over thinking it....build it just like shown in the attachment....I bought this one 25 years ago when I was sailing with my 4 year old son and it worked as advertised. Been sittiing unused ever since I taught him how to pin the forestay a couple years later. I find it easier and quicker just to muscle it up. http://static.hobiecat.co…_attachments/3151z52.pdf
--
Randy Neubauer
Apple Valley, MN
2001 H18M
--
--
Randy Neubauer
Apple Valley, MN
2001 H18M
--
- Rank: Mate
- Registered: Feb 18, 2013
- Last visit: Jul 19, 2015
- Posts: 396
I've seen this and modeled using wood as pole but then switched to using the boom. "if trailer/boat is not on level ground, point bow uphill" was my failing. I had it pointed down hill thinking that was better, reading posts here, put bow down etc, yet failed to account that mast would swing once airborne if bow was downhill. My pole straps were wrong. You're right, I'll just keep on track with this method. I know muscling it up is easier and quicker once you have the technique down. And you can only get that technique down by being up there heaving away. Yes, if your second party is a child or pretty young thing in a bikini (not my case HA) then there goes your secondary helper.. etc
Thanks for everyone's help..
Edited by goodsailing on Mar 26, 2015 - 01:04 PM.
--
Goodsailing
Laser-Standard Rig (Sold 6/15)
H18 (Sold 7/15)
Building 19' Tacking Outrigger
Balt-Wash Area
--
- Rank: Mate
- Registered: Aug 18, 2003
- Last visit: Jul 22, 2025
- Posts: 885
Sorry... I meant front beam!
- Rank: Master Chief
- Registered: Jun 20, 2006
- Last visit: Dec 04, 2024
- Posts: 7090
I agree the ez-step design is a good one, and works -
It is a 2 person boat, and is 70% easier to manage with 2 people
that being said, i own 3 "2 person" boats and solo all of them (but will take help every time raising or lowering my mast)
- Rank: Mate
- Registered: Aug 18, 2003
- Last visit: Jul 22, 2025
- Posts: 885
You might rather have a broken head of somebody walking around (the one that could have helped you)
You won't be able to right the boat solo without a righting pole. Maybe with a righting bag but it's definitely harder to master the technique than raising mastsolo
Regarding the A frame, it doesn't look that it will avoid lateral movement of the mast, you are still considering stabilizing with the trap wires, right?
After all the discussion, I'm seriously considering the electric winch with remote control, I didn't have that option in mind. Very elegant!
After you succeed, which you will certainly do, the next problem is to pin the forestay. You need to tension the rig at that point, not in excess but you don't want it loose. It's easier to adjust a side stay for that purpose, because you don't have to deal with the bridle wires. So on one side pin the sidestay one or two holes higher.
Edited by Andinista on Mar 26, 2015 - 01:49 PM.
- Rank: Mate
- Registered: Feb 18, 2013
- Last visit: Jul 19, 2015
- Posts: 396
Yes
Rating, placement, wiring? & cost of winch
The line holding the forestay will be attached at above the chainplate allowing as much tension needed for attachment.
Look way back.. talking about that... righting pole, and also same pole as sculling oar. If you do this right you could possible have one pole for 1. gin pole, sculling oar, and righting pole. Once the mast is up with the pole, you scull it to sailing area, sail, topple the boat and use the same pole to right the boat etc... 1 pole=3 uses, not excluding 4. using pole to push off from pier or swatting other boaters trying to take your beer. How's that for over thinking!
--
Goodsailing
Laser-Standard Rig (Sold 6/15)
H18 (Sold 7/15)
Building 19' Tacking Outrigger
Balt-Wash Area
--
- Rank: Lubber
- Registered: Apr 24, 2014
- Last visit: Apr 09, 2017
- Posts: 98
Goodsailing,
Here's a link to the winch that I've seen ppl use. They single-handedly raise their mast with virtually no effort or drama. The winch package comes with all the cables to hook it up and control it. You just need to tie off a trap wire to each front corner of the tramp frame.
http://www.harborfreight.com/2000-lb-marine-electric-winch-61237.html
--
Tim
81 Hobie 16
87 Nacra 5.7
Austin, TX
--
- Rank: Mate
- Registered: Feb 18, 2013
- Last visit: Jul 19, 2015
- Posts: 396
Edited by goodsailing on Mar 26, 2015 - 08:26 PM.

- Rank: Chief
- Registered: Nov 26, 2009
- Last visit: Sep 03, 2025
- Posts: 2532
On my 20' Mystere, that was critical, unless you had lots of lateral clearway.
Before I put the Cat on a Seadoo lift, I mucked around with stepping the mast. If you have lots of room to the sides, it really doesn't matter if the mast moves off to the side 5' or so. If your lines are not the same length it will usually fall off one way. I made up some lines specifically for this purpose, using old bridal wires. The thimbles at the ends & quick connect shackles made it all go easy.
That's what the original owner did when he built the trailer for my 20' Mystere. I could easily raise the mast solo. If you screwed something up, it was 10 seconds to lower it part way, fix the problem & raise it again.
However, simply raising the mast was the easy part. Getting that 31' stick into place, & attaching all the rigging was way easier with 2 people.
Here you can see the electric winch mounted on trailer. The pole, with sheave, extends upwards & is then pinned, to create an easy pull angle
Edited by Edchris177 on Mar 26, 2015 - 08:49 PM.
--
Hobie 18 Magnum
Dart 15
Mystere 6.0XL Sold Was a handful solo
Nacra 5.7
Nacra 5.0
Bombardier Invitation (Now officially DEAD)
Various other Dock cluttering WaterCrap
--
- Rank: Chief
- Registered: Nov 26, 2009
- Last visit: Sep 03, 2025
- Posts: 2532
Here is how the electric winch works.
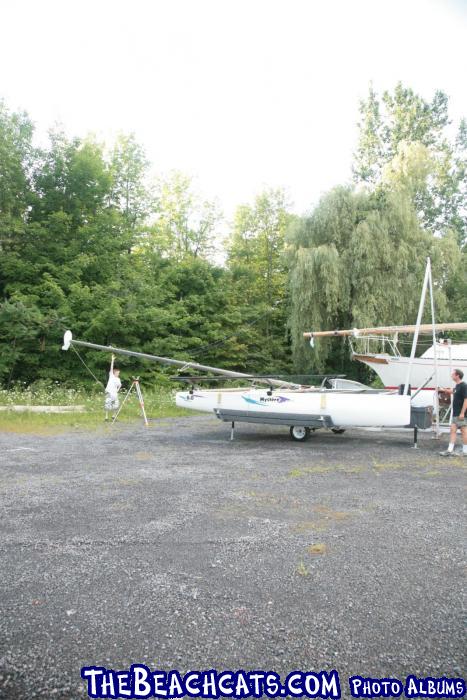
I put some photos in an album, it can be found in TECHNICAL, Trailers.
here;
http://www.thebeachcats.c…ictures?g2_itemId=113144
--
Hobie 18 Magnum
Dart 15
Mystere 6.0XL Sold Was a handful solo
Nacra 5.7
Nacra 5.0
Bombardier Invitation (Now officially DEAD)
Various other Dock cluttering WaterCrap
--
I put some photos in an album, it can be found in TECHNICAL, Trailers.
here;
http://www.thebeachcats.c…ictures?g2_itemId=113144
--
Hobie 18 Magnum
Dart 15
Mystere 6.0XL Sold Was a handful solo
Nacra 5.7
Nacra 5.0
Bombardier Invitation (Now officially DEAD)
Various other Dock cluttering WaterCrap
--

- Rank: Mate
- Registered: Aug 01, 2002
- Last visit: Sep 01, 2025
- Posts: 432
Goodsailing: In an effort to possibly better define the problem......how much would you estimate that your mast weighs?
--
Jerome Vaughan
Hobie 16
Clinton, Mississippi
--
--
Jerome Vaughan
Hobie 16
Clinton, Mississippi
--
- Rank: Mate
- Registered: Aug 18, 2003
- Last visit: Jul 22, 2025
- Posts: 885
I wouldn't worry about over thinking, that's actually part of the fun for the average sailor that lives more than a few miles away from the water. But underestimating other people's experience may have more impact if you don't have a lot of your own.
- Rank: Mate
- Registered: Feb 18, 2013
- Last visit: Jul 19, 2015
- Posts: 396
50lbs. I can lift it and carry it around etc. It's getting it up through the crux standing on the tramp when it's hinged. I drained the mast, but the foam inside could be holding water...
--
Goodsailing
Laser-Standard Rig (Sold 6/15)
H18 (Sold 7/15)
Building 19' Tacking Outrigger
Balt-Wash Area
--
- Rank: Mate
- Registered: Feb 18, 2013
- Last visit: Jul 19, 2015
- Posts: 396
True, but I'm learning through reading and asking questions, and failing. HA
Edited by goodsailing on Mar 27, 2015 - 09:02 PM.
--
Goodsailing
Laser-Standard Rig (Sold 6/15)
H18 (Sold 7/15)
Building 19' Tacking Outrigger
Balt-Wash Area
--
- Rank: Mate
- Registered: Mar 19, 2004
- Last visit: Sep 03, 2025
- Posts: 968
If it's 50 LBS then it is likely not holding much if any water. I measured two of our comptip masts a few years ago and I believe they were both 55 LBS.
sm
sm
- Rank: Mate
- Registered: Feb 18, 2013
- Last visit: Jul 19, 2015
- Posts: 396
I noticed in the Hobie 18 manual, they actually feature two people lifting the mast in one of the photo's. I also noticed there's no chain plate on the forestay. The roller furler is just attached to the end of the forestay. Any reason the previous owner had the chain plate? The roller fuller is attached at the end, hence making the forestay longer. More rake?
--
Goodsailing
Laser-Standard Rig (Sold 6/15)
H18 (Sold 7/15)
Building 19' Tacking Outrigger
Balt-Wash Area
--
--
Goodsailing
Laser-Standard Rig (Sold 6/15)
H18 (Sold 7/15)
Building 19' Tacking Outrigger
Balt-Wash Area
--
- Rank: Mate
- Registered: Mar 19, 2004
- Last visit: Sep 03, 2025
- Posts: 968
The chain plate or forestay adjuster is shown on page 10 of the manual, but it is hard to see due to the darkness of the picture and because it is adjusted to a very short length. The adjuster is just a piece of flat stainless steel bar with about 10 holes punched in it. It is a standard H18 part and is needed to properly connect the swaged fork fitting on the forestay to the roller furler.
sm
sm
- Rank: Master Chief
- Registered: Jun 20, 2006
- Last visit: Dec 04, 2024
- Posts: 7090
shot 2 videos for you
stepping and unstepping the mast
first one (step) the camera was not in the best spot (on another cat) but you can see MY mechanics with a helper on a safety line
second video is better angle of my buddy solo dropping it
https://www.youtube.com/w…UUDFB19kzJwcRCJRH2jDRAcw
https://www.youtube.com/w…UUDFB19kzJwcRCJRH2jDRAcw
- Rank: Mate
- Registered: Aug 01, 2002
- Last visit: Sep 01, 2025
- Posts: 432
As Dogboy stated, I think you're good on the water holding issue. I just wanted to make sure that variable had been properly removed from the equation since you couldn't get the masthead off (per your other thread). FYI...If your mast is all Al (not a comp tip), there should not be any foam in there except for the two relatively small plugs.
Edited by rattlenhum on Mar 30, 2015 - 12:13 PM.
--
Jerome Vaughan
Hobie 16
Clinton, Mississippi
--
- Rank: Mate
- Registered: Feb 18, 2013
- Last visit: Jul 19, 2015
- Posts: 396
How did you get the mast that high up on the rear crutch going up. I see someone pulling on the forestay line too. Yes if you can elevate the mast up so that you can get under it, then you are beyond the crux. Good videos...
--
Goodsailing
Laser-Standard Rig (Sold 6/15)
H18 (Sold 7/15)
Building 19' Tacking Outrigger
Balt-Wash Area
--
- Rank: Mate
- Registered: Feb 18, 2013
- Last visit: Jul 19, 2015
- Posts: 396
Mast hinge still isn't here yet, so Is it worth welding a 7 or 8' T handle to the beech wheel axle?
Edited by goodsailing on Mar 30, 2015 - 05:58 PM.
--
Goodsailing
Laser-Standard Rig (Sold 6/15)
H18 (Sold 7/15)
Building 19' Tacking Outrigger
Balt-Wash Area
--
Edited by goodsailing on Mar 30, 2015 - 05:58 PM.
--
Goodsailing
Laser-Standard Rig (Sold 6/15)
H18 (Sold 7/15)
Building 19' Tacking Outrigger
Balt-Wash Area
--
- Rank: Master Chief
- Registered: Jun 20, 2006
- Last visit: Dec 04, 2024
- Posts: 7090
ALL the guys i sail with trailer with the sterns facing the car for this exact reason.
you just roll the mast backwards and pin it- and you have this advantageous angle and room to get under the mast
Edited by MN3 on Mar 30, 2015 - 02:19 PM.
- Rank: Master Chief
- Registered: Jun 20, 2006
- Last visit: Dec 04, 2024
- Posts: 7090
i have cradles - no arm needed -
- Rank: Lubber
- Registered: Apr 24, 2014
- Last visit: Apr 09, 2017
- Posts: 98
I wouldn't bother. I place my wheels beneath the stays and, using the rope on the ends of the wheels, take about 3-4 wraps around the sidestay chain plate. The boat will be very easy to balance on the wheels at this point. You can just walk to the front and grab the bridle wires where they come together and move the boat around easily. I usually put the bridle wires behind my neck/on my shoulders and grab one in each hand. It's pretty easy to control the balance of the boat and move it around.
--
Tim
81 Hobie 16
87 Nacra 5.7
Austin, TX
--
- Rank: Mate
- Registered: Feb 18, 2013
- Last visit: Jul 19, 2015
- Posts: 396
What do you tie the line that's attached to the forestay if raising the mast solo? Is it wrapped around the front wires holding the roller fuller then back to the mast for tie off so that you can jump down and pin the forestay?
Edited by goodsailing on Mar 30, 2015 - 06:16 PM.
--
Goodsailing
Laser-Standard Rig (Sold 6/15)
H18 (Sold 7/15)
Building 19' Tacking Outrigger
Balt-Wash Area
--
- Rank: Master Chief
- Registered: Jun 20, 2006
- Last visit: Dec 04, 2024
- Posts: 7090
I don't use a saftey line if i am truly solo - however i will walk up and ask a "strong looking" beach goer for a little help "holding" my safety line. Once i am about to step i will tell them to go ahead and pull as i start to lift
when i solo step
I make sure my bows are at least slightly downhill if i can (for 2 reasons, 1 to assist in the angle. 2 so once the mast is up ... gravity will help it lean slightly /stand 90* to the boat)
after the mast is up i take the forestay in hand and walk out on a bow (all the while keeping tension on the forestay to stop the mast from falling)
I get down off the bow (boat still on trailer) and tie off the forestay to the furler ring *(portugesse turnbuckle)
to be honest this is my least fav part of solo stepping
to be even more honest, i utilize (cleat) my spinnaker halyard (that is already tied to the furler ring) this is about the same thing as securing the forestay and can walk out on the bow/off the boat with much less "fear" of the mast dropping
i ALWAYS look for people walking behind me as i do this, and will wait till there is no one in the "danger zone"
if there are people parked next to me, i will alert them to the fact i am stepping my mast, and they shouldn't worry but keep an eye out incase anything goes wrong
- Rank: Mate
- Registered: Feb 18, 2013
- Last visit: Jul 19, 2015
- Posts: 396
Sounds iffy. But what ever works. I'm launching at a place where there is usually no one walking around to grab for help, or to worry about being in the way. So consequently all tasks are solo. All worry is my safety as if I get hurt, I could lay there for hours before anyone found me. Really iffy.
--
Goodsailing
Laser-Standard Rig (Sold 6/15)
H18 (Sold 7/15)
Building 19' Tacking Outrigger
Balt-Wash Area
--
- Rank: Mate
- Registered: Aug 18, 2003
- Last visit: Jul 22, 2025
- Posts: 885
Then your safety is probably a concern, say you capsize and can't right the boat, or maybe you separate from the boat, etc.
Having your cellphone on a waterproof case and with you is a good idea, if there is good signal where you'll be sailing
- Rank: Mate
- Registered: Feb 18, 2013
- Last visit: Jul 19, 2015
- Posts: 396
Water proof VHF, signal mirror, helmet, cold water protection. I'll only be a couple of miles from CG station,.... not that I intend to make the call.
Possibility, but I'm building righting pole.
Biggest concern: I intend to sail close to shore, but getting separated from any sailboat, especially one that isn't coming back is particularly dangerous, hence, more emphasis on ability to withstand/ time/ etc cold water. I'd go out when its colder in the Laser as I know the boat. Best advise is sailing and getting familiar with the cat in warmer water when there are lots of boaters around..
--
Goodsailing
Laser-Standard Rig (Sold 6/15)
H18 (Sold 7/15)
Building 19' Tacking Outrigger
Balt-Wash Area
--
- Rank: Master Chief
- Registered: Jun 20, 2006
- Last visit: Dec 04, 2024
- Posts: 7090
with my spin halyard attached to my bridal ring, it's not an issue at all
without one you will need a different system
- Rank: Mate
- Registered: Aug 18, 2003
- Last visit: Jul 22, 2025
- Posts: 885
Getting separated from your boat while sailing isn't frequent and is probably a risk that you can mitigate mostly with experience, as you say. I was talking about a more frequent one: capsizing and not being able to reach the boat again. Your capsized Laser will stay in place but your cat will go away faster than you can swim.
- Rank: Mate
- Registered: Feb 18, 2013
- Last visit: Jul 19, 2015
- Posts: 396
I understood you to mean separation from boat due to capsize. On a capsize cat the sail goes down and the tramp(sail) goes up etc. And not separation from boat from just falling off, although that could happen, rare. I agree. If you get good in a Laser you never get wet when the sail is in the water.
--
Goodsailing
Laser-Standard Rig (Sold 6/15)
H18 (Sold 7/15)
Building 19' Tacking Outrigger
Balt-Wash Area
--
- Rank: Master Chief
- Registered: Jun 20, 2006
- Last visit: Dec 04, 2024
- Posts: 7090
Goodsailing - since you seem to like to fabricate, here is an option (probably overkill for your mast, but still an option)
my newest cat has a custom alum trailer. they fabricator added a track and an extendable yoke on the trailer mast yoke arm. The yoke can be cranked up the entire length to assist stepping the mast
If i was solo i would extend the entire way and park closer to the water and get the additional 10* of slope
pic one the yoke is not exrtended at all,
pic two i cranked it up about 2' .
I could have gone more but i had a helper pulling on a line tied to my forestay
- Rank: Mate
- Registered: Feb 18, 2013
- Last visit: Jul 19, 2015
- Posts: 396
I think we talked about yoke extension as you describe. At that height you'd be beyond the crux and could easily get under it to lift it. I'm held up due to the fact the mast hinge is not here yet, it was backordered. I plan on using the boom again utilizing my fabricated gooseneck holder. I can only get so close to the water from the parking lot and now beech wheels would be necessary so there's another fabrication or put-together project... under consideration and currently being discussed in other threads... wheels, sand types etc.
--
Goodsailing
Laser-Standard Rig (Sold 6/15)
H18 (Sold 7/15)
Building 19' Tacking Outrigger
Balt-Wash Area
--
--
Goodsailing
Laser-Standard Rig (Sold 6/15)
H18 (Sold 7/15)
Building 19' Tacking Outrigger
Balt-Wash Area
--
- Rank: Mate
- Registered: Feb 18, 2013
- Last visit: Jul 19, 2015
- Posts: 396
Success at last. The hinge came. And I used the H18 boom to raise the H18 Mast. (I wonder how many have done that since the advent of the Hobie Cat.) Here's all the pics in my gallery.
http://www.thebeachcats.c…ictures?g2_itemId=113043
Not sure why these pics don't show in posts?
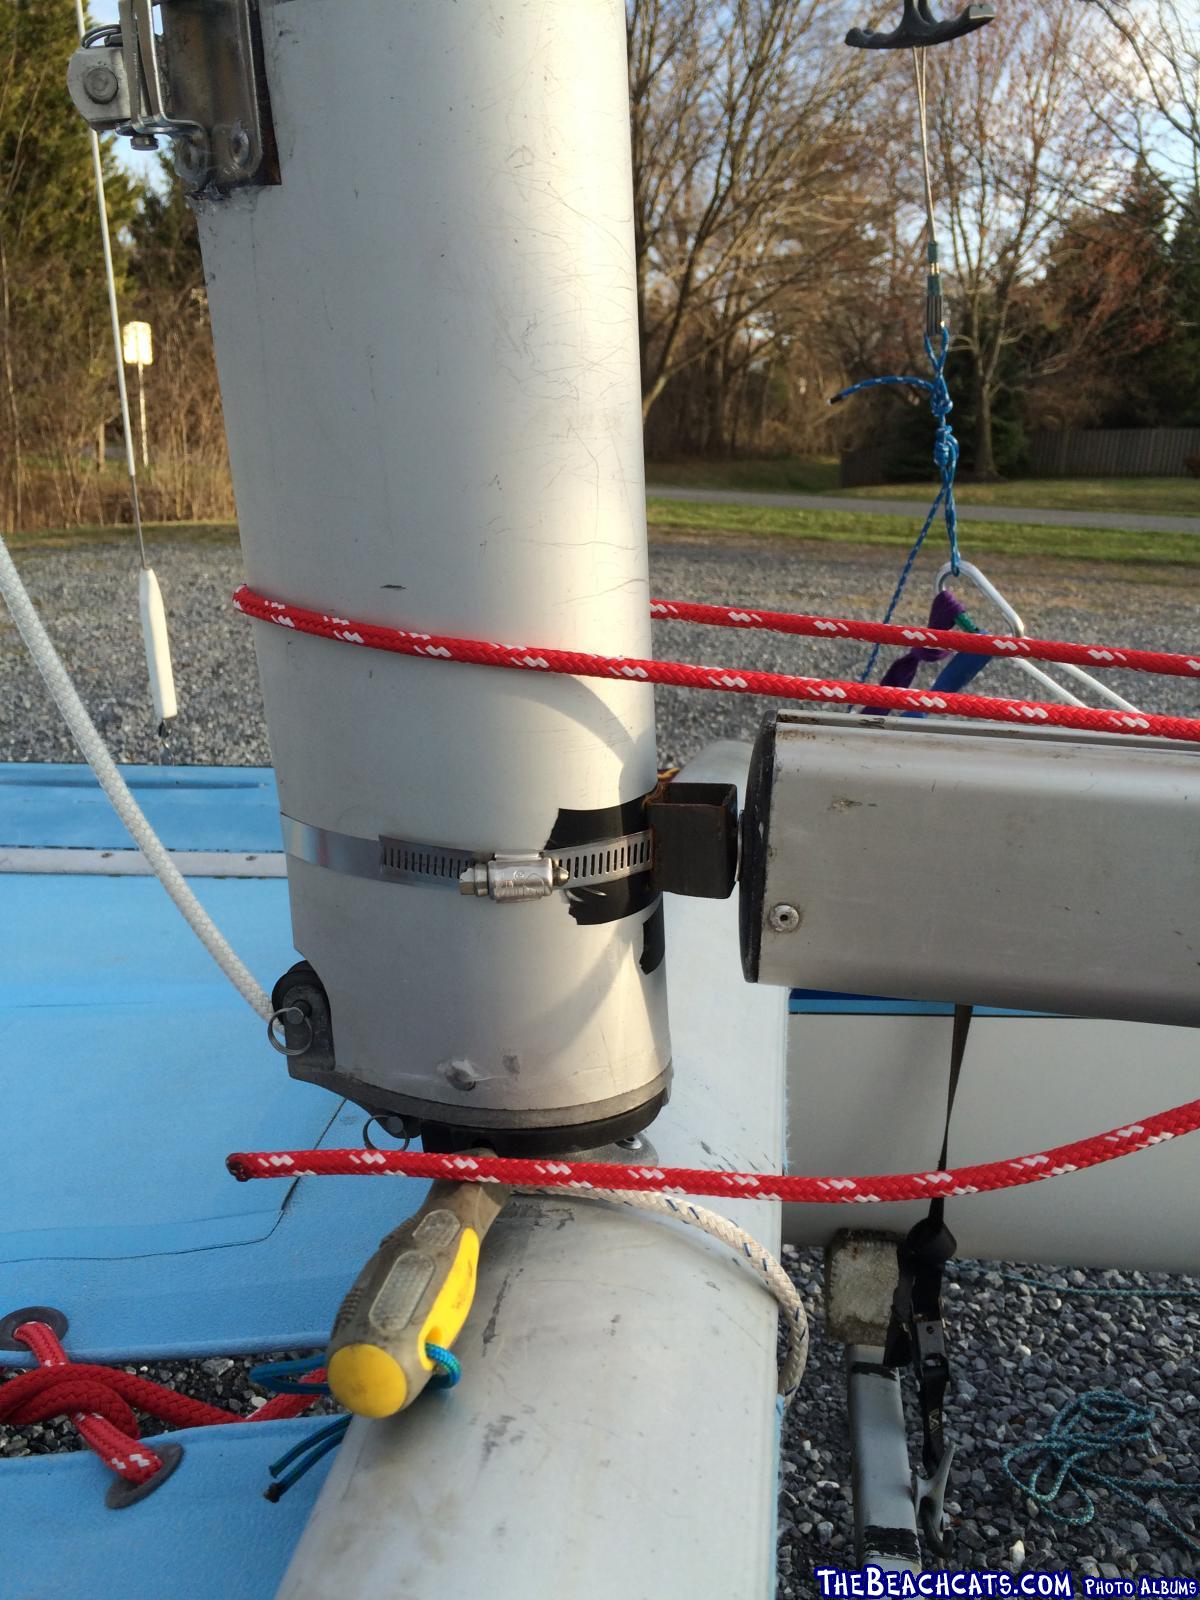
--
Goodsailing
Laser-Standard Rig (Sold 6/15)
H18 (Sold 7/15)
Building 19' Tacking Outrigger
Balt-Wash Area
--
http://www.thebeachcats.c…ictures?g2_itemId=113043
Not sure why these pics don't show in posts?
--
Goodsailing
Laser-Standard Rig (Sold 6/15)
H18 (Sold 7/15)
Building 19' Tacking Outrigger
Balt-Wash Area
--
- Rank: Administrator
- Registered: Jul 19, 2001
- Last visit: Sep 07, 2025
- Posts: 3460
Goodsailing, good job on getting the pics into an album.
The problem you had with inserting the pics into the forum is one a lot of people have. You have to get the url of the actual image and not the url of the page the image is on. Then put that url between the Image tags with the Image button and not the URL tags with the URL button.
I fixed the link to your album in your last post, basically on that one you had a link to your album index enclosed in the image tag instead of the url tag.
Glad you go your mast up!
--
Damon Linkous
1992 Hobie 18
Memphis, TN
Join the discussion at the all new TheBeachcats.com Forums HERE.
https://thebeachcats.temp…l.host/forums/site-talk/
--
- Rank: Mate
- Registered: Feb 18, 2013
- Last visit: Jul 19, 2015
- Posts: 396
But not getting the mast up with the boom? HA...
OK, on to the next project in dealing with this H18
--
Goodsailing
Laser-Standard Rig (Sold 6/15)
H18 (Sold 7/15)
Building 19' Tacking Outrigger
Balt-Wash Area
--
- Rank: Mate
- Registered: Aug 18, 2003
- Last visit: Jul 22, 2025
- Posts: 885
Congratulations! I guess you are thinking in a definitive second goose neck now, or will you leave that one? (corrosion?). How about just a hole in the mast? If it goes through the mast base casting I guess it would be strong enough, the only concern is that the pin doesn't come out during operation?
Edited by Andinista on Apr 08, 2015 - 06:10 AM.
Edited by Andinista on Apr 08, 2015 - 06:10 AM.
- Rank: Master Chief
- Registered: Jun 20, 2006
- Last visit: Dec 04, 2024
- Posts: 7090
well done
- Rank: Mate
- Registered: Feb 18, 2013
- Last visit: Jul 19, 2015
- Posts: 396
Thanks guys. Yea that little thingy is going to rust, it already is in fact. On that 21 footer posted above they had a hole in the mast just for that purpose. I thought about drilling a hole in the mast, then try and find some type plastic cup that would fit inside the hole to accept the boom gooseneck. Sorry Hobie didn't think of it..But then you'd be left with a hole. The steel is pretty common and I have enough of that to last the next 20 years or so, longer than I'll, or my estate (HA) keep the boat... so I'll just switch it out when needed. That band did compress the mast sleeve a tad but it's low enough that it won't interfere with raising sail. Actually, the pressure kept the goosneck in place. I thought the boom would come out once horizontal, but with the cunningham line around it did the trick. I've since rigged 2 lines to limit sway: I attached two small pulleys mid hull on each side of the trailer then through a center block, on the trailer too, to attach 2 quide lines that will be attached to the trapeze wires. This way when you tug on the "sheet" with one hand you can apply tension to either side of the mast, pending wind, slope etc to keep it lined up.
You'll need to complete two pinnings of the bridal/forestay upon raising as the boom gets in the way. Notice pic of boom in horizontal... You can leave everything rigged after lowering for next stepping. You have to change out sheet in the blocks as you need more rope than sheet, the most time consuming.
After the mast went up with ease, I thought... jeesh.. that was easy.
Thanks again for all your help with that one...
Edited by goodsailing on Apr 08, 2015 - 11:01 AM.
--
Goodsailing
Laser-Standard Rig (Sold 6/15)
H18 (Sold 7/15)
Building 19' Tacking Outrigger
Balt-Wash Area
--
- Rank: Mate
- Registered: Mar 19, 2004
- Last visit: Sep 03, 2025
- Posts: 968
The spinnaker pole mount for a Hobie 18 is a gooseneck fitting. It gets riveted to the front centerline of the front crossbar. You could mount one of these fittings to your front crossbar as a permanent bracket for your mast stepper and engage the gooseneck fitting on the boom into that fitting when you step the mast and it should work perfectly. I don't think it will matter if the bracket for your gooseneck is mounted to the mast base or the front crossbar - it should work in either location.
sm
sm
- Rank: Mate
- Registered: Feb 18, 2013
- Last visit: Jul 19, 2015
- Posts: 396
It must rotate 90 degrees. From the pic I saw of that fitting, won't allow the movement needed. Actually the suggesting of drilling a hole in the mast base through the plug is a good idea. It could also serve as drain hole if your mast leaked.
For those who don't want to drill a hole in their mast....
OK now on to fabricating a part that involves a hose clamp, and 1" piece of metal tubing and since this is sailing hardware.... $125 Guy's just love gadgets...
Added: rubber plug to fill hole in mast you drilled. $14.99
Edited by goodsailing on Apr 08, 2015 - 08:11 PM.
--
Goodsailing
Laser-Standard Rig (Sold 6/15)
H18 (Sold 7/15)
Building 19' Tacking Outrigger
Balt-Wash Area
--
- Rank: Mate
- Registered: Feb 18, 2013
- Last visit: Jul 19, 2015
- Posts: 396

Won't rotate... if this is the fitting you're talking about.
Added: only if you mounted to the xbeam as shown, would not rotate. If you mounted to the mast, not sure the radius, it would rotate the proper direction. Good thought though. Be nice just to pin it so it will hold..
Added: Just thought...BUT then your blocks wouldn't be orientated correctly. Won't work....
Edited by goodsailing on Apr 08, 2015 - 08:28 PM.
--
Goodsailing
Laser-Standard Rig (Sold 6/15)
H18 (Sold 7/15)
Building 19' Tacking Outrigger
Balt-Wash Area
--
- Rank: Mate
- Registered: Feb 18, 2013
- Last visit: Jul 19, 2015
- Posts: 396
Just thought about this: you could run a screw driver through there, which would hold the boom in place... Never thought of that till this morning...

--
Goodsailing
Laser-Standard Rig (Sold 6/15)
H18 (Sold 7/15)
Building 19' Tacking Outrigger
Balt-Wash Area
--
--
Goodsailing
Laser-Standard Rig (Sold 6/15)
H18 (Sold 7/15)
Building 19' Tacking Outrigger
Balt-Wash Area
--
- Rank: Lubber
- Registered: Oct 29, 2002
- Last visit: Jun 22, 2016
- Posts: 42
Purchase a hobie 18 gooseneck yoke for 24.95, mount it on the front of the mast then you can just pin the boom into it. It's not going to rust, you are thru cobbling something up and most of all not drilling a hole in the mast.
--
Randy Neubauer
Apple Valley, MN
2001 H18M
--
--
Randy Neubauer
Apple Valley, MN
2001 H18M
--
- Rank: Mate
- Registered: Aug 18, 2003
- Last visit: Jul 22, 2025
- Posts: 885
Even if you could find the right piece, I wouldn't mount it on the beam, it would put a lot of stress on that connection when the boom is vertical.
- Rank: Mate
- Registered: Aug 18, 2003
- Last visit: Jul 22, 2025
- Posts: 885
Somebody has to say it.. This hose clamp and square tube... they just don't belong there...
You know it works, test passed, you made your point.. Now it's time to solve it with elegance, don't forget that you are a honorable representative of the cat sailing community..
- Rank: Mate
- Registered: Feb 18, 2013
- Last visit: Jul 19, 2015
- Posts: 396
Well said. We've talked about simply drilling the hole. Would a hole belong there too. Or simply remove the device when not in use so to not offend any honorable rep or peer? We're talking about aesthetics now. I suppose prior to the advent of a boom, the boomless captains gazed a curious eye at that board hanging off the mast. Then as people used a boom as a part of the sail rig they became common, and elegant...
OK, I'll add powder coating, your choice of red, white, black or even silver to blend in etc.. and I'll throw in free shipping... this all in fun of course. get some retractable beech wheels in the hulls and then we'll be sailing
--
Goodsailing
Laser-Standard Rig (Sold 6/15)
H18 (Sold 7/15)
Building 19' Tacking Outrigger
Balt-Wash Area
--
- Rank: Mate
- Registered: Mar 19, 2004
- Last visit: Sep 03, 2025
- Posts: 968
H18 spinnaker pole mount (which is the H18 gooseneck mount) should work fine. What was shown in the earlier post is a Getaway spinnaker pole mount. The H18 mount is different and is rotated 90 degrees. Regarding stress on the fitting itself, we're only talking a couple hundred pounds here max. The fitting should be capable of handling that. The other advantage (in addition to removing that block of steel from the front of the mast) is that if you ever decided to install a spinnaker on your boat, you'd already have the mount in place.
Another thought would be to create a bracket that installs around the mast step and is held in place by the mast step pin. Then once the mast is up, the whole bracket is removed. That's probably the route I'd go and in fact, I would make a separate pole specifically for stepping the mast and forget about using the boom.
sm
- Rank: Mate
- Registered: Feb 18, 2013
- Last visit: Jul 19, 2015
- Posts: 396
Good points especially adding spin later on. Good... , for the bracket you're talking about would be a 3 sided strip metal with holes for pin, same pin, screw driver, that holds the hinge and same hole I have here, to hold any pole, boom etc., That would rotate verticle above mast for pole installation. You could use just a piece of strip metal, bent twice in vice to form that piece, less work than cuting clamp slots as I've done with dremmel. Good thoughts. I'll make one up. The 3 separate blocks on the boom were cumbersome to deal with changing lines etc. That perhaps a couple of triples already rigged on separate pole would be easier, but adds to cost and more stuff to haul. Thanks for you inputs...
Here's the plug for the hole in the mast idea... something like this I had in mind if anyone wanted to go that route.
http://www.componentforce…y/504/silicone-cone-caps
Plastic might be better if it could be located..
--
Goodsailing
Laser-Standard Rig (Sold 6/15)
H18 (Sold 7/15)
Building 19' Tacking Outrigger
Balt-Wash Area
--
- Rank: Mate
- Registered: Aug 18, 2003
- Last visit: Jul 22, 2025
- Posts: 885
Why! That was Goodsailing's best contribution in my opinion
- Rank: Mate
- Registered: Aug 18, 2003
- Last visit: Jul 22, 2025
- Posts: 885
The hole is an elegant solution to my standards. Even better with a plug (except for the color maybe). A well finished permanent fitting too. What about the Laser boomvang fitting on the boom side, that would work with a screw driver?. (Or a dedicated pin, even more elegant..)
- Rank: Mate
- Registered: Aug 18, 2003
- Last visit: Jul 22, 2025
- Posts: 885
Goodsailing, I'm not against innovation, testing weird ideas, thinking out of the box, etc. I was just suggesting a better finish!
- Rank: Mate
- Registered: Mar 19, 2004
- Last visit: Sep 03, 2025
- Posts: 968
Using the boom is a nice idea if it can actually work in a simple, elegant manner. The problem is that it looks to me that it is proving to be more trouble than it's worth. Re-stringing the main sheet system each time with a longer hoisting sheet would be a PITA. Working around the existing gooseneck fitting may prove to be more cumbersome than worthwhile. Sometimes when you restrict yourself to using one piece of equipment, you end up placing a lot of limitations on what you can do. Yes, using the boom is nice from a minimalist point of view and getting two functions out of one piece of equipment, but if you can do the job better, faster, more easily, and more safely with a dedicated pole, than that is probably better. We're not talking about a lot of weight, space, or extra equipment to have a dedicated pole.
sm
- Rank: Mate
- Registered: Feb 18, 2013
- Last visit: Jul 19, 2015
- Posts: 396
Ah gosh... jeesh, chop saw, drill press etc.. throw a bunch in the powder coating machine and you'd have many parts. They'd look OK. Or spray with Rusto paint before install. I would have done that but didn't have time... because I didn't know if it would work or not..
--
Goodsailing
Laser-Standard Rig (Sold 6/15)
H18 (Sold 7/15)
Building 19' Tacking Outrigger
Balt-Wash Area
--
- Rank: Mate
- Registered: Feb 18, 2013
- Last visit: Jul 19, 2015
- Posts: 396
Got that right, especially if you've not done it. You must keep close track as you thread it or you get lost not knowing which end you are feeding, then it's a clusterf especially with 80' of rope--Having triple on boom would have helped---. But it went pretty quick as I had some experience. Separate pole, and blocks would add to expense, for not a lot of time savings IMO. Longer to un-thread, than thread. Beside, money best spent on beech wheel parts now that gin pole is done. Thanks for your help guys..
--
Goodsailing
Laser-Standard Rig (Sold 6/15)
H18 (Sold 7/15)
Building 19' Tacking Outrigger
Balt-Wash Area
--
- Rank: Mate
- Registered: Feb 18, 2013
- Last visit: Jul 19, 2015
- Posts: 396
I got a disguarded water pipe, just happened to the the length shown, stuck it in the oven at 300 until pliable (don't forget tin foil on the racks before setting them in) then ran them out when hot wearing welders gloves, threw the carpet on them and pressed them up underneath against the hulls, and whallah, hull cradles. The brackets will be the hard part,
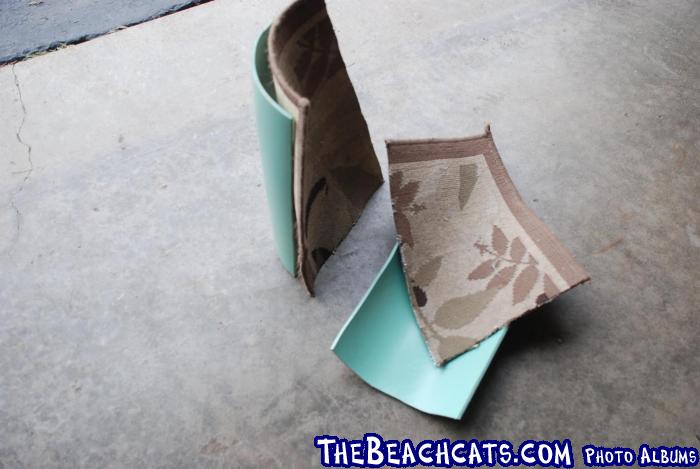
Edited by goodsailing on Apr 09, 2015 - 04:45 PM.
--
Goodsailing
Laser-Standard Rig (Sold 6/15)
H18 (Sold 7/15)
Building 19' Tacking Outrigger
Balt-Wash Area
--
Edited by goodsailing on Apr 09, 2015 - 04:45 PM.
--
Goodsailing
Laser-Standard Rig (Sold 6/15)
H18 (Sold 7/15)
Building 19' Tacking Outrigger
Balt-Wash Area
--
- Rank: Lubber
- Registered: Oct 29, 2002
- Last visit: Jun 22, 2016
- Posts: 42
Not to be critical but I am, looked at your photos and I see you have a winch on your trailer and saw the clusterf of a sheet going up to the pulleys...with the winch you DONT need any pulleys. As I said earlier you are overthinking it and making it more of a cluster than you need to Again, go back to the link for the ez step and study it and read the directions as there is no need for any pulleys and you could still use your boom for the gin pole . Sometimes it pointless to try and build a better mousetrap when there is already a 35 year old, simple and proven design.

--
Randy Neubauer
Apple Valley, MN
2001 H18M
--
- Rank: Mate
- Registered: Feb 18, 2013
- Last visit: Jul 19, 2015
- Posts: 396
It probably seem like more over -thinking than there is really.
I'll try that, but hope the mast crutch that holds the crank won't break off. There's a pic out there somewhere where that happened and where a plate was welded to the base for more support. The base on the crutch here is shakey. Also, when you stand up there to tension all the lines, there is no way you can crank the crank standing up on the tramp. My method has one hand on the boom to steady it, as there's slack in the line, and the other reeling in the sheet to add tension as I'm up there holding the boom. Could you adjust the crank line to a pre-determined length, marked by a sharpee prior to inserting it into the mast?... probably. But the crank is slooooooo. i did 5 or 6 pulls with the pulleys and the mast was up quick.
I'll give it a try and let you know how it went. Not having to thread pulleys, as mentioned as being a PITA, would be ideal including not having to carry a bundle of extra rope/line, whatever...Thanks.
--
Goodsailing
Laser-Standard Rig (Sold 6/15)
H18 (Sold 7/15)
Building 19' Tacking Outrigger
Balt-Wash Area
--
I'll try that, but hope the mast crutch that holds the crank won't break off.
I'll give it a try and let you know how it went. Not having to thread pulleys, as mentioned as being a PITA, would be ideal including not having to carry a bundle of extra rope/line, whatever...Thanks.
--
Goodsailing
Laser-Standard Rig (Sold 6/15)
H18 (Sold 7/15)
Building 19' Tacking Outrigger
Balt-Wash Area
--
- Rank: Mate
- Registered: Mar 19, 2004
- Last visit: Sep 03, 2025
- Posts: 968
Agree. What is the logic of re-stringing the mainsheet and dealing with all that mess when you could simply use the trailer winch? A hand crank trailer winch has more than enough mechanical advantage to raise a Hobie mast.
sm
- Rank: Mate
- Registered: Feb 18, 2013
- Last visit: Jul 19, 2015
- Posts: 396
You will note on page 3 of the ez mast stepper manual there's a mast hinge comprised of straps which might add to stability of the gin pole holding it verticle. My case is a pin in a socket and there is no stability there, where tension on the lines holds the boom up. So, I'd have to get the boom vertical and with my hand on the winch line, add enough tension while moving down from the tramp towards the winch to get my hand on the crank to take up slack.... OK.. seems better than rigging boom with longer line. Worth trying... Thanks.
--
Goodsailing
Laser-Standard Rig (Sold 6/15)
H18 (Sold 7/15)
Building 19' Tacking Outrigger
Balt-Wash Area
--
--
Goodsailing
Laser-Standard Rig (Sold 6/15)
H18 (Sold 7/15)
Building 19' Tacking Outrigger
Balt-Wash Area
--
- Rank: Lubber
- Registered: Oct 29, 2002
- Last visit: Jun 22, 2016
- Posts: 42
Quite honestly you are so intent your way is the best way your head is up your... Go ahead and put together your custerf@&$ and waiting to se your cat wheels (just my opinion from a cat sailor who has seen a lot in 40 years). I am thru even opening up this thread or your other until your head sees the light of the day.
--
Randy Neubauer
Apple Valley, MN
2001 H18M
--
- Rank: Mate
- Registered: Feb 18, 2013
- Last visit: Jul 19, 2015
- Posts: 396
A tad harsh aren't you. I said I would use the winch not the blocks... OK we're done with getting the mast up... Thanks for your help.
Edited by goodsailing on Apr 09, 2015 - 06:45 PM.
--
Goodsailing
Laser-Standard Rig (Sold 6/15)
H18 (Sold 7/15)
Building 19' Tacking Outrigger
Balt-Wash Area
--

- Rank: Mate
- Registered: Oct 26, 2002
- Last visit: Sep 23, 2019
- Posts: 390
You might check out these gin poles to see if there are any ideas you can incorporate in your pole:
http://www.thebeachcats.com/pictures?g2_itemId=109328
I've designed several that used the trailer winch, all worked fine, just remember to keep the boat tied to the trailer while raising and lowering, or the boat will slide forward at some point, with unfortunate consequences!
Dave
http://www.thebeachcats.com/pictures?g2_itemId=109328
I've designed several that used the trailer winch, all worked fine, just remember to keep the boat tied to the trailer while raising and lowering, or the boat will slide forward at some point, with unfortunate consequences!
Dave
- Rank: Mate
- Registered: Oct 26, 2002
- Last visit: Sep 23, 2019
- Posts: 390
You might check out these gin poles to see if there are any ideas you can incorporate in your pole:
http://www.thebeachcats.com/pictures?g2_itemId=109328
I've designed several that used the trailer winch, all worked fine, just remember to keep the boat tied to the trailer while raising and lowering, or the boat will violently slide forward at some point, with unfortunate consequences!
Dave
Edited by davefarmer on Apr 10, 2015 - 11:20 AM.
- Rank: Mate
- Registered: Feb 18, 2013
- Last visit: Jul 19, 2015
- Posts: 396
Thanks Dave. I scoured this site and the web pretty good. At first, without thinking about using the boom, I built wooden pole from 2 x 4's but felt it too flimsy, plus I broke my hinge because I didn't have the guide wires set up right. I think now I have it dialed in pretty good. The next raising will include using the winch, as one advocated, in order not to have to thread the blocks etc. I actually got the idea for my little part from seeing a video that had a sunken hole in the mast for this purpose. Also, drilling a hole through the end cap as we discussed might gull the parts making it impossible to remove the end cap so... it's up to anyone where to drill if they just want to put a hole there. Good tip about keeping the boat tied down, especially after coming back, you'd might forget to do that...
--
Goodsailing
Laser-Standard Rig (Sold 6/15)
H18 (Sold 7/15)
Building 19' Tacking Outrigger
Balt-Wash Area
--
--
Goodsailing
Laser-Standard Rig (Sold 6/15)
H18 (Sold 7/15)
Building 19' Tacking Outrigger
Balt-Wash Area
--
- Rank: Mate
- Registered: Feb 18, 2013
- Last visit: Jul 19, 2015
- Posts: 396
One of the diamond wire rollers was broke when I bought the boat, and I busted the other one when raising the mast. Part #2 that I destroyed by accident. Cooler crushed it... So, since this is an older boat, with an older sail that might be replaced, do I really need those rollers anyway?
--
Goodsailing
Laser-Standard Rig (Sold 6/15)
H18 (Sold 7/15)
Building 19' Tacking Outrigger
Balt-Wash Area
--
--
Goodsailing
Laser-Standard Rig (Sold 6/15)
H18 (Sold 7/15)
Building 19' Tacking Outrigger
Balt-Wash Area
--
- Rank: Mate
- Registered: Mar 19, 2004
- Last visit: Sep 03, 2025
- Posts: 968
Just tape up the spreader ends and all the little cotter pins really well.
sm
sm
- Rank: Mate
- Registered: Feb 18, 2013
- Last visit: Jul 19, 2015
- Posts: 396
Done. Tks!
--
Goodsailing
Laser-Standard Rig (Sold 6/15)
H18 (Sold 7/15)
Building 19' Tacking Outrigger
Balt-Wash Area
--
- Rank: Master Chief
- Registered: Jun 20, 2006
- Last visit: Dec 04, 2024
- Posts: 7090
You substantially increase the chances of your spreaders poking a hole through your jib (during tack/gybe) without the rollers.
worth the investment - at the very least tape the snot out of the ends to reduce this risk
- Rank: Chief
- Registered: Nov 26, 2009
- Last visit: Sep 03, 2025
- Posts: 2532
+1
If you sail a lot you will find those ends will wear on the jib.
You can buy rollers that snap on to the diamond wires, they are far cheaper than even a single repair to the jib, & once you buy a new(used) jib, you are going to have to buy them anyway.
Use a small zip tie, or wrap of tape just above them, so they don't get stuck near the top when you flip.
http://www.sailcare.com/sailsaver.shtml
Edited by Edchris177 on Apr 11, 2015 - 09:11 AM.
--
Hobie 18 Magnum
Dart 15
Mystere 6.0XL Sold Was a handful solo
Nacra 5.7
Nacra 5.0
Bombardier Invitation (Now officially DEAD)
Various other Dock cluttering WaterCrap
--
- Rank: Mate
- Registered: Mar 19, 2004
- Last visit: Sep 03, 2025
- Posts: 968
The rollers have been broken off my boat for years. I just taped the spreader ends up really well and my jib has been fine other than some minor black marks from the electrical tape I used rubbing off on the sail.
sm
sm
- Rank: Chief
- Registered: Nov 26, 2009
- Last visit: Sep 03, 2025
- Posts: 2532
I use the colored electrical tape, comes in red, green, white & yellow. It does not have that gooey adhesive that the black stuff seems to leave. Not quite as durable as real rigging tape, but for 75 cents a roll at Princess Auto, I'll use it for taping all ring dings etc.
--
Hobie 18 Magnum
Dart 15
Mystere 6.0XL Sold Was a handful solo
Nacra 5.7
Nacra 5.0
Bombardier Invitation (Now officially DEAD)
Various other Dock cluttering WaterCrap
--
- Rank: Mate
- Registered: Feb 18, 2013
- Last visit: Jul 19, 2015
- Posts: 396
Hi, I got the sail up today and it went up a lot easier than expected.
1. I move the blocks for the side tensioners further aft and made them dimetrically opposed for maximum pulling on the tramp wires to keep the mast lined up while it is stepped with the winch.
2. The crank is a pain as it did get away from me and hit my arm..which stopped it from falling... Careful now.
3. The sail did rest on the wires, there was light wind, beautiful day here. I have them taped. Will probably buy diamond wire rollers should I get new sails.. good for now..
4. There's got to be an easier way to pin pins. Those wire do hickys suck. Having to spread the coil to start it through the hole while your holding the roller furler up is clugy. Having tension on the winch made this a lot easier. I couldn't imagine not using some tension on the forestay to pin it properly.
5. I practiced pulling the jib sheet and the pulley lips got caught on the my bungee triangle so I remove the bungee and it fed better. At first I thought the mast gooseneck holder would get in the way of the jib sheet but was not a factor. I'll look into pig tails, if anyone can point me to how to rig that I'd appreciate it.
6. I adjust the tramp tensioners
7. The sail went up and hooked with no problem, after I took off that flapper (thanks Dogboy. The only thing is some of the keepers for battons (mast side) are missing. Not sure what is needed there. Need to look closer at it. String perhaps.
8. I strung new jib down haul line to the eye in the wire that takes up the sail. Not sure of terminology there. Roller fuller works good.
9. I added bungees to the ropes on the dagger boards.
10. Traveler appears working normally...
Nothing left but waiting for beech wheel parts. Should be here this week.
Thanks for all you help thus far..
--
Goodsailing
Laser-Standard Rig (Sold 6/15)
H18 (Sold 7/15)
Building 19' Tacking Outrigger
Balt-Wash Area
--
- Rank: Master Chief
- Registered: Jun 20, 2006
- Last visit: Dec 04, 2024
- Posts: 7090
ringdings can be hard to put on, but they stay on .... good fingernails are essential and as everything here .. it's all about technique
there are "cheater" rings that are easier but they can also get fouled with line much easier - (top rings in image below)
TAPE UP ALL CRITICAL RINGS so they can't get fouled and pulled

"strings" that pull up sails are always called halyards
a better way / place to tie your downhaul PROBABLY is:
tie downhaul line to the furler ring
loop line through tack of jib (front bottom)
run back through furler ring (now a 2:1 purchase)
and repeat till you have a 3 or 4:1 and secure with a rolling hitch or knot of choice
- Rank: Mate
- Registered: Mar 19, 2004
- Last visit: Sep 03, 2025
- Posts: 968
There should be a switch on the winch to turn on the ratchet so it can not free-wheel.
Connecting the forestay to the furler adjuster takes three hands - one to hold up the furler, one to hold the forestay fork aligned with the adjuster, and one to install the clevis pin. A much easier way to connect the forestay on the 18 is to connect the forestay to the furler adjuster before hoisting the mast (bridle wires disconnected from the bow tangs). When the mast is up, install the pins for the bridle wires/bow tangs - this only takes two hands.
This is also better for the bridle wires. If you connect the bridle wires to the bow tangs and let the furler hang down, you will see that the bridle wires want to kink out at the swage fittings for the bow tangs - not good for the wires. When we travel, the bridle wires/furler are completely disconnected from the boat and stored in the trailer box.
sm
- Rank: Mate
- Registered: Feb 18, 2013
- Last visit: Jul 19, 2015
- Posts: 396
Some good tips guys. Not sure why the rachet stop released on the winch. It's rusty. Perhaps I knocked it some how... I've looked at those rings/pins. Yes perhaps pinning at bows would be easier. I had to shave metal off of yoke on the furler to ensure easy alignment of the holes. Not sure why the yoke didn't clear the spool housing. What is the yoke used for? I see no purpose for it. Unless of course if you install a brass ring and run your anchor rode/ retrieve line etc. I intend to buy a shackle and pulley to make the furler line work easier. The weather is getting ideal now and I'm anxious to go sailing.... soon.
--
Goodsailing
Laser-Standard Rig (Sold 6/15)
H18 (Sold 7/15)
Building 19' Tacking Outrigger
Balt-Wash Area
--
--
Goodsailing
Laser-Standard Rig (Sold 6/15)
H18 (Sold 7/15)
Building 19' Tacking Outrigger
Balt-Wash Area
--
- Rank: Master Chief
- Registered: Jun 20, 2006
- Last visit: Dec 04, 2024
- Posts: 7090
not sure what you are talking about here
- Rank: Mate
- Registered: Feb 18, 2013
- Last visit: Jul 19, 2015
- Posts: 396
--
Goodsailing
Laser-Standard Rig (Sold 6/15)
H18 (Sold 7/15)
Building 19' Tacking Outrigger
Balt-Wash Area
--
- Rank: Lubber
- Registered: Oct 29, 2002
- Last visit: Jun 22, 2016
- Posts: 42
The "yoke" you are talking about is the tell-cat (specific type of wind vane) hobie 18 bridle adapter. If you are not going to purchase the tell-cat wind vane then you can just remove the bridle adapter.
--
Randy Neubauer
Apple Valley, MN
2001 H18M
--
--
Randy Neubauer
Apple Valley, MN
2001 H18M
--
- Rank: Mate
- Registered: Nov 02, 2004
- Last visit: Jul 11, 2025
- Posts: 627
That's a mount for a bridle fly..
http://shop.mariner-sails…er-Adapter-HC-CM7705.htm

--
Ron
Nacra F18
Reservoir Sailing Assn.
Brandon, Mississippi
--
- Rank: Administrator
- Registered: Jul 19, 2001
- Last visit: Sep 07, 2025
- Posts: 3460
What holes were you trying to line up? Like said above if you aren't using that particular kind of bridle fly (I like it) then remove that extra bracket.
The bridle wires stay attached to the furler all the time so you shouldn't be needing to line up those holes during rigging.
You either disconnect the jib halyard forestay adjuster from the furler, OR as some have suggested, disconnect the ends of the bridle wires from the bows.
--
Damon Linkous
1992 Hobie 18
Memphis, TN
Join the discussion at the all new TheBeachcats.com Forums HERE.
https://thebeachcats.temp…l.host/forums/site-talk/
--
- Rank: Lubber
- Registered: Oct 29, 2002
- Last visit: Jun 22, 2016
- Posts: 42
Not sure what you are talking about....if your furler is in proper repair it pulls in and out very easily and I don't see how a shackle and pulley on the furling line would be a fix.
--
Randy Neubauer
Apple Valley, MN
2001 H18M
--
- Rank: Mate
- Registered: Feb 18, 2013
- Last visit: Jul 19, 2015
- Posts: 396
The bracket now identified as bridal fly, through that, trough the bridal stays, through the yoke pt# 61980000. Sorry it was the bridal fly, that was shaved. Now that I know what it's for. The metal wasn't bent either. I may be able to adapt my Laser wind indicator, fly etc somehow. But it could be used as a haul/ anchor line, right, or better from bow stays as previously mentioned?
Yes, next raising will include pulling the whole unit down and attaching bridle wires at the bows.
--
Goodsailing
Laser-Standard Rig (Sold 6/15)
H18 (Sold 7/15)
Building 19' Tacking Outrigger
Balt-Wash Area
--
- Rank: Mate
- Registered: Feb 18, 2013
- Last visit: Jul 19, 2015
- Posts: 396
Not my pics, yet from the web...

And, should you chose not to wrap the line around the mast.

$50 for furler refresh kit, plus new line etc, or pulley I already have... etc. There's so many projects with this boat that I might just leave it as is for now...
Thanks for all the tips guys.... boy I love thebeachcats!
--
Goodsailing
Laser-Standard Rig (Sold 6/15)
H18 (Sold 7/15)
Building 19' Tacking Outrigger
Balt-Wash Area
--
- Rank: Lubber
- Registered: Apr 24, 2014
- Last visit: Apr 09, 2017
- Posts: 98
Looking at your pictures, you should totally eliminate the pulley, shackle, and the blue line. Run the white line that exits the furler drum straight back through the cam cleat on your front crossbar (where blue line is now).
--
Tim
81 Hobie 16
87 Nacra 5.7
Austin, TX
--
--
Tim
81 Hobie 16
87 Nacra 5.7
Austin, TX
--
- Rank: Administrator
- Registered: Jul 19, 2001
- Last visit: Sep 07, 2025
- Posts: 3460
OK, that's the "1 to 2" system and was meant to cause the jib to furl twice as fast, I've seen a few done that way.
My opinion.. Totally unnecessary. I've always used the completely stock system, works just fine.
--
Damon Linkous
1992 Hobie 18
Memphis, TN
Join the discussion at the all new TheBeachcats.com Forums HERE.
https://thebeachcats.temp…l.host/forums/site-talk/
--
My opinion.. Totally unnecessary. I've always used the completely stock system, works just fine.
--
Damon Linkous
1992 Hobie 18
Memphis, TN
Join the discussion at the all new TheBeachcats.com Forums HERE.
https://thebeachcats.temp…l.host/forums/site-talk/
--
- Rank: Mate
- Registered: Feb 18, 2013
- Last visit: Jul 19, 2015
- Posts: 396
You are mostly right about that. How many times are you going to be furling the jib anyway during the course of day. What I want to know is do you really need all the jib line. How much pressure is on there taking up up all the slack to close hauled? Do you need as much purchase that you could remove those two blocks up front and just tie lines to the clew and run them back to the blocks on the tramp? Or put blocks on the front xbeam with jam cleat?
--
Goodsailing
Laser-Standard Rig (Sold 6/15)
H18 (Sold 7/15)
Building 19' Tacking Outrigger
Balt-Wash Area
--
- Rank: Mate
- Registered: Feb 18, 2013
- Last visit: Jul 19, 2015
- Posts: 396
Not my pics.... There's not a jam cleat on my front xbeam... I put disclaimer. Pic was only there to answer question.. etc. No problem.. yes just go with stock set up unless furler is fouled then do the refresh kit.. Thanks much..
--
Goodsailing
Laser-Standard Rig (Sold 6/15)
H18 (Sold 7/15)
Building 19' Tacking Outrigger
Balt-Wash Area
--
- Rank: Administrator
- Registered: Jul 19, 2001
- Last visit: Sep 07, 2025
- Posts: 3460
Is this part about the Jib sheets instead of the furling line? If so then yes, you need everything the H18 was designed to use. Or just try it a completely different way and let us know how it goes. You could have found a better way!
- Rank: Mate
- Registered: Feb 18, 2013
- Last visit: Jul 19, 2015
- Posts: 396
Jib sheet. My jib sheet, the blocks, got hung up on the bungee that was put there to prevent catches. The jib sheet blocks are original equipment. I took the bungee off and the lip of the pulley never caught anything. So why did people place the bungee there to begin with. In thinking so differently.
--
Goodsailing
Laser-Standard Rig (Sold 6/15)
H18 (Sold 7/15)
Building 19' Tacking Outrigger
Balt-Wash Area
--
--
Goodsailing
Laser-Standard Rig (Sold 6/15)
H18 (Sold 7/15)
Building 19' Tacking Outrigger
Balt-Wash Area
--

- Rank: Mate
- Registered: Jul 20, 2011
- Last visit: Apr 07, 2019
- Posts: 323
Assuming you find a good set of hobie 18 hulls, you could probably completely design and build a custom 18 footer for less than $4000 thats lighter and faster than an actual hobie 18 ( if you had a few weeks to engineer and source aluminum to make your own crossbeams and mast - or get used ) Heck, If you can figure out how to twine all your own sheets and halyards you could probably get that figure down to $3750 - $3800
Edited by fxloop on Apr 14, 2015 - 06:58 PM.
--
Tim Grover
1996 Hobie Miracle 20
Two Hobie 14's
1983 G-Cat Restored
Memphis TN / North Mississippi
--
Edited by fxloop on Apr 14, 2015 - 06:58 PM.
--
Tim Grover
1996 Hobie Miracle 20
Two Hobie 14's
1983 G-Cat Restored
Memphis TN / North Mississippi
--
- Rank: Mate
- Registered: Feb 18, 2013
- Last visit: Jul 19, 2015
- Posts: 396
No but why was the bungee place there?
Added: I'm building a modified A cat hull 19' for my outrigger... way light and way inexpensive. It took only 2 gal of epoxy and is nearing paint.
Added: the reason I bought the H18 was to take it apart and use the hulls for either an outrigger, and if that didn't work, I'd use both hulls for a trimaran. Now, if you've priced tri's then.. you'll see my reasoning, however, the H18 was in pretty good shape it didn't make sense to take it apart and make another boat from it. The reason I'm referbing it a tad to get some use out of it. Besides, the DIY outrigger is not yet ready of almas, I basically needed another trailer too, as the Laser trailer won't handle the outrigger. Thanks for all your help... this is a great site.
Edited by goodsailing on Apr 14, 2015 - 07:46 PM.
--
Goodsailing
Laser-Standard Rig (Sold 6/15)
H18 (Sold 7/15)
Building 19' Tacking Outrigger
Balt-Wash Area
--
- Rank: Mate
- Registered: Feb 18, 2013
- Last visit: Jul 19, 2015
- Posts: 396
After tapping a patch, I drilled a bunch of holes in the aft port side deck that was separated. I injected a fair amount of resin using the horse needles less the metal needle. Yet didn't fill it. I waited to green stage and removed the tape. Mixed up more resin and repeated. I used squeegee to push resin in holes. I ended doing this 3 times. There must be about a pint in there. Taping was useless. I'll post pic when its cured.
--
Goodsailing
Laser-Standard Rig (Sold 6/15)
H18 (Sold 7/15)
Building 19' Tacking Outrigger
Balt-Wash Area
--
--
Goodsailing
Laser-Standard Rig (Sold 6/15)
H18 (Sold 7/15)
Building 19' Tacking Outrigger
Balt-Wash Area
--
- Rank: Master Chief
- Registered: Jun 20, 2006
- Last visit: Dec 04, 2024
- Posts: 7090
There is a good amount of pressure on the jib sail and sheets - doubtful you could sheet tight enough in medium heavy air or when a storm pops up and you have 25-30mph (or more)
putting blocks on the front beam (like the h16) would change the sheeting angle of your jib sheets, dramatically changing the shape of your jib (not in a good way)
you would also you would lose the 2 way (fore and aft) adjust-ability (a valuable adjuster)
- Rank: Administrator
- Registered: Jul 19, 2001
- Last visit: Sep 07, 2025
- Posts: 3460
The bungee that most H18 sailors rig from dolphin striker support rod, up to the base of the diamond wires and down to the striker rod on the other side is meant to prevent the major problem of the jib sheets getting either snagged on the rotation limiter or even worse getting locked under the rotating mast between the mast base and the mast step ball.
Were your blocks getting snagged on this bungee while you were actually sailing or just in the driveway? I think you'll find it works fine under way.
--
Damon Linkous
1992 Hobie 18
Memphis, TN
Join the discussion at the all new TheBeachcats.com Forums HERE.
https://thebeachcats.temp…l.host/forums/site-talk/
--
- Rank: Administrator
- Registered: Jul 19, 2001
- Last visit: Sep 07, 2025
- Posts: 3460
Yes, you need everything to be setup exactly as designed. If you put jib blocks on the front beam you'd need a custom sail, the H18 jib is too big for that, plus it's not how the boat was designed.
--
Damon Linkous
1992 Hobie 18
Memphis, TN
Join the discussion at the all new TheBeachcats.com Forums HERE.
https://thebeachcats.temp…l.host/forums/site-talk/
--
- Rank: Mate
- Registered: Feb 18, 2013
- Last visit: Jul 19, 2015
- Posts: 396
Driveway. What advantages are using pigtails instead of blocks? Would they too need bungee on dolfin etc?
--
Goodsailing
Laser-Standard Rig (Sold 6/15)
H18 (Sold 7/15)
Building 19' Tacking Outrigger
Balt-Wash Area
--
- Rank: Mate
- Registered: Feb 18, 2013
- Last visit: Jul 19, 2015
- Posts: 396
But I did pull them port to starboard and then back again... snagged up so I removed the bungee. The bungee caught the lip of the older block, org equip, housing.
--
Goodsailing
Laser-Standard Rig (Sold 6/15)
H18 (Sold 7/15)
Building 19' Tacking Outrigger
Balt-Wash Area
--
--
Goodsailing
Laser-Standard Rig (Sold 6/15)
H18 (Sold 7/15)
Building 19' Tacking Outrigger
Balt-Wash Area
--
- Rank: Master Chief
- Registered: Jun 20, 2006
- Last visit: Dec 04, 2024
- Posts: 7090
the bungee system works correctly on the water - the occasional fouling with the bungee is minimal compared to the contoinual snagging that will occur without it (occasionally horrifically like damon's example)
pigtails get hung up on diamond wires and anything else they can (during tack/gybe)
plus more pigtail = less jib sheet needed (and on the deck)
you don't want too much though... it will make sheeting the jib all the way, impossible
Edited by MN3 on Apr 29, 2015 - 10:39 AM.
- Rank: Master Chief
- Registered: Jun 20, 2006
- Last visit: Dec 04, 2024
- Posts: 7090
yard sailing is great for a dry rigging (and real fun with 2 sets of beach wheels), but i (personally) would wait till i had OTW time to make modifications
Edited by MN3 on Apr 29, 2015 - 10:38 AM.
- Rank: Mate
- Registered: Feb 18, 2013
- Last visit: Jul 19, 2015
- Posts: 396
Thanks for the tips...

Should I use the carpet. Won't it just cause drag when pushing the wheels under the boat.
Thanks
--
Goodsailing
Laser-Standard Rig (Sold 6/15)
H18 (Sold 7/15)
Building 19' Tacking Outrigger
Balt-Wash Area
--
Should I use the carpet. Won't it just cause drag when pushing the wheels under the boat.
Thanks
--
Goodsailing
Laser-Standard Rig (Sold 6/15)
H18 (Sold 7/15)
Building 19' Tacking Outrigger
Balt-Wash Area
--
- Rank: Administrator
- Registered: Jul 19, 2001
- Last visit: Sep 07, 2025
- Posts: 3460
Use it. Yes it will create some drag but you want a little drag to keep the boat in place. Especially when putting the boat on the beach wheels in the water.
--
Damon Linkous
1992 Hobie 18
Memphis, TN
Join the discussion at the all new TheBeachcats.com Forums HERE.
https://thebeachcats.temp…l.host/forums/site-talk/
--
- Rank: Mate
- Registered: Feb 18, 2013
- Last visit: Jul 19, 2015
- Posts: 396
OK, Beech Wheels done. The proof will be in the sand.
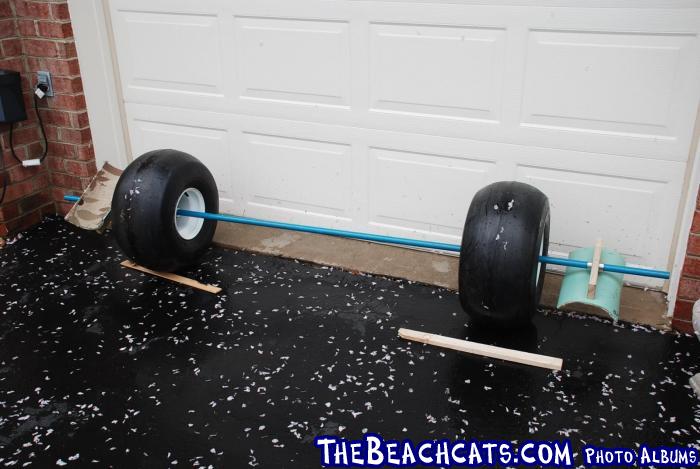
--
Goodsailing
Laser-Standard Rig (Sold 6/15)
H18 (Sold 7/15)
Building 19' Tacking Outrigger
Balt-Wash Area
--
--
Goodsailing
Laser-Standard Rig (Sold 6/15)
H18 (Sold 7/15)
Building 19' Tacking Outrigger
Balt-Wash Area
--
- Rank: Lubber
- Registered: Mar 25, 2002
- Last visit: Oct 20, 2022
- Posts: 5
The lessons I've learned from raising my H-18 mast, with the boat facing forward on the trailer:
Easiest way to raise the mast with 2 people (and by 2, you'll only need the 2nd person for about 60 seconds, if you're relying on a helpful passerby), is to attach a long line to the end of the mainsheet halyard. Lead this forward, to out in front of the tow vehicle (lead it over the top of the mast support arm on the trailer). The helper will pull on this line as you raise it up off the rear crossbar - you'll only need to lift it to waist height, the halyard will take the load from there.
You will need to keep it from swinging to the sides, which is very easy to do if you're not carrying any load while you do it. Use this method one time, you'll never want to do it differently. The helper (pulling on the halyard) doesn't need to be a gorilla either; The mast weighs 50#, but with it being a 28' lever arm to raise it, a child can pull it!
I do have an old step ladder that has been dedicated to the boat, the back/top of the mast rests on it while pinning to the mast base (keep it below/forward of the comp tip), so the mast is already above horizontal to start. The ladder also makes it easier to get up on the tramp to work (you'll appreciate this more once you become AARP eligable).
Lowering it is even easier, as the helper doesn't need to be out in front of the tow vehicle:
Reattach the long line to the halyard ring, wrap this line just once around the trailer tongue; Be sure to lead it over the top of the mast support pole on the trailer (more important when lowering than when raising). Again, you'll be standing on the tramp to simply guide it down, all the load will be taken by the halyard line. It's so effective, that you'll be asking the helper to speed it up when lowering.
I agree with an earlier suggestion to leave the roller furling attached to the bridles, and use the 2 bridle tangs near the front of both hulls to attach/detach. I use a solid pin, quick disconnect type, from Tractor Supply, that's much longer than it needs to be, but has a built in 1/2 circle hinged locking spring on it (It may be called a 'hitch pin', or 'hinge pin'). It's not stainless, but it's held up for 10 years in non-salt use. It's also not stored on the boat, but with the bridle in the storage box. I use these same pins for my Magnum/SX wings too - much faster than clevis rings.
Another advantage of removing the bridles is the ease of walking around the boat when you're working on it, and not having to do the limbo when walking between the hulls (remember AARP reference above).
- Rank: Mate
- Registered: Feb 18, 2013
- Last visit: Jul 19, 2015
- Posts: 396
Thanks for the tips.. yes there's the crux that another person is needed to hurdle which only takes seconds. Good news is: my weight lifting weights have 1" holes so I'll be able to slide some weight over the beech wheel ends and do olympic lifting to build up to the point where I'd be able to heave it myself, but it's doubtfull..... yea we're talking AARP but believe me when I get this on the water those youngins better watch out..
--
Goodsailing
Laser-Standard Rig (Sold 6/15)
H18 (Sold 7/15)
Building 19' Tacking Outrigger
Balt-Wash Area
--
--
Goodsailing
Laser-Standard Rig (Sold 6/15)
H18 (Sold 7/15)
Building 19' Tacking Outrigger
Balt-Wash Area
--
- Rank: Mate
- Registered: Feb 18, 2013
- Last visit: Jul 19, 2015
- Posts: 396
OK, here's the pic of the fixed aft hull. Tighter than Bruce Jners yoga pants. The horse syringe was useful for the first few injections but then I resorted to pouring it in using the paper cups that had the rolled tops cut off. I wouldn't have been able to do that with plastic cups. It took several set ups to fill. As mentioned before the tape prior to drilling was not worth the effort. I'm not worried about looks as if I decided to do the hulls this will be wet sanded before painted. Who said epoxy won't stick to gelcoat... notice how it deepened the color...
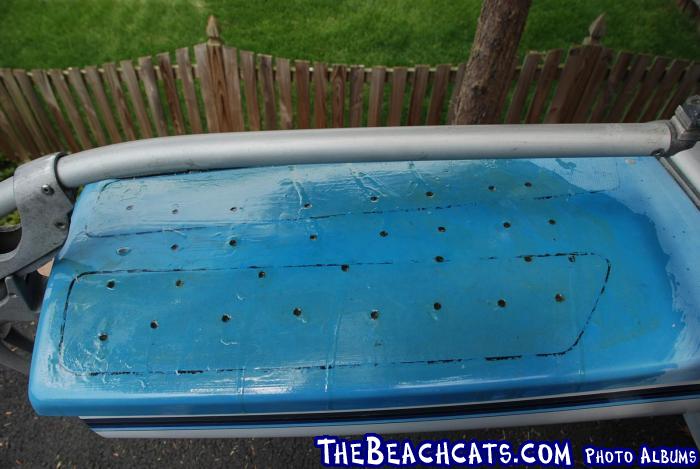
--
Goodsailing
Laser-Standard Rig (Sold 6/15)
H18 (Sold 7/15)
Building 19' Tacking Outrigger
Balt-Wash Area
--
--
Goodsailing
Laser-Standard Rig (Sold 6/15)
H18 (Sold 7/15)
Building 19' Tacking Outrigger
Balt-Wash Area
--
- Rank: Master Chief
- Registered: Jun 20, 2006
- Last visit: Dec 04, 2024
- Posts: 7090
what kind of epoxy?
what kind of filler used in epoxy (if any)?
did you prep the blue gelcoat (sand? anything?)
How spungy was the hull?
what are those marker outlines for (or whatever those shapes are that take up most of the surface)?
Edited by MN3 on May 05, 2015 - 03:38 PM.
what kind of filler used in epoxy (if any)?
did you prep the blue gelcoat (sand? anything?)
How spungy was the hull?
what are those marker outlines for (or whatever those shapes are that take up most of the surface)?
Edited by MN3 on May 05, 2015 - 03:38 PM.
- Rank: Mate
- Registered: Feb 18, 2013
- Last visit: Jul 19, 2015
- Posts: 396
I'd sand everything down to mostly level with hole tops as they are rough, 10 minutes, fill if needed then paint. Was a tad crunchy, yet spungy in the center about 2" wide strip the most recessed area that took most of the resin. The cool thing about this is that the repair will most likely outlast the boat... I wouldn't consider doing a complete hull top as this little section took nearly a pint. Just want a structurally sound hull with little attention to how it looks at the moment. Not sure the markers.... part of the design... not decal; not sure.
--
Goodsailing
Laser-Standard Rig (Sold 6/15)
H18 (Sold 7/15)
Building 19' Tacking Outrigger
Balt-Wash Area
--
- Rank: Mate
- Registered: Feb 18, 2013
- Last visit: Jul 19, 2015
- Posts: 396
Righting Pole: I was going to use an oar but found them too expensive. I just happened to be in an military surplus and saw these fiberglass antenna tubes. I bought 2 for $6. Total cost is under $10 considering hardware. It won't float now but after I stuff them with noodle section I suspect it will float. I put an adjustable line on it that will attach to the righting line that is affixed underneath the hull. All I need to do is get the pole out and attach it to that line. I'm sure it will hold the weight but again: we'll see if it works. The cool thing about this is that you can break it down for storage. I plan on keeping it in two section while sailing then if I need it, just put it together to use it. I used Paulownia wood for the base, a wood that is light weight and won't degrade in salt water the same wood I'm using to build the Hawaiian outrigger. Parts strip planked and others stitch and glue..

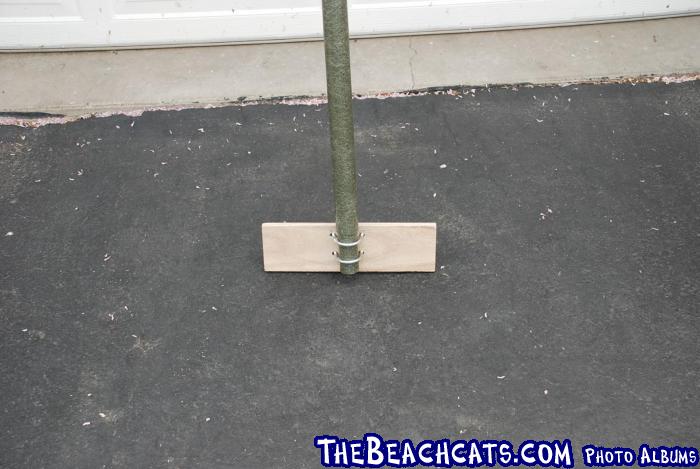
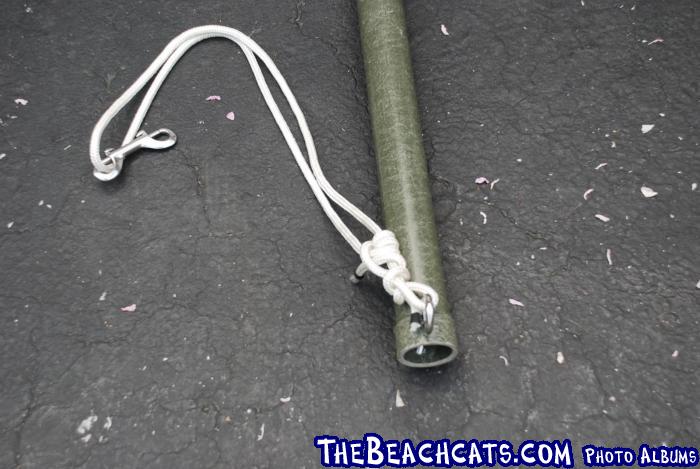
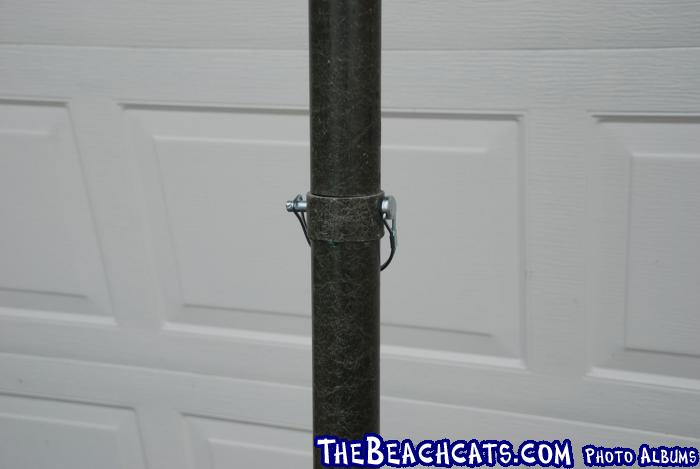
This pretty much concludes the amount of work I'm going to do on the boat as it is time now to go and sail it. I appreciate all the fine tips and encouragement along the way. This is a great site and you guys are fantastic!
I'll post here once I sail it to let know how I made out with the boat. Which if windfinder is telling the truth, it could be as early as tomorrow.
--
Goodsailing
Laser-Standard Rig (Sold 6/15)
H18 (Sold 7/15)
Building 19' Tacking Outrigger
Balt-Wash Area
--
- Rank: Mate
- Registered: Aug 18, 2003
- Last visit: Jul 22, 2025
- Posts: 885
It looks good! I liked the idea of attaching to the righting line, it's a good good improvement compared to rolling a line around the pole. Managing the line with bungee underneath the tramp, which is what I did, is pretty complicated too.
I suggest to try it dry first, it's not hard to capsize the cat on the beach. I would check if the pole resists your weight. I broke an aluminum one the first time so on my current I have also a central line for more protection. it's probably not really needed but I preferred to avoid any risk. It seems a bit long, on the dry test you may find how much length yo really need (plus an extra for wet sails, etc.). I think that lateral movement of the pole could be an issue, if your adjustable line is too long it might not be stable enough. Why not just attaching righting the line directly to the pole? That would allow an attachment point not so far back on the pole and would improve its resistance. (you may walk even past the attachment point if necessary)
I suggest to try it dry first, it's not hard to capsize the cat on the beach. I would check if the pole resists your weight. I broke an aluminum one the first time so on my current I have also a central line for more protection. it's probably not really needed but I preferred to avoid any risk. It seems a bit long, on the dry test you may find how much length yo really need (plus an extra for wet sails, etc.). I think that lateral movement of the pole could be an issue, if your adjustable line is too long it might not be stable enough. Why not just attaching righting the line directly to the pole? That would allow an attachment point not so far back on the pole and would improve its resistance. (you may walk even past the attachment point if necessary)
- Rank: Mate
- Registered: Aug 18, 2003
- Last visit: Jul 22, 2025
- Posts: 885
- Rank: Mate
- Registered: Feb 18, 2013
- Last visit: Jul 19, 2015
- Posts: 396
Good tips, yea I need to adjust when having the boat tilted the reason there's an adjustable knot on the line. I'm not sure having a sliding snap on the righting line would work but you'd find center pretty quick. I may just be able to lay the pole inside the righting line loop etc no knot or adjustment. Yes I could move the eye bolt further in but this pole is pretty strong. I'll start with max leverage then go from there. These are two 4 foot sections= eight feet.
I stuffed it with noodles tonight and now here it is in the pool floating. Glad I have a pool to test stuff... I've done a lot of work back here trying out all kinds of things... I like this as there is no float material on the outside... Pretty clean and lightweight.
Edited by goodsailing on May 05, 2015 - 09:20 PM.
--
Goodsailing
Laser-Standard Rig (Sold 6/15)
H18 (Sold 7/15)
Building 19' Tacking Outrigger
Balt-Wash Area
--
- Rank: Mate
- Registered: Feb 18, 2013
- Last visit: Jul 19, 2015
- Posts: 396
This is a far as I got so far. I've not sailed it yet. I found I need two sets of beech wheels to move the boat solo through the sand at my sailing spot. Much work doing this solo after 1.5 hour drive to beach getting the mast up, and pushing the boat to the water.. perhaps too much for me to handle myself... at this juncture I thought I'd just leave the wheels on the beach instead of carrying them back to the trailer.. if I ever get this boat wet.

--
Goodsailing
Laser-Standard Rig (Sold 6/15)
H18 (Sold 7/15)
Building 19' Tacking Outrigger
Balt-Wash Area
--
--
Goodsailing
Laser-Standard Rig (Sold 6/15)
H18 (Sold 7/15)
Building 19' Tacking Outrigger
Balt-Wash Area
--
- Rank: Mate
- Registered: Mar 19, 2004
- Last visit: Sep 03, 2025
- Posts: 968
If I recall, one of your first questions on this forum was whether or not a Hobie 18 was an appropriate boat for single handing. My response was that it is doable, but not ideal and that there are better boats out there if you primarily plan to solo sail. Now you are probably starting to understand why....
sm
sm
- Rank: Mate
- Registered: Jul 20, 2011
- Last visit: Apr 07, 2019
- Posts: 323
For that kind of trailering, setup time and long way to the beach, why not just buy a Hobie 16 ect for solo days and take the 18 out when you've got crew? 400+ lbs going up hill on soft sand on wheels a good distance is still gonna wipe you out lol.
--
Tim Grover
1996 Hobie Miracle 20
Two Hobie 14's
1983 G-Cat Restored
Memphis TN / North Mississippi
--
--
Tim Grover
1996 Hobie Miracle 20
Two Hobie 14's
1983 G-Cat Restored
Memphis TN / North Mississippi
--
- Rank: Master Chief
- Registered: Jun 20, 2006
- Last visit: Dec 04, 2024
- Posts: 7090
removed
Edited by MN3 on May 13, 2015 - 12:42 PM.
Edited by MN3 on May 13, 2015 - 12:42 PM.
- Rank: Mate
- Registered: Feb 18, 2013
- Last visit: Jul 19, 2015
- Posts: 396
I watched a kayak fisherman take his boat off the car and went out. As I was getting the boat on the trailer he came back in. Nice to get on the water. I realize this was going to be a project. I didn't go sailing as the winds picked up and there were T storms in the area. Plus I may have been somewhat intimated being a new boat to fly so all in all I'm satisfied. Also, I had offers to help push the boat so people were right saying that curious on lookers might offer help. I declined the help to see if I could do it myself which I did do, so.... I can now get it to the water and back to the the trailer. I now have a system that I'm sure I can reduce the set up time with a few runs. Next up is sailing the boat.... and I'm looking forward to doing that soon. I appreciate all the help thus far. You've been fantastic!
OH, I've not got the boat out of the water yet so that's another hurdle especially if there's a few gallons in the hulls etc..
--
Goodsailing
Laser-Standard Rig (Sold 6/15)
H18 (Sold 7/15)
Building 19' Tacking Outrigger
Balt-Wash Area
--
OH, I've not got the boat out of the water yet so that's another hurdle especially if there's a few gallons in the hulls etc..
--
Goodsailing
Laser-Standard Rig (Sold 6/15)
H18 (Sold 7/15)
Building 19' Tacking Outrigger
Balt-Wash Area
--
- Rank: Mate
- Registered: Feb 18, 2013
- Last visit: Jul 19, 2015
- Posts: 396
I think it would be easy enough to get a crew around here... my adult kids might go if they can be peeled from their iphones and computers god forbid water could ruin electronics! HA
--
Goodsailing
Laser-Standard Rig (Sold 6/15)
H18 (Sold 7/15)
Building 19' Tacking Outrigger
Balt-Wash Area
--
- Rank: Master Chief
- Registered: Jun 20, 2006
- Last visit: Dec 04, 2024
- Posts: 7090
nice!
now don't be to shy or proud to accept offers or even ask someone to help pull your "safety" line (line tied to your forestay" while you step the mast
most small boaters want everyone to have a fun time and like to help
esp other sailors
Edited by MN3 on May 13, 2015 - 03:28 PM.
- Rank: Mate
- Registered: Feb 18, 2013
- Last visit: Jul 19, 2015
- Posts: 396
Yea the last time I was here I helped a young man carry his kayak to the end of the ramp to his car and helped him put it on his roof. He said he'd help me if I needed. The last thing I heard was his car door shut and he drove off ... no thank you, no asking if he could help me. Then again, he wasn't a sailor but a fishing kayaker..
--
Goodsailing
Laser-Standard Rig (Sold 6/15)
H18 (Sold 7/15)
Building 19' Tacking Outrigger
Balt-Wash Area
--
- Rank: Master Chief
- Registered: Jun 20, 2006
- Last visit: Dec 04, 2024
- Posts: 7090
what more do you need?
I used to be very afraid of dropping my mast on someone on our very busy beach, and it stopped me from sailing a lot (i wouldn't rig solo)
If you speak up, (most) people are glad to help you get in the water. I am sure of this. many may act pissed, or gruff but don't let that stop you from sailing ... even if they act that way, they like being the "authority" and helping ... (been there, done that)
now that i have rigged over 1000 times there, i can tell you it's not a big deal to ask for help, and you should be willing to help other boaters ...
Edited by MN3 on May 13, 2015 - 06:17 PM.
- Rank: Mate
- Registered: Feb 18, 2013
- Last visit: Jul 19, 2015
- Posts: 396
From that guy, some courtesy perhaps. There will be plenty of people there in no time. I'm not afraid to ask for help, but around here, there's usually no one around when it's cooler and the wind is blowing, the reason I need to be able to do this solo. The state police and coast guard are on the park grounds so if I run into a real problem I suspect I could find plenty of help if needed. Getting the boat to the water is no problem... I'll learn soon what it is like getting it out of the water back to the car.
--
Goodsailing
Laser-Standard Rig (Sold 6/15)
H18 (Sold 7/15)
Building 19' Tacking Outrigger
Balt-Wash Area
--
- Rank: Master Chief
- Registered: Jun 20, 2006
- Last visit: Dec 04, 2024
- Posts: 7090
good luck with that....
(IMHO)
the guy offers to help you if you need it - that is the moment you should focus on and say "thanks I may ...", not when he leaves without saying goodbye - seize the moment (i am really not telling you how to live your life, just how to help you or others with my experiences)
If you walk up to me when i am in a bad mood, or have been distracted by other people asking me questions and messing me up while rigging, or i am just back from a sail and broke or lost something, or was cut off by powerboaters, or a bird just pooped on my head ... your gonna get some attitude from me ....
walk up to me when everthing is going smoothly and your likely to get a nicer version of me .... nothing personal but rigging/boating is very intense, dangerous and hard work .. i don't have my "best attitude" on auto-smile
EITHER way, i am more than happy to help someone step their mast, or push their boat up the beach .... i just may or may not smile.
try not to take things personally or be sensitive - boating can be the best of times, or the worst day ever (all depending on how smoothly things go) - and you never know what kinda day (or trials and tribulations) the other person has just had
again most small boaters want to see you succeed, and are happy to help, even if they don't look like it (except powerboaters and jetskis - they want to run over you at full speed )
Edited by MN3 on May 14, 2015 - 10:05 AM.
- Rank: Mate
- Registered: Feb 18, 2013
- Last visit: Jul 19, 2015
- Posts: 396
I didn't think much of it really... he probably didn't get any fish. The guys in RI who were fixing their moths didn't even acknowledge my presence when I approached them while they were rigging their boats, and even after asking one question about the boat.
So what, As we've learned getting a boat ready quickly is on most peoples minds when the day wears on. I would not want to rig a moth, let alone try to get up on one.
--
Goodsailing
Laser-Standard Rig (Sold 6/15)
H18 (Sold 7/15)
Building 19' Tacking Outrigger
Balt-Wash Area
--
- Rank: Master Chief
- Registered: Jun 20, 2006
- Last visit: Dec 04, 2024
- Posts: 7090
during a race, or with very expensive and fragile boats, you wont get much help and may be completely ignored
just like yesterday when the JC sailed in from Miami and was instantly on camera for a few questions ... he completely ignored the questions and focused on his $50,000 catamaran
my 31' mast is a beast ...
my big cat can be almost 2 hours (or my 5.5 if i am rigging a spin)
Edited by MN3 on May 14, 2015 - 10:56 AM.
- Rank: Mate
- Registered: Feb 18, 2013
- Last visit: Jul 19, 2015
- Posts: 396
Just saw 5 people get a cat out of the surf for FL 300. I'm only wondering how much help I'll need getting out of the water. Saturday.. I'll know more.
--
Goodsailing
Laser-Standard Rig (Sold 6/15)
H18 (Sold 7/15)
Building 19' Tacking Outrigger
Balt-Wash Area
--
--
Goodsailing
Laser-Standard Rig (Sold 6/15)
H18 (Sold 7/15)
Building 19' Tacking Outrigger
Balt-Wash Area
--
- Rank: Master Chief
- Registered: Jun 20, 2006
- Last visit: Dec 04, 2024
- Posts: 7090
it's more technique than muscle
get the wheels dead on CG and secure them so they can't slip
get on the bows or sterns and push uphill
if you have a long beach, go wide and zig zag if not .. push harder
easy ( i do it every week, often solo)
get the wheels dead on CG and secure them so they can't slip
get on the bows or sterns and push uphill
if you have a long beach, go wide and zig zag if not .. push harder
easy ( i do it every week, often solo)
- Rank: Mate
- Registered: Feb 18, 2013
- Last visit: Jul 19, 2015
- Posts: 396
Took muscle to get this up off the small grade beach. Also your technique of lashing the wheels to the xbeam kept wheels from slipping backwards as muscle pushed. Thanks for the tip as I worked hard to keep the extra hands interested in hanging in there. Quad wheels worked. Not sure if only one set would have done the trick.
http://www.thebeachcats.c…c/15587/start/0#pid56195
--
Goodsailing
Laser-Standard Rig (Sold 6/15)
H18 (Sold 7/15)
Building 19' Tacking Outrigger
Balt-Wash Area
--
http://www.thebeachcats.c…c/15587/start/0#pid56195
--
Goodsailing
Laser-Standard Rig (Sold 6/15)
H18 (Sold 7/15)
Building 19' Tacking Outrigger
Balt-Wash Area
--
- Rank: Mate
- Registered: Feb 18, 2013
- Last visit: Jul 19, 2015
- Posts: 396
I can't remember if I covered this or not but what lube are you using for main luff to help it glide to the top? I used some snow ski wax, just rubbing the hard wax on the rope. That seemed to help, but is there anything that would work better?
--
Goodsailing
Laser-Standard Rig (Sold 6/15)
H18 (Sold 7/15)
Building 19' Tacking Outrigger
Balt-Wash Area
--
--
Goodsailing
Laser-Standard Rig (Sold 6/15)
H18 (Sold 7/15)
Building 19' Tacking Outrigger
Balt-Wash Area
--
- Rank: Lubber
- Registered: Oct 29, 2002
- Last visit: Jun 22, 2016
- Posts: 42
]
--
Randy Neubauer
Apple Valley, MN
2001 H18M
--
--
Randy Neubauer
Apple Valley, MN
2001 H18M
--
- Rank: Mate
- Registered: Feb 18, 2013
- Last visit: Jul 19, 2015
- Posts: 396
Thanks for the tip.
Does it work. How about simply wetting the sail with water, as lube. Part that goes up the mast.
--
Goodsailing
Laser-Standard Rig (Sold 6/15)
H18 (Sold 7/15)
Building 19' Tacking Outrigger
Balt-Wash Area
--
Does it work. How about simply wetting the sail with water, as lube. Part that goes up the mast.
--
Goodsailing
Laser-Standard Rig (Sold 6/15)
H18 (Sold 7/15)
Building 19' Tacking Outrigger
Balt-Wash Area
--
- Rank: Lubber
- Registered: Mar 25, 2002
- Last visit: Oct 20, 2022
- Posts: 5
Sailkote is the best dry lube you can use. Spray on both sail luff, and mast sail track. Then spray every pulley, cam cleat, roller furling, mast base/ball, traveller track, and mainsheet blocks with this stuff. Keep going - trailer rollers, winch pulley, etc.
I also use it on the trailer hitch & ball; I know that white lithium grease is suggested for the hitch ball lubrication, but it's messy, and gets on your legs & pants when youi brush against it.
There is a lower cost teflon spray that I saw at Lowes last week, ~$4.75/ can ('Blaster' brand, same company that makes PB Blaster (for rusty bolts/nuts)). I don't know how it will hold up around water, or how else it compares to Sailkote, I hope someone else can report on that..
- Rank: Mate
- Registered: Feb 18, 2013
- Last visit: Jul 19, 2015
- Posts: 396
Ok thanks. I put no grease on ball. You'll have to drive 5 million miles for that ball to wear. Saves messy cloths.
--
Goodsailing
Laser-Standard Rig (Sold 6/15)
H18 (Sold 7/15)
Building 19' Tacking Outrigger
Balt-Wash Area
--
- Rank: Lubber
- Registered: Apr 24, 2014
- Last visit: Apr 09, 2017
- Posts: 98
You probably already know this from your Laser experience, but ensuring that the boat is pointed DIRECTLY into the wind so that the main flows straight back from the mast helps immensely. Keeping the sail in line with the sail track vastly reduces the drag of the bolt rope on the mast track. Also, hand feed the sail adjacent to each batten into the sail track.
--
Tim
81 Hobie 16
87 Nacra 5.7
Austin, TX
--
--
Tim
81 Hobie 16
87 Nacra 5.7
Austin, TX
--
- Rank: Mate
- Registered: Feb 18, 2013
- Last visit: Jul 19, 2015
- Posts: 396
Thanks for the help guys!
See THIRD SPLASH
--
Goodsailing
Laser-Standard Rig (Sold 6/15)
H18 (Sold 7/15)
Building 19' Tacking Outrigger
Balt-Wash Area
--