Copyright TheBeachcats.com

Please Support
TheBeachcats.com
The Hobie 20 sports an advanced tiller connection with features of easy disassembly, accurate turning, no binding, and reduced or eliminated slop. All other models, however, have a bolt with spacers, a spring, and a nylon lock nut. The same kit (part number 1953, $104) from Hobie will add these features to the 14, 16, 17, 18, and 21 cruiser.
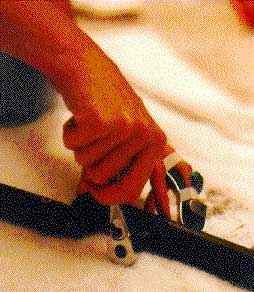 We'll start by removing the existing rudder connectors. The stock systems will have a bolt attaching the adjuster kit to the tiller crossbar. Remove the bolt
and slide the kit out of the crossbar. We'll start by removing the existing rudder connectors. The stock systems will have a bolt attaching the adjuster kit to the tiller crossbar. Remove the bolt
and slide the kit out of the crossbar.
|
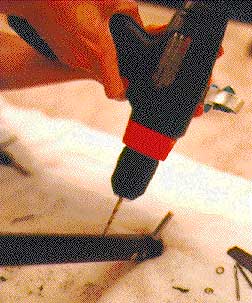
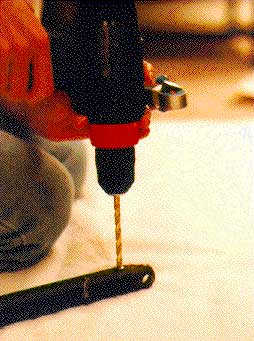 Now, remove the rudder arm end cap from the rudder arms. Drill out the two rivets on each side of the rudder arm using about a 5/16" drill bit and knock off the rivet head. Now, remove the rudder arm end cap from the rudder arms. Drill out the two rivets on each side of the rudder arm using about a 5/16" drill bit and knock off the rivet head.
Then place the nail in the rivet hole and give a sharp blow with the hammer. This will force the rivet body into the rudder arm. Remove the end cap. Repeat for the other rudder arm. Next, we'll install the threaded delrin end cap of the Hobie 20 kit on the rudder crossbar. This piece is attached with two screws since rivets would get in the way of the adjustment arm that will screw into it. |
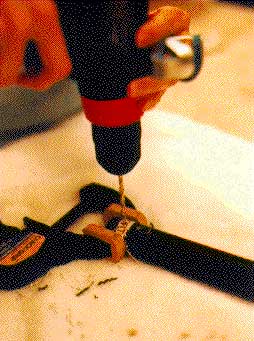 Insert the end cap into the PORT side of the
rudder crossbar, hold it in place with a clamp, and drill two #25 holes 180 degrees apart
7/16" from the edge of the rudder arm. Insert the end cap into the PORT side of the
rudder crossbar, hold it in place with a clamp, and drill two #25 holes 180 degrees apart
7/16" from the edge of the rudder arm.
|
 Make sure that the threaded end cap is clamped tightly against the end of the crossbar
while drilling. This will help this relatively short piece not to wobble once the screws are
in place. Make sure that the threaded end cap is clamped tightly against the end of the crossbar
while drilling. This will help this relatively short piece not to wobble once the screws are
in place.
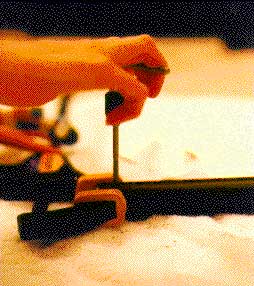
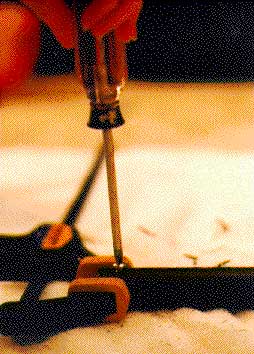
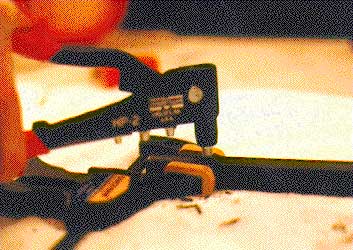
While still clamped, tap the two holes just drilled using a #10-24 tap: |
 Now, insert two of the supplied #10-24x1/4" phillips pan head screws into the just
tapped holes: Now, insert two of the supplied #10-24x1/4" phillips pan head screws into the just
tapped holes:
|
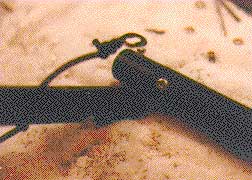
 Insert the provided screw adjustment arm into the threaded end cap just installed: Insert the provided screw adjustment arm into the threaded end cap just installed:
|
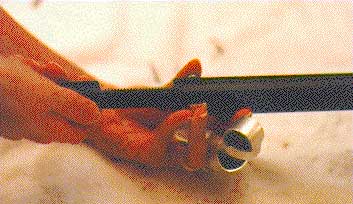
 Next, we'll install the solid end cap in the starboard side of the rudder crossbar. Attach
it with a clamp and line up the hole in the Hobie 20 solid end cap with the existing hole in the
crossbar. Lining up these two holes will ensure that the tiller yoke assembly (the Y
piece that holds the hotstick) will be in the proper place. Next, we'll install the solid end cap in the starboard side of the rudder crossbar. Attach
it with a clamp and line up the hole in the Hobie 20 solid end cap with the existing hole in the
crossbar. Lining up these two holes will ensure that the tiller yoke assembly (the Y
piece that holds the hotstick) will be in the proper place.
|
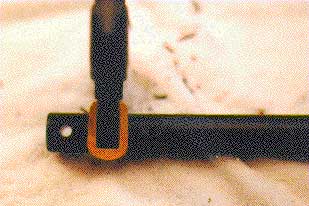
 Drill two #11 (3/16") holes 180 degrees apart 1/2" from the crossbar end. Fasten the
solid end cap with two provided rivets. Drill two #11 (3/16") holes 180 degrees apart 1/2" from the crossbar end. Fasten the
solid end cap with two provided rivets.
|
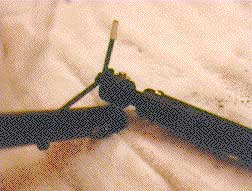
 Move on to the rudder arms. Insert the provided Hobie 20 post assembly in the rudder arms
and hold with a clamp. Drill two #11 (3/16") holes 180 degrees apart 1 and a 1/4" from
the end of the rudder arm. I placed mine so that they would end up on the rudder arm
sides. Insert and pull provided rivets in new holes. CAUTION: don't be tempted to use
the existing rudder arm end cap holes! The swivel mechanism within the post assembly
extend deep into its sleeve. Move on to the rudder arms. Insert the provided Hobie 20 post assembly in the rudder arms
and hold with a clamp. Drill two #11 (3/16") holes 180 degrees apart 1 and a 1/4" from
the end of the rudder arm. I placed mine so that they would end up on the rudder arm
sides. Insert and pull provided rivets in new holes. CAUTION: don't be tempted to use
the existing rudder arm end cap holes! The swivel mechanism within the post assembly
extend deep into its sleeve.
Repeat the swivel assembly installation for the other rudder arm. |
 The last step is to attach the provided retainer clips. This will not only keep you from
losing them (don't, because they are over $7 each to replace), but it holds them in a
locked position. The instructions that came with the Hobie 20 kit called for a 5/16" hole in
the rudder arm. The kit also comes with 1/4" shock cord. This seemed like overkill to
me. I also did not like the idea of drilling this huge 5/16" hole in the rudder arm. I felt I
could get adequate tension with 3/16" shock cord. It would also be easier to tie on the
retainer clip and remain fastened. The last step is to attach the provided retainer clips. This will not only keep you from
losing them (don't, because they are over $7 each to replace), but it holds them in a
locked position. The instructions that came with the Hobie 20 kit called for a 5/16" hole in
the rudder arm. The kit also comes with 1/4" shock cord. This seemed like overkill to
me. I also did not like the idea of drilling this huge 5/16" hole in the rudder arm. I felt I
could get adequate tension with 3/16" shock cord. It would also be easier to tie on the
retainer clip and remain fastened.
So, drill a 1/4" hole 3 1/4" from the end of the rudder arm. Position the hole such that it will be vertical when the rudder is on the boat. |
 File the hole edges just drilled so that the inserted shock cord does not get cut. Insert
the shock cord through the hold and tie off the bottom. Attach the retainer clip with a
couple of knots. Repeat for the other rudder arm. File the hole edges just drilled so that the inserted shock cord does not get cut. Insert
the shock cord through the hold and tie off the bottom. Attach the retainer clip with a
couple of knots. Repeat for the other rudder arm.
|
 Mount the rudders on the boat. Place the provided nylon spacer washer on each post
and attach the crossbar with the PORT marking on the port side. Attach the retainer
clips. Mount the rudders on the boat. Place the provided nylon spacer washer on each post
and attach the crossbar with the PORT marking on the port side. Attach the retainer
clips.
|
| Align the rudders by placing the boat on a trailer, rudders down, and measure the forward edge distance compared to the trailing edge distance. Adjust the rudder alignment by removing the port retainer clip and adjusting the screw adjustment arm on the port side of the connector arm. If you trailer with your rudders off, you may want to mark your parallel position on the threads (or count the threads) in case the screw adjuster is turned accidentally off the boat. |
| For the Hobie 16, the measured rudder edge distance should be 1/8" to 1/4" less on the forward edge than the trailing edge. For other symmetrical hulled boats the rudders should be parallel. For parallel rudder boats you can get a more accurate alignment by having the rudders in the up position. This will give more length for the parallel measurement. |
| Congratulations! You are now ready to go for a test sail. I have sailed a couple of times since installing this kit. The feel and reduced slop is excellent. Definitely well worth the cost and trouble to install. |
|
Originally submitted to "On The Wire Ezine" by Gary Willcox
|