Welcome anonymous guest

Please Support
TheBeachcats.com

Hobie 18 sailors, intel, suggestions requested.  Bottom

Go to page [-1] 1 - 2:

  • Got the album to work.
    http://www.thebeachcats.com/pictures?g2_itemId=120185
    It's pretty grungy on the hulls, but I think it will clean up nicely. I took a rubber block & 400 grit wet/dry to a few spots. They came out pretty nice, it's not actually a white boat!
    I appreciate all the suggestions, & anything else people might notice from the photos. I would sooner do pre-emptive work, based on others experience, rather than reinvent the wheel.
    QuoteIf the blades are black with fibers showing, then they are likely original EPO rudders.

    If you go to the album & select max size, you can just see what looks like fibres.
    http://www.thebeachcats.com/gallery2/main.php?g2_view=core.DownloadItem&g2_itemId=120261&g2_serialNumber=4
    QuoteThere are upgraded anchor kits for the front crossbar and the shrouds.

    Is this the upgrade? If so, should the bolts still be changed out?
    http://www.thebeachcats.com/gallery2/main.php?g2_view=core.DownloadItem&g2_itemId=120247&g2_serialNumber=4
    Quote The front crossbars have a tendency to crack near the mast step rivets.

    There are no visible cracks on either side.
    http://www.thebeachcats.com/gallery2/main.php?g2_view=core.DownloadItem&g2_itemId=120304&g2_serialNumber=4
    The front crossbar does not appear to have the upgraded anchor.
    http://www.thebeachcats.com/gallery2/main.php?g2_view=core.DownloadItem&g2_itemId=120307&g2_serialNumber=4
    The rear traveler seems to run on one "ball",(left side) & one "slug", (hidden on the right). Is that normal?
    http://www.thebeachcats.com/gallery2/main.php?g2_view=core.DownloadItem&g2_itemId=120316&g2_serialNumber=4

    What is the difference between the H18 SE, SX, & Magnum models?
    I think the mainsail has "18SE" written on it in pencil, from the manufacturer. I see what looks like "SX" written on the underside of the tramp.
    The mast measures 28'1".
    http://www.thebeachcats.com/gallery2/main.php?g2_view=core.DownloadItem&g2_itemId=120310&g2_serialNumber=4


    Edited by Edchris177 on Nov 05, 2015 - 11:17 AM.

    --
    Hobie 18 Magnum
    Dart 15
    Mystere 6.0XL Sold Was a handful solo
    Nacra 5.7
    Nacra 5.0
    Bombardier Invitation (Now officially DEAD)
    Various other Dock cluttering WaterCrap
    --
  • the ball and slug is normal. you can also run two slugs, i prefer ball and slug as it's easier to get in and out for repairs or changing the bearings. these wear down quick, i've had them pop out on me while sailing. you can purchase new ones at murrays.com, they call them the traveler "ball" and "cylinder".

    i've always been under the impression those anchors under the rails of the hulls are for greater support for wings/shrouds, and came on the sx, but i could be mistaken. i'm pretty sure only the sx came with them and not the se. the sx has a longer mast, but you shouldn't have any major problems running an se sail. pretty sure the magnum is just an se with wings. se and magnum have a 28'-1" mast and sx has a 29'-7". you may have a bit of frankenstein on your hands.

    as for cleaning rent a power washer. it'll be looking brand new real fast. be wary of power washing any soft spots on the hulls to powerfully. strip the tramps off, all of the lines, and power wash those too. i've done this with a number of hobies donated to the sailing program i run, and they come out looking like they just rolled out of mr. alters garage. good luck!
  • The rudders look like EPOs. You can clean them up with a little elbow grease and some relatively inexpensive materials. A quick overview of the process I've used - knock off loose fibers and scuff up the surface using 150 - 220 grit paper. Paint on a coat of epoxy resin (one side at a time). Sand down to a dull finish. Recoat with epoxy and repeat if necessary. Shoot with two coats of flat black spray paint. Wet sand up to 1500 grit.

    Your boat also has the upgraded rudder castings.

    You have the upgraded hull anchors on the shrouds. These should also be added to the front crossbar, especially if it is a red glue boat. The screws for the existing shroud plates do not need to be replaced, but you should check to make sure they're tight.

    Your boat is an 18 magnum. The SX would have a longer mast (29'-6"). It would also have a comptip which your boat does not have, and SX wings (your boat has magnum wings).

    The only other thing I would suggest would be changing out the access ports. Your boat has the original pop-in ports. I would switch these out for screw-in ports. The problem with the pop-in ports is that over time, the pull up/push down action required to install and remove them will eventually flex the deck to the point that it causes it to go soft.

    sm
  • You got a great deal, the rudder castings alone are worth what you paid! And so are the wings!

    The boat has some nice upgrades, someone was taking care of it once upon a time.

    The mast step needs a new mast step bearing kit. The screw head should be above the plastic, it is digging into the mast base hinge.

    http://www.murrays.com/01-4045.html

    Agree with Dogboy on changing out the access ports to screw-in type.

    --
    Damon Linkous
    1992 Hobie 18
    Memphis, TN

    How To Create Your Signature

    How To Create Your Own Cool Avatar

    How To Display Pictures In The Forums.
    --
  • Quoteas for cleaning rent a power washer. it'll be looking brand new real fast. be wary of power washing any soft spots on the hulls to powerfully. strip the tramps off, all of the lines, and power wash those too.

    I soaked all lines in a bucket of hot water & oxyclean overnight, then threw them in the wash, on HOT, again with more Oxyclean. Despite knowing better,(and not being able to locate the wife's' bra bags)I just tossed them in. They came out looking nearly new, but, looked like hangman's noose & spaghetti thrown against a wall. Took 1/2 hour to untangle.
    I went over every inch of the hulls yesterday, there are zero soft spots. The high load/wear areas are all solid, probably due to no hard sailing. The lake it lived on since new is tiny,down in a hollow, it would never see waves/swells. I also confirmed it is not a "redline", the glue is black.
    I have a gas washer, so went at it for over 3 hours yesterday. The tramps came out looking new. Took all the algae & dirt off the mesh & hiking straps. I don't think they are original, they are in to good of condition.
    The boat took quite a bit of time. The worst is the non slip. Every small ridge blocks the spray, & leaves a very fine line of grunge. You have to go at it from all 4 directions to get it completely clean.
    I also recommend a mechanics stool, with wheels. You need to be able to move along the hull, & precisely control the power wand, or you will eat the speed lines. By holding the wand a few inches from the end, you can strip within an 1/8" of the lines.
    The boat came out looking very nice, though it left a stream of blue/white water running onto the lawn. Maybe the chinch bugs will eat it & die!
    I was going to order a quart of heavy compounding solution, but I think 70% of the oxidation stripped off with the washer. I'm going to go with light compound/polish in the spring.
    Added full size photos to the album.
    http://www.thebeachcats.com/gallery2/main.php?g2_view=core.DownloadItem&g2_itemId=120325&g2_serialNumber=4
    What I thought was black anti skid is actually just grunge
    http://www.thebeachcats.com/gallery2/main.php?g2_view=core.DownloadItem&g2_itemId=120328&g2_serialNumber=4
    http://www.thebeachcats.com/gallery2/main.php?g2_view=core.DownloadItem&g2_itemId=120331&g2_serialNumber=4
    Hulls totally cleaned. The tramps are hanging in the background, on the lightpole to dry.
    http://www.thebeachcats.com/gallery2/main.php?g2_view=core.DownloadItem&g2_itemId=120341&g2_serialNumber=4
    For its age, the boat is fairly free of dings & dents.
    http://www.thebeachcats.com/gallery2/main.php?g2_view=core.DownloadItem&g2_itemId=120344&g2_serialNumber=4
    Now parked in the backyard for the winter. I know it's not ideal, the trees are oaks, they don't tend to come down in storms.
    http://www.thebeachcats.com/gallery2/main.php?g2_view=core.DownloadItem&g2_itemId=120347&g2_serialNumber=4


    Edited by Edchris177 on Nov 17, 2015 - 12:00 PM.

    --
    Hobie 18 Magnum
    Dart 15
    Mystere 6.0XL Sold Was a handful solo
    Nacra 5.7
    Nacra 5.0
    Bombardier Invitation (Now officially DEAD)
    Various other Dock cluttering WaterCrap
    --
  • I removed the beams to check for corrosion,(and to make comounding/polishing easier) things look OK.
    Can anyone shed light on this sticker, re, "new style beams".
    Is the difference just black anodized vs the older "clear" beams?
    http://www.thebeachcats.com/gallery2/main.php?g2_view=core.DownloadItem&g2_itemId=120356&g2_serialNumber=4&g2_GALLERYSID=102e8c9c4d097f950b2fba43158cd905
    This is the only crack I can find on the shroud anchors & front beam attach.
    I've found 4 of the improved anchor plates to reinforce the front beam, & will add the internal glass tab in the spring.
    From the anchor pin threads being the same diameter as the pin, and the pin being non magnetic, I'm pretty sure they are old style. When viewing under loupe, I see no sign of any cracks, but if $70 prevents a dismasting, I think I'll replace them.
    http://www.thebeachcats.com/gallery2/main.php?g2_view=core.DownloadItem&g2_itemId=120360&g2_serialNumber=3
    http://www.thebeachcats.com/gallery2/main.php?g2_view=core.DownloadItem&g2_itemId=120368&g2_serialNumber=4

    --
    Hobie 18 Magnum
    Dart 15
    Mystere 6.0XL Sold Was a handful solo
    Nacra 5.7
    Nacra 5.0
    Bombardier Invitation (Now officially DEAD)
    Various other Dock cluttering WaterCrap
    --
  • Hobie changed the design of the internal casting for the inboard crossbar bolts early on. I believe that is what the sticker refers to. Check around the inboard rivets for cracks, make sure the traveler dead eye is secure and not corroding the crossbar, make sure there are no cracks around the mast step, make sure the mast step is firmly riveted to the crossbar and the dolphin striker rod is tight.

    sm
  • Boat is now completely disassembled. No cracks of any size were found in either beam. New hatches on order, along with a complete set of standing rigging. Still waiting for the front beam anchor plates to show up, though it may not get warm enough for epoxy work til spring.
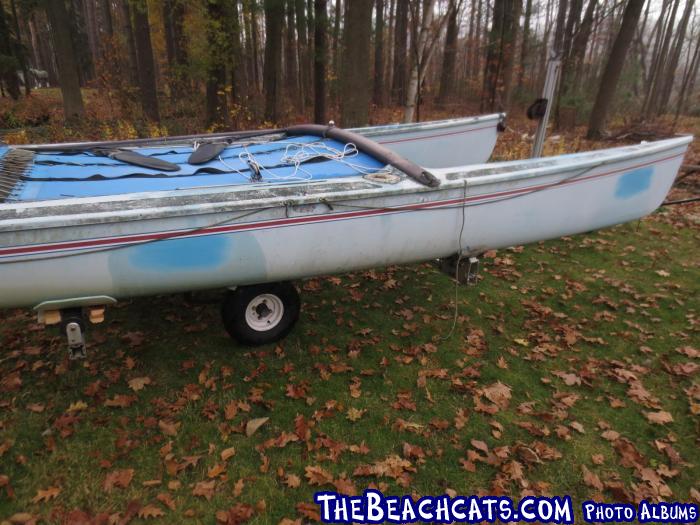
    In the meantime I decided I did not want to look at those chalky hulls sitting in the backyard all winter.
    I wet sanded both hulls with 600 grit, to remove the worst of the oxidation. The good news is, oxidation is pretty soft, & comes off without much real work. The sides are easy, it's getting into all the small places that takes time. I removed all hardware except the gudgeons, which would have greatly simplified the sterns. Total time, around 5 hours.
    Next, I hinted to my wife that #1 Daughter should get me a soft start/variable speed automotive polisher for Christmas, & further convinced everyone that we should open 1 gift each..., surprise, a polisher!
    I spent another 2 hours with new polisher & Bass Pro Cleaner Wax with PTEF, using lambswool pad. Cleaner waxes have an ultra fine compounding added to the wax. BP brand is 1/2 the cost of Maquires/Mothers/StarBrite product, so I gave it a try. I used 2/3 of a 16 oz bottle to do the entire Cat.
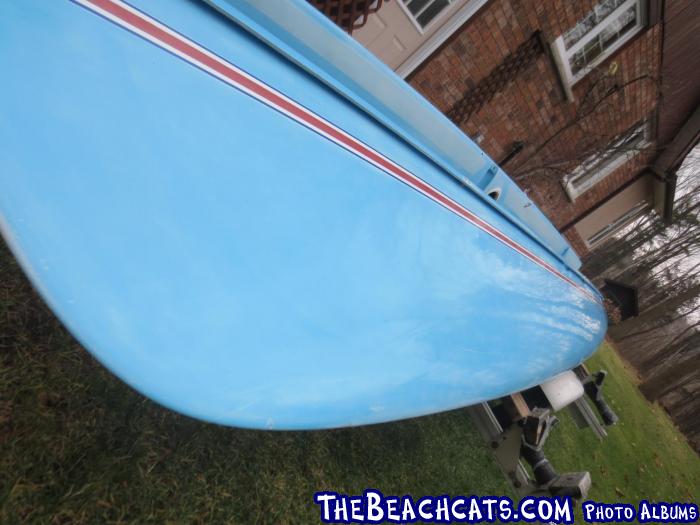
    It got rid of the swirls & shined things up, (though in hindsight I should have added an extra stage using either a straight medium, or fine compounding product)using lambswool pad. I can still see some oxidation in a few spots, the hull is not completely sky blue.
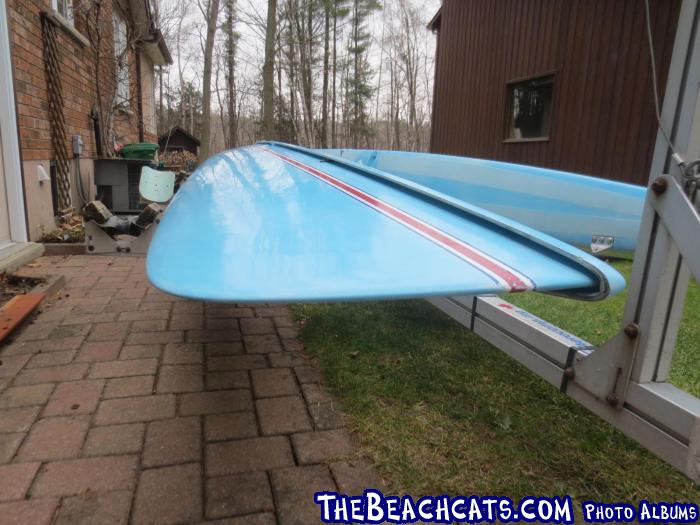
    Finally I hand applied a 2nd coating of Star Brite Premium Marine Wax to only the left hull, buffed out with the Simoniz buffer I use on the cars. I only did the left hull so I can compare the two waxes longevity. I got the wax in a 16oz tub, as I find the tubs go further than the bottles. You actually use very little of the pure wax, this tub will do 10 Cats, maybe more.
    The difference between now, & when I picked it up are dramatic. I would encourage anyone who buys a neglected Cat to consider restoration before painting, unless you want a totally different color.
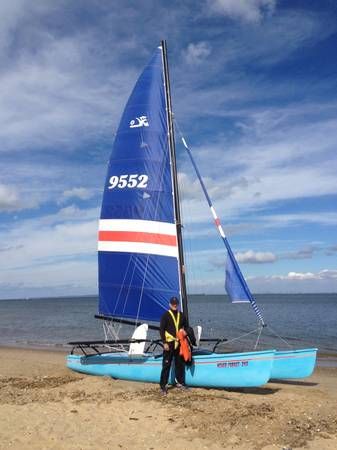
    These hulls were totally white,with copious grunge, showing none of the optional blue gelcote. I think the retro mid 80's color will look great when paired with the dark blue '84 Summer Games sails.
    Before;
    http://www.thebeachcats.com/gallery2/main.php?g2_view=core.DownloadItem&g2_itemId=120219&g2_serialNumber=4
    How they look today. These are dry hulls, on a heavy overcast day.;
    http://www.thebeachcats.com/gallery2/main.php?g2_view=core.DownloadItem&g2_itemId=120436&g2_serialNumber=4
    http://www.thebeachcats.com/gallery2/main.php?g2_view=core.DownloadItem&g2_itemId=120439&g2_serialNumber=4
    http://www.thebeachcats.com/gallery2/main.php?g2_view=core.DownloadItem&g2_itemId=120448&g2_serialNumber=4
    http://www.thebeachcats.com/gallery2/main.php?g2_view=core.DownloadItem&g2_itemId=120452&g2_serialNumber=4

    --
    Hobie 18 Magnum
    Dart 15
    Mystere 6.0XL Sold Was a handful solo
    Nacra 5.7
    Nacra 5.0
    Bombardier Invitation (Now officially DEAD)
    Various other Dock cluttering WaterCrap
    --
  • Not sure what epoxy work you're refering to, but the front crossbar brackets are just a drill and bolt on installation. If your boat had red glue hulls, or if there was cracking under the hull flanges then you would probably want to add some glass inside the hull. But based on what you've described, I would just install the upgraded plates and be done.

    Otherwise, the hulls look very good. Nice job.

    sm
  • Dramatic difference!! Great work, Ed!

    --
    Tim
    81 Hobie 16
    87 Nacra 5.7
    Austin, TX
    --
  • QuoteNot sure what epoxy work you're refering to, but the front crossbar brackets are just a drill and bolt on installation.

    First, thanks for all the great advice/knowledge re the H18.
    I was reading a bunch of threads on the H18 Forum, there seemed to be a problem with the early Redline boats, & those utilizing WINGS.
    In one thread Matt Miller said, if you have wings, & the patch under the front beam was only the width of the beam, to fair the hull/deck joint with thickened epoxy, then add a patch appx 12" wide.
    I understood this to mean all boats with wings, not just the Redline boats.
    Are the boats with wings holding up with just the 4 screw anchor plates?
    I'm not adverse to glass work, it looks pretty accessible with the hatch mounting ring removed, which I intend to do anyway in order to install the screw in covers. But if it really isn't needed, I won't bother. We are not heavy weights, but I foresee the odd time we would have guests that weigh in at the wing limit.
    QuoteDramatic difference!! Great work, Ed!

    Thanks, that was my first try at rejuvenating old fibreglass. I think I'll polish both Nacras in the spring, it isn't that much hard labour with the power tools.
    I constantly see people here buy an old boat, & immediately want to paint. I'm thinking you have to do almost the same prep work before paint, if you want a good job. Might as well try a restore first.
    When I first bought the boat I thought it was white. Apparently the colored hulls were an option. I test sanded a few small areas, then talked to a couple of auto detailers & a marine shop. They both told me to ditch the 400 grit & start with 600-800 or heavy compound, & to buy a decent power polisher.
    The boat is in such good condition that I decided to restore it to original.
    I wish I was in Texas, & could put it together & launch! We put things away a bit to early, last sail was Nov 8th, we could have been sailing this week too, with wetsuits & booties.

    --
    Hobie 18 Magnum
    Dart 15
    Mystere 6.0XL Sold Was a handful solo
    Nacra 5.7
    Nacra 5.0
    Bombardier Invitation (Now officially DEAD)
    Various other Dock cluttering WaterCrap
    --
  • Edchris177
    I was reading a bunch of threads on the H18 Forum, there seemed to be a problem with the early Redline boats, & those utilizing WINGS.


    I know, I've added the patch to my boat (a red line) and I actually started a thread showing how I put the patch in.

    http://www.hobiecat.com/forums/viewtopic.php?f=13&t=49780

    The older boats were a heavier construction than the '85 red lines. It's your call. If you look under the hull flanges where the crossbars attach and there are no visible cracks, I probably would not worry about adding glass patches. If you want to do the job right, it is somewhat involved as you're working in a fairly tight space which makes grinding and sanding difficult. The tough part is grinding away the excess glue from the hull/deck seam. You need to grind the glue away and then create a fillet with thickened resin in the corner for the new glass to lay properly without any voids. When I did the job, I actually used several layers of 6oz carbon cloth and laminated it in in several steps. I would say the project will take at least a couple weekends between the prep work and the curing cycles. It's definitely easier if you have the hulls apart too.

    sm
  • QuoteI wish I was in Texas, & could put it together & launch! We put things away a bit to early, last sail was Nov 8th, we could have been sailing this week too, with wetsuits & booties.


    We're pretty spoiled down here. It's supposed to be near 80 degrees tomorrow with 10-15 mph winds. The 5.7 is gonna get wet!

    --
    Tim
    81 Hobie 16
    87 Nacra 5.7
    Austin, TX
    --
  • I'm in Tennessee and its going to be 75 deg with 14 mph winds... the boats are getting wet up here too


    Edited by fxloop on Dec 10, 2015 - 09:50 PM.

    --
    Tim Grover
    1996 Hobie Miracle 20
    Two Hobie 14's
    1983 G-Cat Restored
    Memphis TN / North Mississippi
    --
  • QuoteI know, I've added the patch to my boat (a red line) and I actually started a thread showing how I put the patch in.

    That is a very good write up. I actually came across it while perusing that forum on last weeks Hongkong layover.
    I also saw threads regarding cracks & corrosion. I have now inspected everything, & found nary a crack, or hint of corrosion, the pro of a lightly used freshwater boat.
    I have the boat completely apart, & built some stands that screw to the sawhorses, allowing me to rotate the hulls to any orientation.
    With the hatch flanges out, access is not bad. I'll do the patch in the spring, but use FG vs Carbon.
    I had the end cap off the boom yesterday, to clean/inspect/replace traveler bearing & bungee. All was good, just needed a cleanup, (except for the bungee). I had read about problem with the screws on the outhaul line cleat being seized, mine came out easily, looking like new.
    Hobie used SS rivets on the end cap. The cap is under tension, & the flange holds all the loads, the rivets only keep it from falling out. Is there any downside to using AL rivets when I put it together?
    Also the H18 manual calls for 7' of 1/4" bungee. From that, I assume it loops through the end of the traveler, then deadends at the two holes in those boom cleat clamps that reside inside the boom.
    What do you use to prevent bungee from wearing through at the traveler? It seems that thin metal will wear it quickly.
    Is there supposed to be some sort of thimble, or do you just replace it often?
    Took the sails in yesterday to have them gone over. This is not my boat, but an identical one to mine, the sails are only a couple hundred numbers apart.
    http://i1073.photobucket.com/albums/w397/aaron-photo1/3Ea3Ge3F65Ne5Ee5H7d4o813ea09e8c8e137c_zpsf9dfe4a4.jpg


    Edited by Edchris177 on Dec 19, 2015 - 04:36 PM.

    --
    Hobie 18 Magnum
    Dart 15
    Mystere 6.0XL Sold Was a handful solo
    Nacra 5.7
    Nacra 5.0
    Bombardier Invitation (Now officially DEAD)
    Various other Dock cluttering WaterCrap
    --
  • The boom end cap is one of the few places on the boat where aluminum rivets are OK. As you noted, all the load is inboard so the rivets just keep the cap from falling off.

    As long as there are no sharp edges, the bungee will be fine passing through the outhaul car as designed. It should last several years.

    sm
  • Congrats on the boat and the progress.

    Not sure what opportunity you have, but the BIGGEST thing I've learned since moving from a few years on a Hobie 18 to an F16 would be this: "Don't overcomplicate things" aka Keep it Simple..S..

    Basically, and folks will almost universally agree, when the 18s were built they didn't know design limits for materials as well nor the loads they will encounter.... so more was better. So the boat is overbuilt. Fine, no problem. However, the down side can, and often is, more parts are used than necessary, which can lead to unnecessary weight (not a big deal), unnecessary complexity (could be an issue), and therefore multiple points of failure (definitely an area of concern).

    Then the balance is simplicity AND convenience while sailing. Each sailor has to find their own mix.

    That said, there are a LOT of things on the original H18 design which can be simplified or made more convenient (which may add complexity, but it's purposeful) by examining the rigging and layouts of more modern boats. I'm finding it real interesting.

    Cheers - Rob.
  • An update on my progress.
    We had a shi**y spring, along with Wifey wanting top floor of one house painted, interior trim/doors changed, so things got delayed.
    Got the bottom wear strip done last week, along with the front beam interior patch to alleviate wing loading problems. Pressure tested the hulls, found one tiny leak in a dagger trunk, 1/2 way up, must have got a small rock caught at one point. It was an easy fix, good access through hatch.
    Traveler, & outhaul have new parts installed, new Viking Marine hatches put in, & will assemble boat today, or tomorrow.
    Speaking of hatches, am I the only one who wants to slap Viking Marine?
    I ordered the H18 hatches,(from a Hobie dealer), & figured it would be a 10 minute job. Guess what...the damn rivet hole pattern does not match up with the old,(also Viking hatch). I tried rotating it, made no difference, had to drill new holes, right beside the old. This meant I had to epoxy small tabs under the perimeter
    What were they thinking?

    --
    Hobie 18 Magnum
    Dart 15
    Mystere 6.0XL Sold Was a handful solo
    Nacra 5.7
    Nacra 5.0
    Bombardier Invitation (Now officially DEAD)
    Various other Dock cluttering WaterCrap
    --
  • Don't know much about the Hobie brand, but I must congratulate on you bringing new life to an old boat...

    With some of the new rides costing as much as my first house... well condo.... glad to see some of these yard queens getting a second chance...

    --
    John Schwartz
    Ventura, CA
    --
  • Update.
    I've had the 18 out a few times now, most of the kinks worked out, but I have a few questions.
    Daggers- Hobie says 4' of 1/4" bungee. It seems near impossible to stretch the 2' length from the dagger through the deck lip hole, & have enough to tie a knot. Before I cut any, what do you guys use? (I was thinking a single strand of 5/16"). How much "pull" does one need to keep them in place?
    I rigged using some old bungee. & stretched it with a piece of line, so tension is adjustable, just to get on the water.
    I purchased some of that 3M strip dagger well liner. Where in the well do you use it, & how much?
    Is it just at the front/rear, top/bottom edge, or a strip along the side?

    Rudder kick up- I have one set pretty good, the other tends to let go at high speed. The spring adjust screws turn easy, to start with, then they get pretty stiff.
    Should I take them out, drop the spring & clean? (The boat is sitting on a lift in the water, are there any plungers, or other parts that might fall out & disappear?)
    It seems a large screwdriver won't fit up through the casting, a smaller one doesn't have the bite to turn the screw. Any tricks?

    I did the reinforce patch back in May.
    Quote The tough part is grinding away the excess glue from the hull/deck seam. You need to grind the glue away and then create a fillet with thickened resin in the corner for the new glass to lay properly without any voids.

    Mine is a black glue boat. I found the glue to quite brittle. Rather than grind, I used a wood chisel, & a small hammer. It was VERY east to set the chisel right at glue edge, one or two taps & the excess broke of, almost like obsidian. It came off in large chunks which I shop vacced out.
    I had the hatch fittings removed, (installed new screw in hatches), the extra room is so useful, I would remove the rings, even if installing the same hatches.

    --
    Hobie 18 Magnum
    Dart 15
    Mystere 6.0XL Sold Was a handful solo
    Nacra 5.7
    Nacra 5.0
    Bombardier Invitation (Now officially DEAD)
    Various other Dock cluttering WaterCrap
    --

Go to page [-1] 1 - 2:

No HTML tags allowed (except inside [code][/code] tags)

  • Options
  • 0 users

This list is based on users active over the last 60 minutes.