


My friend has a 60s era P-Cat and needs a part nicknamed a "toilet bowl". This is the cradle that the mast rides on. Any ideas?
Thanks in advance!
Bill
--
Bill
Nacra 5.5 SL
Redondo Beach, CA
--
Need a P-Cat part

-
- Rank: Lubber
- Registered: Aug 20, 2012
- Last visit: Jan 29, 2014
- Posts: 48
 Posted: Nov 10, 2012 - 12:11 PM
-
- Rank: Mate
- Registered: Mar 20, 2012
- Last visit: Jun 16, 2014
- Posts: 248
Posted: Nov 10, 2012 - 02:49 PM
If you find a source for this part, let me know. I've got a 60s era P-Cat, too.
For what it's worth the "toilet bowl" (GREAT NAME!) is a cast metal part. A decent foundry should be able to to take an existing one and make a duplicate by using the original as a casting pattern. I'd offer mine, but I'll be darned if I've figured out how to get it off. At one point I broke what I guess you'd call the toilet bowl seat (mast step hinge), and desperately needed to remove the toilet bowl to finish the repair. I never did manage to get it off, so I wound up doing everything in-situ.
Best of luck finding a source for your friend's part. The P-Cat is still a fun boat to sail. I'd love to see it back on the water.
Tom
--
Tom Benedict
Island of Hawaii
P-Cat 18 / Sail# 361 / HA 7633 H / "Smilodon"
-- -
- Rank: Lubber
- Registered: Aug 20, 2012
- Last visit: Jan 29, 2014
- Posts: 48
Posted: Nov 11, 2012 - 10:08 AM
Thanks Tom, I'll forward your suggestions to my friend. We were trying to lower the mast in 20+ mph winds (on land). As it was coming down, the mast was swerving all over the place and didn't come down perfectly in-line with what the mast step hinge wanted and cracked the casting.
Other than that, this boat is in superb shape and sails great.
Bill
--
Bill
Nacra 5.5 SL
Redondo Beach, CA
-- -
- Rank: Mate
- Registered: Mar 20, 2012
- Last visit: Jun 16, 2014
- Posts: 248
Posted: Nov 11, 2012 - 11:03 AM
Do you have pictures of the broken casting?
Even if the part itself can't be removed, it may be possible to install a new hinge (if that's what broke) on the existing part.
Tom
--
Tom Benedict
Island of Hawaii
P-Cat 18 / Sail# 361 / HA 7633 H / "Smilodon"
-- -
- Rank: Lubber
- Registered: Aug 20, 2012
- Last visit: Jan 29, 2014
- Posts: 48
Posted: Nov 11, 2012 - 12:32 PM
Tom, we will be at the boat sometime this week. I'll get a picture and send it your way.
Thanks,
Bill
--
Bill
Nacra 5.5 SL
Redondo Beach, CA
-- -
- Rank: Lubber
- Registered: Aug 20, 2012
- Last visit: Jan 29, 2014
- Posts: 48
Posted: Nov 12, 2012 - 07:50 PM
Tom, I sent you a PM.
Bill
--
Bill
Nacra 5.5 SL
Redondo Beach, CA
-- -
- Rank: Lubber
- Registered: Aug 20, 2012
- Last visit: Jan 29, 2014
- Posts: 48
Posted: Nov 14, 2012 - 08:53 AM
Tom, I uploaded 4 pictures in the Photo Album under "P-Cat mast step Hinge".
Bill
--
Bill
Nacra 5.5 SL
Redondo Beach, CA
-- -
- Rank: Mate
- Registered: Mar 20, 2012
- Last visit: Jun 16, 2014
- Posts: 248
Posted: Nov 14, 2012 - 12:07 PM
Aaaaaight! Looks like it's the same part that broke on mine. But I think I busted mine worse. Here's a picture of my broken part and the replacement I made:
I made it out of 6061-T651 aluminum. Nothing special about the alloy, except that it's more ductile than the original casting, and should be able to take more abuse. It's just what I had on hand. I think the slab I started with was 1/4" thick. Except for the hinge part where the pin goes through, which was left full-thickness, I had to machine the rest down enough that the mast base would be able to fit through it and rotate. (I think that wound up being something on the order of 3/16" thick, but this is from memory.)
The biggest mistake I made was in tracing my busted part onto the slab and trying to do most of the work on the bandsaw. The original castings were an awful mishmash shape that really don't need to be duplicated in a new part. You can see some remnants of this in the shape of the part I made. Honestly a much cleaner profile could be made from the get-go, resulting in a nicer part that's just as functional.
This is something just about any machine shop could knock out in an hour or so. If you like I can measure mine and send you a drawing of it. I don't know what a shop would charge for this, but it shouldn't be too much.
Tom
P.S. I've got a bunch of pictures from restoring my P-Cat. Here's the URL to the album: http://www.thebeachcats.c…ictures/?g2_itemId=83700
Edited by benedict on Nov 14, 2012 - 08:08 AM.
--
Tom Benedict
Island of Hawaii
P-Cat 18 / Sail# 361 / HA 7633 H / "Smilodon"
-- -
- Rank: Lubber
- Registered: Aug 20, 2012
- Last visit: Jan 29, 2014
- Posts: 48
Posted: Nov 14, 2012 - 05:54 PM
Tom, thanks for a thorough response. I think I'll convince my friend Jeff (the P-Cat owner) to follow the same procedure. I'll also get him to join the Beachcats forum so he can read all the stuff I'm reading.
I took a look at your Photo Album. Very cool! I really like your mast step assist rig. If we had that when we were trying to lower the mast, we wouldn't need a mast step hinge now. You also had some pictures of the inside of your hulls. Jeff was trying to describe them to me, but your pictures are worth a thousand words. I may PM you later.
Bill
--
Bill
Nacra 5.5 SL
Redondo Beach, CA
-- -
- Rank: Mate
- Registered: Mar 20, 2012
- Last visit: Jun 16, 2014
- Posts: 248
Posted: Nov 14, 2012 - 06:59 PM
Hey, I only built that mast step assist AFTER I broke my mast hinge. Nothing like 20/20 hindsight...
By all means invite Jeff here, and feel free to PM me any time.
Tom
--
Tom Benedict
Island of Hawaii
P-Cat 18 / Sail# 361 / HA 7633 H / "Smilodon"
-- -
- Rank: Mate
- Registered: Mar 12, 2003
- Last visit: Feb 19, 2021
- Posts: 879
Posted: Nov 15, 2012 - 12:06 PM
Have a P-cat mast step hinge. Email me for pics, etc. Pete pbegle@charter.net -
- Rank: Mate
- Registered: Mar 20, 2012
- Last visit: Jun 16, 2014
- Posts: 248
Posted: Nov 15, 2012 - 12:57 PM
OOOOH! Hey, just for future reference, what other P-Cat parts do you have? I might be interested in a couple.
Thanks!
Tom
--
Tom Benedict
Island of Hawaii
P-Cat 18 / Sail# 361 / HA 7633 H / "Smilodon"
-- -
- Rank: Lubber
- Registered: Aug 20, 2012
- Last visit: Jan 29, 2014
- Posts: 48
Posted: Nov 15, 2012 - 01:30 PM
Tom, I think Jeff's boat is only 9 serial numbers after yours. I've added another picture (IMG_2371x 2.jpg) to my Photo Album of the mast step hinge showing the serial number as 370. I fired off an email to Pete about the mast step hinge.
Bill
--
Bill
Nacra 5.5 SL
Redondo Beach, CA
-- -
- Rank: Mate
- Registered: Mar 20, 2012
- Last visit: Jun 16, 2014
- Posts: 248
Posted: Nov 15, 2012 - 04:34 PM
Cool! Hey, it'd be neat to find out the history of Jeff's boat. I think I've got a pretty complete picture of mine but there are some fuzzy bits, like the actual year the thing was made.
Tom
--
Tom Benedict
Island of Hawaii
P-Cat 18 / Sail# 361 / HA 7633 H / "Smilodon"
-- -
- Rank: Lubber
- Registered: Aug 20, 2012
- Last visit: Jan 29, 2014
- Posts: 48
Posted: Nov 17, 2012 - 01:06 AM
Hey Tom, did you get my PM about the daggerboards I sent Thursday?
Bill
--
Bill
Nacra 5.5 SL
Redondo Beach, CA
-- -
- Rank: Lubber
- Registered: Aug 20, 2012
- Last visit: Jan 29, 2014
- Posts: 48
Posted: Nov 17, 2012 - 10:54 PM
Here are some "Before" and "After" pictures of the P-Cat. They show all of the lines that were, frankly, in the way. We cleaned them up and the boat does not know the difference.
Bill
--
Bill
Nacra 5.5 SL
Redondo Beach, CA
-- -
- Rank: Mate
- Registered: Mar 20, 2012
- Last visit: Jun 16, 2014
- Posts: 248
Posted: Nov 19, 2012 - 11:50 AM
Crap. I typed in a long reply, then accidentally hit the back button on my browser, and lost it. Let me try this again...
On the dagger boards, here's a question: When I got my P-Cat, it came with these aluminum strips I couldn't identify. Finally I found a matching set of holes on the bottoms of each of the hulls, on either side of the dagger board trunk. I called the previous owner, and he said there was a rubber "skirt", held on with those strips, that the dagger board passed through. This was apparently common practice with dinghies when Carter Pyle designed the P-Cat back in the day. So I got some 1/8" neoprene sheet from the marine store and installed them. Once they were there, I cut slits for the dagger board to pass through. This makes for a nice snug fit, and keeps water from gurgling around in those mile-long dagger board trunks the P-Cat has.
One problem I still have, though, is that the boards like to settle as far down in the trunk as they can go. NOTHING will keep them from doing this. They're just too darned heavy. There's a rope donut tied through the handle on each of the boards that keeps them from sinking through the bottom of the boat. But it's still holy hell to pull the things out once they've sunk in.
Sorry, I don't have any pictures of any of this. But I can take some if you're interested.
Tom
(Running rigging is next. But cripes, I don't want to lose this post again through my own stupidity.)
--
Tom Benedict
Island of Hawaii
P-Cat 18 / Sail# 361 / HA 7633 H / "Smilodon"
-- -
- Rank: Mate
- Registered: Mar 20, 2012
- Last visit: Jun 16, 2014
- Posts: 248
Posted: Nov 19, 2012 - 12:07 PM
Ok, running rigging...
WOW!
Our P-Cat is rigged very differently from either of your photos. Not saying it's right, just saying it's different. It matches, as closely as possible, the rigging diagram in Royce's Sailing Illustrated (which pictures a P-Cat 2, not a P-Cat). I'm not that keen on it. But I'll describe it, anyway. Again, no photos of the boat rigged. But I have enough other photos I can probably piece some of this together.
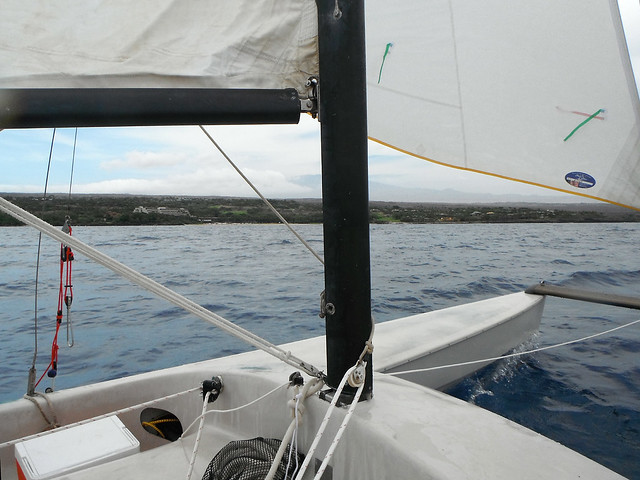
The jib has long leaders that go back to single-sheave blocks. When sheeted in, those blocks almost reach the rear crossbeam of the boat. (LONG leaders...) The rear crossbeam has two tracks, one on each side, with a block and becket on each track. You can see one of them in the left side of this photo:
The rigging starts at the becket, runs forward to the jib block, runs back through the block on the rear crossbeam, and then forward (again) to the cam cleat block located on the front crossbeam:
The free end then goes back through the same pattern on the far side of the boat. So the jib sheet is continuous.
The way it's rigged in Royce's Sailing Illustrated, the jib sheet crosses the deck and goes into the cam cleat on the opposite side. This puts the sheet right in the hands of the crew as it exits the block. This also drives me and my wife nuts since we learned to sail on a Prindle 16. So we don't rig it that way. The port side rigging stays on the port side, and the starboard side rigging stays on the starboard side.
So on to Jeff's rigging:
First, do you guys have a spinnaker on that boat? Because there are some lines on there I'm not familiar with. There are some screw holes on my hull that have been filled in that match some of the stuff I see on Jeff's boat, so I'm curious.
In your second photo, it looks like a much-compressed version of what I'm running right now. But instead of having the jib block at the rear crossbeam, you've got it on the sidestay. How does this work for you? And do you have that 2:1 purchase on the jib sheet, or is it a single-purchase?
I really really like how clean the rigging is in your second photo. It's about as close to a modern cat as I could imagine a P-Cat getting. I'm not all that keen on how my jib sheets run back and forth along the length of the deck. Even when everything is running neat, it feels cluttered. I'm constantly tripping over jib sheets.
At some point I also need to pick your brain about the mainsheet traveler. It's very different from the one I'm using. Another P-Cat sailor said the traveler really needs 3:1 purchase in order to have the oomph to move the traveler when sheeted in. Mine has 3:1, but it's not the nicest setup in the world. There are a number of other 3:1 purchase travelers that seem like they'd be a lot more pleasant to use. Do you mind describing how Jeff's is set up?
Some other questions unrelated to rigging:
I also see you've still got the hooks for the hiking straps, but don't have hiking straps installed. Our hiking strap holes were filled in. I've been toying with the idea of replacing them, but haven't decided one way or the other yet. I kind of need to figure this out before doing the gel coat work on the deck.
Sorry to keep going with the questions, but I see the two hatches in the front crossbeam. That's one area I haven't managed to photograph inside the hulls. Any chance of sticking a camera in Jeff's hulls at that point? I'm curious what's underneath the mast. When I installed my new cam cleat blocks for the jib, aluminum bits came out when I drilled the holes. So it seems like there's aluminum embedded in the fiberglass. It would be nice to know if I'm right or wrong about that.
LOVE the compass. That's seriously cool. I hadn't thought of using that area for mounting instruments, but it seems obvious now that I'm looking at it.
How did you guys get the two-tone pattern on deck? I'm planning to do some gel coat work on my deck in the not too distant future, but we've got alligator cracking all through the textured parts of the deck (brown in your photos). I don't mind doing different treatments on different parts of the deck. Did the boat come that way, or was that something you guys did?
Sorry for the question barrage. This is just GREAT having another P-Cat owner to bounce questions off of.
Thanks!
Tom
--
Tom Benedict
Island of Hawaii
P-Cat 18 / Sail# 361 / HA 7633 H / "Smilodon"
-- -
- Rank: Lubber
- Registered: Aug 20, 2012
- Last visit: Jan 29, 2014
- Posts: 48
Posted: Nov 19, 2012 - 04:30 PM
Tom, I’ll answer what I can, but Jeff is now a member of Beachcats and will probably chime in on this.
Re: dagger boards, I have not seen the aluminum strips you referred to or any rubber at the bottom of the dagger board wells. Instead there is flimsy piece of what looks like thin styrene with a slit in it at the bottom of the well. The dagger board slides through this and that is all there is to the whole system. The dagger board well tapers up along the sides of the well so that there is a considerable gap between the side of the well and the topsides of the dagger board itself. Consequently with no lateral friction, the dagger board is free to move aft and retract depending on where the loads are coming from. Our dagger boards settle all the way down too, until they hit the rope stop.
Re: rigging, in talking with Jeff, he tells me this was the way he purchased the boat and assumed it was the standard P-Cat rigging system. Like you said, it may not be right or wrong, just different. As crew, I was in charge of the jib, and being as careful as I could, I still got tangled up with the many lines on deck. I cut myself many times on the small cleats when I planted my knee in shuffling over to the other side. I looked at the system carefully and made my suggestions to Jeff. He was reticent to change, his thought being that he wanted to keep the boat as stock as possible. He eventually acquiesced and we significantly reduced the number of lines required to sail. Like the famous architect Mies van der Rohe said, “Less is More”. We now just have one line on each side of the jib going through a rotating cleat on the forward crossbeam. We filled in the holes, and although they look like they are just raw holes in the “After” picture, they are absolutely flush with the surface of the deck. I asked Jeff for his honest opinion after we sailed it like this and he gave a thumbs up.
Re: Jeff’s rigging, we do not have a spinnaker on the boat. On the traveler car, we had it actually come off while sailing. One of the end stop-screw’s head broke off and the car ran right off the traveler. Fortunately, Jeff was Johnny-on-the-spot and grabbed almost all of the ball bearings. We locked it in place and made for the dock. I made a custom jig to hold the ball bearings in place and we carefully slid it back into position and replaced the end stops. I am not nearly as familiar with P-Cats as you, but Jeff’s boat does not have a sliding adjustment for the traveler car. It does slide, but it is not the pull-push system you find on monohulls. You have to manually move it. Jeff will have to answer this in greater detail. Our hiking straps are removed at this time because we took the mast and all of its attendant rigging apart as well. (There is a very interesting story that goes with why the mast step hinge is broken, but I will leave that alone for right now).
Re: inside the hulls, those two hatches are SO handy. We keep a pair of pliers and the halyard crank in one side and bungees for the mainsail in the other. I will ask Jeff if he can shoot inside the hull and get what you need.
Re: the compass. I dismissed it early, but now I use it all the time when I am captain on the boat.
Re: the paint job, the base color is a brown/mustard hue with white painted trim. The white is wearing off in some areas. I’m pretty sure he got the boat that way. I have hinted that the boat would look awesome with a new paint job, but that can be expensive and I understand his reticence.
We really need someone to talk to about gel coat. I’ll leave those questions for you and Jeff.
Bill
--
Bill
Nacra 5.5 SL
Redondo Beach, CA
-- -
- Rank: Mate
- Registered: Mar 20, 2012
- Last visit: Jun 16, 2014
- Posts: 248
Posted: Nov 19, 2012 - 05:28 PM
Eeeeeh... I really don't know that much more about P-Cats. I started this odyssey less than a year ago, never having seen a P-Cat in my life. That odyssey started when the boat showed up as a bare hull and mast with a five gallon bucket and a cardboard box, both full of... stuff... I took one look and thought, "Ya gettin' in deep now, man!"
Despite being such a wildly popular boat in its day, there aren't that many people who remember it now. Some of the info I had was gleaned from 1950's era postcards, from watching The Endless Summer and a couple of Disney clips someone was kind enough to point out to me. Finding that rigging diagram in Royce's was sheer serendipity. (It's a small book, dirt cheap, and well worth reading for the historical information alone.) The previous owners of my boat have been a good source of information, too, but everything else was sheer guesswork. The only edge I might have on you and Jeff is that I did more Google searches over the last year. (Or maybe not!)
I think my traveler system pre-dates recirculating balls. I don't know if mine is original hardware, so again they're different but that's about it. My Prindle 16 had a system similar to the one in your pictures. There was a line running from the rear of the rear crossbeam up and through the traveler, and then through a cam cleat that was riveted to the rear crossbar. I liked it because you could set a certain amount of travel, and even when you tacked it would maintain that amount of travel on the new tack as well.
The one I have on my P-Cat is more complicated (read that as "more likely to tangle") but has two cool features: The 3:1 travel means even when the sail is loaded up hard, I can still move the traveler in without much effort. The other is that it'll sheet in past center-line. This is a cool feature, and lets it point a little higher than my Prindle ever could. But it also makes it way too easy to pinch and lose headway. I love having it, but I find myself staring at telltales on the sails way more than I used to.
I'll take a picture of the rubber and aluminum on the bottom of my hulls when I get home tonight, and post them. I can believe this stuff wasn't stock. (What on my boat is stock?!) But it works well, so I'm happy to share. It's not the most hydrodynamic setup in the world. Push comes to shove it's probably draggy as hell. But it's built like a tank, and it works.
At the tops of the daggerboard trunks, is there enough room to put something in there to help wedge the boards in place? Over on the Hobie forums, one guy posted a build of a Miracle 20. When he got to the daggerboard trunks, he posted a neat tip: Get some self-adhesive Velcro. Get the fuzzy side and stick it in the daggerboard trunk, fuzzy side facing the board. He only used four little tabs on his, but the Miracle 20 trunks are a close fit to the boards. I was planning to line the things end-to-end with fuzzy Velcro. But my trunks are a much tighter fit than yours, it sounds like. If I stuck Velcro in there, the daggerboard never would've fit. (I did use this trick with the rudder castings, though. The resulting fit is snug snug snug. I LOVE having rudders that don't rattle at all.)
Now I need to go look at compasses. I really really like that setup.
Thanks again,
Tom
--
Tom Benedict
Island of Hawaii
P-Cat 18 / Sail# 361 / HA 7633 H / "Smilodon"
--


