

My friend has a 60s era P-Cat and needs a part nicknamed a "toilet bowl". This is the cradle that the mast rides on. Any ideas?
Thanks in advance!
Bill
--
Bill
Nacra 5.5 SL
Redondo Beach, CA
--
Need a P-Cat part
- Rank: Lubber
- Registered: Aug 20, 2012
- Last visit: Jan 29, 2014
- Posts: 48


- Rank: Mate
- Registered: Mar 20, 2012
- Last visit: Jun 16, 2014
- Posts: 248
If you find a source for this part, let me know. I've got a 60s era P-Cat, too.
For what it's worth the "toilet bowl" (GREAT NAME!) is a cast metal part. A decent foundry should be able to to take an existing one and make a duplicate by using the original as a casting pattern. I'd offer mine, but I'll be darned if I've figured out how to get it off. At one point I broke what I guess you'd call the toilet bowl seat (mast step hinge), and desperately needed to remove the toilet bowl to finish the repair. I never did manage to get it off, so I wound up doing everything in-situ.
Best of luck finding a source for your friend's part. The P-Cat is still a fun boat to sail. I'd love to see it back on the water.
Tom
--
Tom Benedict
Island of Hawaii
P-Cat 18 / Sail# 361 / HA 7633 H / "Smilodon"
--
- Rank: Lubber
- Registered: Aug 20, 2012
- Last visit: Jan 29, 2014
- Posts: 48
Thanks Tom, I'll forward your suggestions to my friend. We were trying to lower the mast in 20+ mph winds (on land). As it was coming down, the mast was swerving all over the place and didn't come down perfectly in-line with what the mast step hinge wanted and cracked the casting.
Other than that, this boat is in superb shape and sails great.
Bill
--
Bill
Nacra 5.5 SL
Redondo Beach, CA
--
Other than that, this boat is in superb shape and sails great.
Bill
--
Bill
Nacra 5.5 SL
Redondo Beach, CA
--
- Rank: Mate
- Registered: Mar 20, 2012
- Last visit: Jun 16, 2014
- Posts: 248
Do you have pictures of the broken casting?
Even if the part itself can't be removed, it may be possible to install a new hinge (if that's what broke) on the existing part.
Tom
--
Tom Benedict
Island of Hawaii
P-Cat 18 / Sail# 361 / HA 7633 H / "Smilodon"
--
Even if the part itself can't be removed, it may be possible to install a new hinge (if that's what broke) on the existing part.
Tom
--
Tom Benedict
Island of Hawaii
P-Cat 18 / Sail# 361 / HA 7633 H / "Smilodon"
--
- Rank: Lubber
- Registered: Aug 20, 2012
- Last visit: Jan 29, 2014
- Posts: 48
Tom, we will be at the boat sometime this week. I'll get a picture and send it your way.
Thanks,
Bill
--
Bill
Nacra 5.5 SL
Redondo Beach, CA
--
Thanks,
Bill
--
Bill
Nacra 5.5 SL
Redondo Beach, CA
--
- Rank: Lubber
- Registered: Aug 20, 2012
- Last visit: Jan 29, 2014
- Posts: 48
Tom, I sent you a PM.
Bill
--
Bill
Nacra 5.5 SL
Redondo Beach, CA
--
Bill
--
Bill
Nacra 5.5 SL
Redondo Beach, CA
--
- Rank: Lubber
- Registered: Aug 20, 2012
- Last visit: Jan 29, 2014
- Posts: 48
Tom, I uploaded 4 pictures in the Photo Album under "P-Cat mast step Hinge".
Bill
--
Bill
Nacra 5.5 SL
Redondo Beach, CA
--
Bill
--
Bill
Nacra 5.5 SL
Redondo Beach, CA
--
- Rank: Mate
- Registered: Mar 20, 2012
- Last visit: Jun 16, 2014
- Posts: 248
Aaaaaight! Looks like it's the same part that broke on mine. But I think I busted mine worse. Here's a picture of my broken part and the replacement I made:
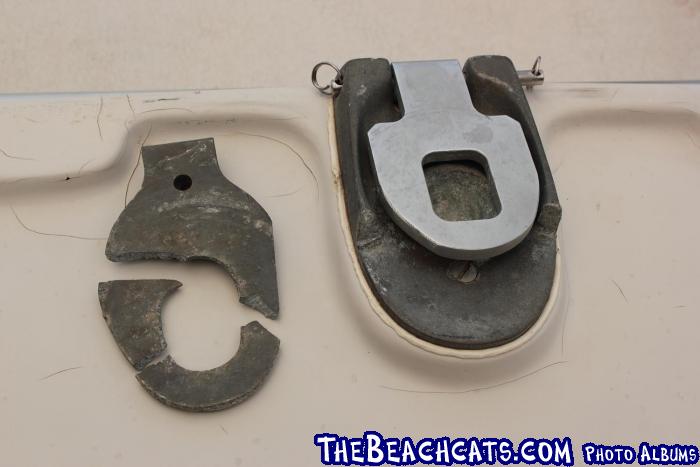
I made it out of 6061-T651 aluminum. Nothing special about the alloy, except that it's more ductile than the original casting, and should be able to take more abuse. It's just what I had on hand. I think the slab I started with was 1/4" thick. Except for the hinge part where the pin goes through, which was left full-thickness, I had to machine the rest down enough that the mast base would be able to fit through it and rotate. (I think that wound up being something on the order of 3/16" thick, but this is from memory.)
The biggest mistake I made was in tracing my busted part onto the slab and trying to do most of the work on the bandsaw. The original castings were an awful mishmash shape that really don't need to be duplicated in a new part. You can see some remnants of this in the shape of the part I made. Honestly a much cleaner profile could be made from the get-go, resulting in a nicer part that's just as functional.
This is something just about any machine shop could knock out in an hour or so. If you like I can measure mine and send you a drawing of it. I don't know what a shop would charge for this, but it shouldn't be too much.
Tom
P.S. I've got a bunch of pictures from restoring my P-Cat. Here's the URL to the album: http://www.thebeachcats.c…ictures/?g2_itemId=83700
Edited by benedict on Nov 14, 2012 - 08:08 AM.
--
Tom Benedict
Island of Hawaii
P-Cat 18 / Sail# 361 / HA 7633 H / "Smilodon"
--
- Rank: Lubber
- Registered: Aug 20, 2012
- Last visit: Jan 29, 2014
- Posts: 48
Tom, thanks for a thorough response. I think I'll convince my friend Jeff (the P-Cat owner) to follow the same procedure. I'll also get him to join the Beachcats forum so he can read all the stuff I'm reading.
I took a look at your Photo Album. Very cool! I really like your mast step assist rig. If we had that when we were trying to lower the mast, we wouldn't need a mast step hinge now. You also had some pictures of the inside of your hulls. Jeff was trying to describe them to me, but your pictures are worth a thousand words. I may PM you later.
Bill
--
Bill
Nacra 5.5 SL
Redondo Beach, CA
--
- Rank: Mate
- Registered: Mar 20, 2012
- Last visit: Jun 16, 2014
- Posts: 248
Hey, I only built that mast step assist AFTER I broke my mast hinge. Nothing like 20/20 hindsight...
By all means invite Jeff here, and feel free to PM me any time.
Tom
--
Tom Benedict
Island of Hawaii
P-Cat 18 / Sail# 361 / HA 7633 H / "Smilodon"
--
By all means invite Jeff here, and feel free to PM me any time.
Tom
--
Tom Benedict
Island of Hawaii
P-Cat 18 / Sail# 361 / HA 7633 H / "Smilodon"
--

- Rank: Mate
- Registered: Mar 12, 2003
- Last visit: Feb 19, 2021
- Posts: 879
Have a P-cat mast step hinge. Email me for pics, etc. Pete pbegle@charter.net
- Rank: Mate
- Registered: Mar 20, 2012
- Last visit: Jun 16, 2014
- Posts: 248
OOOOH! Hey, just for future reference, what other P-Cat parts do you have? I might be interested in a couple.
Thanks!
Tom
--
Tom Benedict
Island of Hawaii
P-Cat 18 / Sail# 361 / HA 7633 H / "Smilodon"
--
Thanks!
Tom
--
Tom Benedict
Island of Hawaii
P-Cat 18 / Sail# 361 / HA 7633 H / "Smilodon"
--
- Rank: Lubber
- Registered: Aug 20, 2012
- Last visit: Jan 29, 2014
- Posts: 48
Tom, I think Jeff's boat is only 9 serial numbers after yours. I've added another picture (IMG_2371x 2.jpg) to my Photo Album of the mast step hinge showing the serial number as 370. I fired off an email to Pete about the mast step hinge.
Bill
--
Bill
Nacra 5.5 SL
Redondo Beach, CA
--
Bill
--
Bill
Nacra 5.5 SL
Redondo Beach, CA
--
- Rank: Mate
- Registered: Mar 20, 2012
- Last visit: Jun 16, 2014
- Posts: 248
Cool! Hey, it'd be neat to find out the history of Jeff's boat. I think I've got a pretty complete picture of mine but there are some fuzzy bits, like the actual year the thing was made.
Tom
--
Tom Benedict
Island of Hawaii
P-Cat 18 / Sail# 361 / HA 7633 H / "Smilodon"
--
Tom
--
Tom Benedict
Island of Hawaii
P-Cat 18 / Sail# 361 / HA 7633 H / "Smilodon"
--
- Rank: Lubber
- Registered: Aug 20, 2012
- Last visit: Jan 29, 2014
- Posts: 48
Hey Tom, did you get my PM about the daggerboards I sent Thursday?
Bill
--
Bill
Nacra 5.5 SL
Redondo Beach, CA
--
Bill
--
Bill
Nacra 5.5 SL
Redondo Beach, CA
--
- Rank: Lubber
- Registered: Aug 20, 2012
- Last visit: Jan 29, 2014
- Posts: 48
Here are some "Before" and "After" pictures of the P-Cat. They show all of the lines that were, frankly, in the way. We cleaned them up and the boat does not know the difference.

Bill
--
Bill
Nacra 5.5 SL
Redondo Beach, CA
--
Bill
--
Bill
Nacra 5.5 SL
Redondo Beach, CA
--
- Rank: Mate
- Registered: Mar 20, 2012
- Last visit: Jun 16, 2014
- Posts: 248
Crap. I typed in a long reply, then accidentally hit the back button on my browser, and lost it. Let me try this again...
On the dagger boards, here's a question: When I got my P-Cat, it came with these aluminum strips I couldn't identify. Finally I found a matching set of holes on the bottoms of each of the hulls, on either side of the dagger board trunk. I called the previous owner, and he said there was a rubber "skirt", held on with those strips, that the dagger board passed through. This was apparently common practice with dinghies when Carter Pyle designed the P-Cat back in the day. So I got some 1/8" neoprene sheet from the marine store and installed them. Once they were there, I cut slits for the dagger board to pass through. This makes for a nice snug fit, and keeps water from gurgling around in those mile-long dagger board trunks the P-Cat has.
One problem I still have, though, is that the boards like to settle as far down in the trunk as they can go. NOTHING will keep them from doing this. They're just too darned heavy. There's a rope donut tied through the handle on each of the boards that keeps them from sinking through the bottom of the boat. But it's still holy hell to pull the things out once they've sunk in.
Sorry, I don't have any pictures of any of this. But I can take some if you're interested.
Tom
(Running rigging is next. But cripes, I don't want to lose this post again through my own stupidity.)
--
Tom Benedict
Island of Hawaii
P-Cat 18 / Sail# 361 / HA 7633 H / "Smilodon"
--
- Rank: Mate
- Registered: Mar 20, 2012
- Last visit: Jun 16, 2014
- Posts: 248
Ok, running rigging...
WOW!
Our P-Cat is rigged very differently from either of your photos. Not saying it's right, just saying it's different. It matches, as closely as possible, the rigging diagram in Royce's Sailing Illustrated (which pictures a P-Cat 2, not a P-Cat). I'm not that keen on it. But I'll describe it, anyway. Again, no photos of the boat rigged. But I have enough other photos I can probably piece some of this together.
The jib has long leaders that go back to single-sheave blocks. When sheeted in, those blocks almost reach the rear crossbeam of the boat. (LONG leaders...) The rear crossbeam has two tracks, one on each side, with a block and becket on each track. You can see one of them in the left side of this photo:
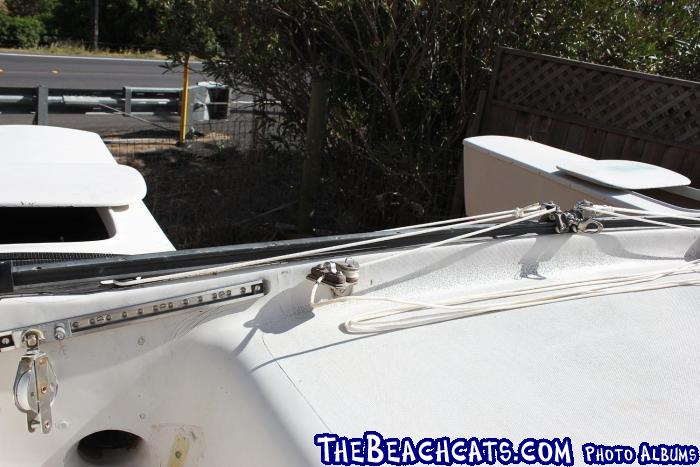
The rigging starts at the becket, runs forward to the jib block, runs back through the block on the rear crossbeam, and then forward (again) to the cam cleat block located on the front crossbeam:
The free end then goes back through the same pattern on the far side of the boat. So the jib sheet is continuous.
The way it's rigged in Royce's Sailing Illustrated, the jib sheet crosses the deck and goes into the cam cleat on the opposite side. This puts the sheet right in the hands of the crew as it exits the block. This also drives me and my wife nuts since we learned to sail on a Prindle 16. So we don't rig it that way. The port side rigging stays on the port side, and the starboard side rigging stays on the starboard side.
So on to Jeff's rigging:
First, do you guys have a spinnaker on that boat? Because there are some lines on there I'm not familiar with. There are some screw holes on my hull that have been filled in that match some of the stuff I see on Jeff's boat, so I'm curious.
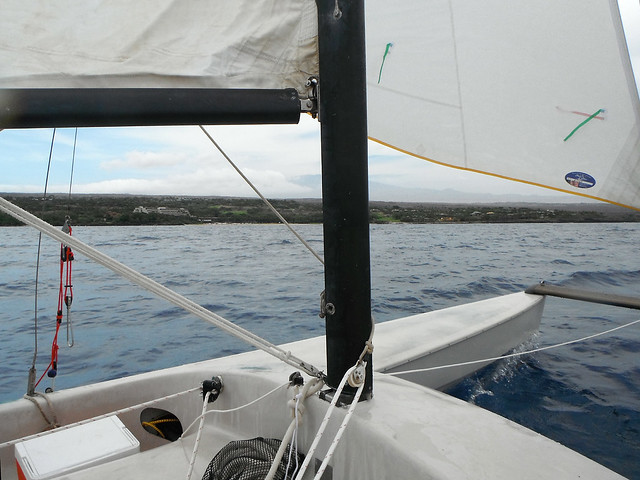
In your second photo, it looks like a much-compressed version of what I'm running right now. But instead of having the jib block at the rear crossbeam, you've got it on the sidestay. How does this work for you? And do you have that 2:1 purchase on the jib sheet, or is it a single-purchase?
I really really like how clean the rigging is in your second photo. It's about as close to a modern cat as I could imagine a P-Cat getting. I'm not all that keen on how my jib sheets run back and forth along the length of the deck. Even when everything is running neat, it feels cluttered. I'm constantly tripping over jib sheets.
At some point I also need to pick your brain about the mainsheet traveler. It's very different from the one I'm using. Another P-Cat sailor said the traveler really needs 3:1 purchase in order to have the oomph to move the traveler when sheeted in. Mine has 3:1, but it's not the nicest setup in the world. There are a number of other 3:1 purchase travelers that seem like they'd be a lot more pleasant to use. Do you mind describing how Jeff's is set up?
Some other questions unrelated to rigging:
I also see you've still got the hooks for the hiking straps, but don't have hiking straps installed. Our hiking strap holes were filled in. I've been toying with the idea of replacing them, but haven't decided one way or the other yet. I kind of need to figure this out before doing the gel coat work on the deck.
Sorry to keep going with the questions, but I see the two hatches in the front crossbeam. That's one area I haven't managed to photograph inside the hulls. Any chance of sticking a camera in Jeff's hulls at that point? I'm curious what's underneath the mast. When I installed my new cam cleat blocks for the jib, aluminum bits came out when I drilled the holes. So it seems like there's aluminum embedded in the fiberglass. It would be nice to know if I'm right or wrong about that.
LOVE the compass. That's seriously cool. I hadn't thought of using that area for mounting instruments, but it seems obvious now that I'm looking at it.
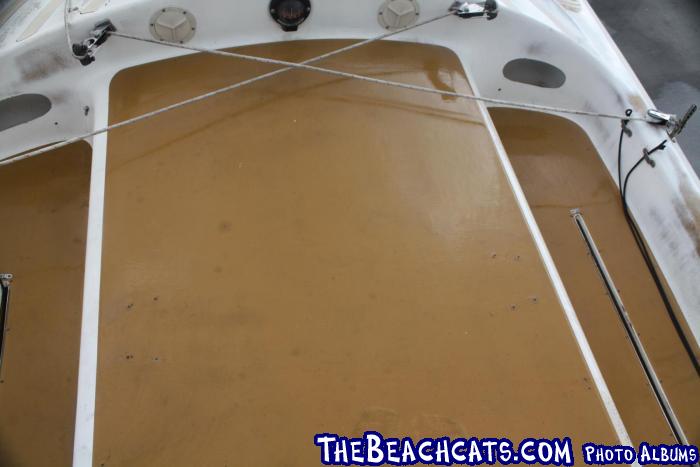
How did you guys get the two-tone pattern on deck? I'm planning to do some gel coat work on my deck in the not too distant future, but we've got alligator cracking all through the textured parts of the deck (brown in your photos). I don't mind doing different treatments on different parts of the deck. Did the boat come that way, or was that something you guys did?
Sorry for the question barrage. This is just GREAT having another P-Cat owner to bounce questions off of.
Thanks!
Tom
--
Tom Benedict
Island of Hawaii
P-Cat 18 / Sail# 361 / HA 7633 H / "Smilodon"
--
WOW!
Our P-Cat is rigged very differently from either of your photos. Not saying it's right, just saying it's different. It matches, as closely as possible, the rigging diagram in Royce's Sailing Illustrated (which pictures a P-Cat 2, not a P-Cat). I'm not that keen on it. But I'll describe it, anyway. Again, no photos of the boat rigged. But I have enough other photos I can probably piece some of this together.
The jib has long leaders that go back to single-sheave blocks. When sheeted in, those blocks almost reach the rear crossbeam of the boat. (LONG leaders...) The rear crossbeam has two tracks, one on each side, with a block and becket on each track. You can see one of them in the left side of this photo:
The rigging starts at the becket, runs forward to the jib block, runs back through the block on the rear crossbeam, and then forward (again) to the cam cleat block located on the front crossbeam:
The free end then goes back through the same pattern on the far side of the boat. So the jib sheet is continuous.
The way it's rigged in Royce's Sailing Illustrated, the jib sheet crosses the deck and goes into the cam cleat on the opposite side. This puts the sheet right in the hands of the crew as it exits the block. This also drives me and my wife nuts since we learned to sail on a Prindle 16. So we don't rig it that way. The port side rigging stays on the port side, and the starboard side rigging stays on the starboard side.
So on to Jeff's rigging:
First, do you guys have a spinnaker on that boat? Because there are some lines on there I'm not familiar with. There are some screw holes on my hull that have been filled in that match some of the stuff I see on Jeff's boat, so I'm curious.
In your second photo, it looks like a much-compressed version of what I'm running right now. But instead of having the jib block at the rear crossbeam, you've got it on the sidestay. How does this work for you? And do you have that 2:1 purchase on the jib sheet, or is it a single-purchase?
I really really like how clean the rigging is in your second photo. It's about as close to a modern cat as I could imagine a P-Cat getting. I'm not all that keen on how my jib sheets run back and forth along the length of the deck. Even when everything is running neat, it feels cluttered. I'm constantly tripping over jib sheets.
At some point I also need to pick your brain about the mainsheet traveler. It's very different from the one I'm using. Another P-Cat sailor said the traveler really needs 3:1 purchase in order to have the oomph to move the traveler when sheeted in. Mine has 3:1, but it's not the nicest setup in the world. There are a number of other 3:1 purchase travelers that seem like they'd be a lot more pleasant to use. Do you mind describing how Jeff's is set up?
Some other questions unrelated to rigging:
I also see you've still got the hooks for the hiking straps, but don't have hiking straps installed. Our hiking strap holes were filled in. I've been toying with the idea of replacing them, but haven't decided one way or the other yet. I kind of need to figure this out before doing the gel coat work on the deck.
Sorry to keep going with the questions, but I see the two hatches in the front crossbeam. That's one area I haven't managed to photograph inside the hulls. Any chance of sticking a camera in Jeff's hulls at that point? I'm curious what's underneath the mast. When I installed my new cam cleat blocks for the jib, aluminum bits came out when I drilled the holes. So it seems like there's aluminum embedded in the fiberglass. It would be nice to know if I'm right or wrong about that.
LOVE the compass. That's seriously cool. I hadn't thought of using that area for mounting instruments, but it seems obvious now that I'm looking at it.
How did you guys get the two-tone pattern on deck? I'm planning to do some gel coat work on my deck in the not too distant future, but we've got alligator cracking all through the textured parts of the deck (brown in your photos). I don't mind doing different treatments on different parts of the deck. Did the boat come that way, or was that something you guys did?
Sorry for the question barrage. This is just GREAT having another P-Cat owner to bounce questions off of.
Thanks!
Tom
--
Tom Benedict
Island of Hawaii
P-Cat 18 / Sail# 361 / HA 7633 H / "Smilodon"
--
- Rank: Lubber
- Registered: Aug 20, 2012
- Last visit: Jan 29, 2014
- Posts: 48
Tom, I’ll answer what I can, but Jeff is now a member of Beachcats and will probably chime in on this.
Re: dagger boards, I have not seen the aluminum strips you referred to or any rubber at the bottom of the dagger board wells. Instead there is flimsy piece of what looks like thin styrene with a slit in it at the bottom of the well. The dagger board slides through this and that is all there is to the whole system. The dagger board well tapers up along the sides of the well so that there is a considerable gap between the side of the well and the topsides of the dagger board itself. Consequently with no lateral friction, the dagger board is free to move aft and retract depending on where the loads are coming from. Our dagger boards settle all the way down too, until they hit the rope stop.
Re: rigging, in talking with Jeff, he tells me this was the way he purchased the boat and assumed it was the standard P-Cat rigging system. Like you said, it may not be right or wrong, just different. As crew, I was in charge of the jib, and being as careful as I could, I still got tangled up with the many lines on deck. I cut myself many times on the small cleats when I planted my knee in shuffling over to the other side. I looked at the system carefully and made my suggestions to Jeff. He was reticent to change, his thought being that he wanted to keep the boat as stock as possible. He eventually acquiesced and we significantly reduced the number of lines required to sail. Like the famous architect Mies van der Rohe said, “Less is More”. We now just have one line on each side of the jib going through a rotating cleat on the forward crossbeam. We filled in the holes, and although they look like they are just raw holes in the “After” picture, they are absolutely flush with the surface of the deck. I asked Jeff for his honest opinion after we sailed it like this and he gave a thumbs up.
Re: Jeff’s rigging, we do not have a spinnaker on the boat. On the traveler car, we had it actually come off while sailing. One of the end stop-screw’s head broke off and the car ran right off the traveler. Fortunately, Jeff was Johnny-on-the-spot and grabbed almost all of the ball bearings. We locked it in place and made for the dock. I made a custom jig to hold the ball bearings in place and we carefully slid it back into position and replaced the end stops. I am not nearly as familiar with P-Cats as you, but Jeff’s boat does not have a sliding adjustment for the traveler car. It does slide, but it is not the pull-push system you find on monohulls. You have to manually move it. Jeff will have to answer this in greater detail. Our hiking straps are removed at this time because we took the mast and all of its attendant rigging apart as well. (There is a very interesting story that goes with why the mast step hinge is broken, but I will leave that alone for right now).
Re: inside the hulls, those two hatches are SO handy. We keep a pair of pliers and the halyard crank in one side and bungees for the mainsail in the other. I will ask Jeff if he can shoot inside the hull and get what you need.
Re: the compass. I dismissed it early, but now I use it all the time when I am captain on the boat.
Re: the paint job, the base color is a brown/mustard hue with white painted trim. The white is wearing off in some areas. I’m pretty sure he got the boat that way. I have hinted that the boat would look awesome with a new paint job, but that can be expensive and I understand his reticence.
We really need someone to talk to about gel coat. I’ll leave those questions for you and Jeff.
Bill
--
Bill
Nacra 5.5 SL
Redondo Beach, CA
--
- Rank: Mate
- Registered: Mar 20, 2012
- Last visit: Jun 16, 2014
- Posts: 248
Eeeeeh... I really don't know that much more about P-Cats. I started this odyssey less than a year ago, never having seen a P-Cat in my life. That odyssey started when the boat showed up as a bare hull and mast with a five gallon bucket and a cardboard box, both full of... stuff... I took one look and thought, "Ya gettin' in deep now, man!"
Despite being such a wildly popular boat in its day, there aren't that many people who remember it now. Some of the info I had was gleaned from 1950's era postcards, from watching The Endless Summer and a couple of Disney clips someone was kind enough to point out to me. Finding that rigging diagram in Royce's was sheer serendipity. (It's a small book, dirt cheap, and well worth reading for the historical information alone.) The previous owners of my boat have been a good source of information, too, but everything else was sheer guesswork. The only edge I might have on you and Jeff is that I did more Google searches over the last year. (Or maybe not!)
I think my traveler system pre-dates recirculating balls. I don't know if mine is original hardware, so again they're different but that's about it. My Prindle 16 had a system similar to the one in your pictures. There was a line running from the rear of the rear crossbeam up and through the traveler, and then through a cam cleat that was riveted to the rear crossbar. I liked it because you could set a certain amount of travel, and even when you tacked it would maintain that amount of travel on the new tack as well.
The one I have on my P-Cat is more complicated (read that as "more likely to tangle") but has two cool features: The 3:1 travel means even when the sail is loaded up hard, I can still move the traveler in without much effort. The other is that it'll sheet in past center-line. This is a cool feature, and lets it point a little higher than my Prindle ever could. But it also makes it way too easy to pinch and lose headway. I love having it, but I find myself staring at telltales on the sails way more than I used to.
I'll take a picture of the rubber and aluminum on the bottom of my hulls when I get home tonight, and post them. I can believe this stuff wasn't stock. (What on my boat is stock?!) But it works well, so I'm happy to share. It's not the most hydrodynamic setup in the world. Push comes to shove it's probably draggy as hell. But it's built like a tank, and it works.
At the tops of the daggerboard trunks, is there enough room to put something in there to help wedge the boards in place? Over on the Hobie forums, one guy posted a build of a Miracle 20. When he got to the daggerboard trunks, he posted a neat tip: Get some self-adhesive Velcro. Get the fuzzy side and stick it in the daggerboard trunk, fuzzy side facing the board. He only used four little tabs on his, but the Miracle 20 trunks are a close fit to the boards. I was planning to line the things end-to-end with fuzzy Velcro. But my trunks are a much tighter fit than yours, it sounds like. If I stuck Velcro in there, the daggerboard never would've fit. (I did use this trick with the rudder castings, though. The resulting fit is snug snug snug. I LOVE having rudders that don't rattle at all.)
Now I need to go look at compasses. I really really like that setup.
Thanks again,
Tom
--
Tom Benedict
Island of Hawaii
P-Cat 18 / Sail# 361 / HA 7633 H / "Smilodon"
--
- Rank: Lubber
- Registered: Aug 20, 2012
- Last visit: Jan 29, 2014
- Posts: 48
Tom, the following is from Jeff while he solves his login problems with Beachcats.
Bill
1. My P-Cat equipment was done through Owen Minney (now retired in Nevada?) who was a P-Cat dealer.
2. My first P-Cat was hull # 290. It had exactly the same rigging as it is in yours pictures.
3. Hiking foot straps were synthetic material about 2" wide; good to have.
4. My memory has been jogged; the aluminum and rubber on the dagger wells was on my first P-Cat too!
Jeff
--
Bill
Nacra 5.5 SL
Redondo Beach, CA
--
Bill
1. My P-Cat equipment was done through Owen Minney (now retired in Nevada?) who was a P-Cat dealer.
2. My first P-Cat was hull # 290. It had exactly the same rigging as it is in yours pictures.
3. Hiking foot straps were synthetic material about 2" wide; good to have.
4. My memory has been jogged; the aluminum and rubber on the dagger wells was on my first P-Cat too!
Jeff
--
Bill
Nacra 5.5 SL
Redondo Beach, CA
--
- Rank: Mate
- Registered: Mar 20, 2012
- Last visit: Jun 16, 2014
- Posts: 248
Good info!
1 - The name Owen Minney sounds familiar. I think that's who the first owner of my boat bought through. (I could be wrong, though... don't have my notes in front of me.)
2 - Hey, when Jeff got #290, was it bought new? I'm still trying to get a better idea of the manufacture date of my boat. But it's tough to find anything that ties hull numbers to dates. The best I have right now is when Endless Summer was filmed versus what hull numbers appear in it. Which is kind of like saying, "The culprit was a male, between five and a half and six and a half feet tall, with brown hair." Doesn't narrow it down much at all.
Since Jeff has now tried the original P-Cat rigging on #290 and the modified rigging you guys came up with for his current hull, I'm curious to hear what he thinks about the two. I'm still not keen on that back-and-forth route for the jib sheets. If I can shorten the leaders on the jib clew blocks and bring those blocks forward to the side stays, that makes the run a lot cleaner. The only thing I see I'm losing is the ability to move the blocks inboard. Which isn't minor, but it's a tradeoff I might be willing to go for since I'm not racing this thing.
3 - Sounds like nylon seatbelt webbing. That's easy enough to get, so I may roll my own. (It's not like you can order hiking straps for a P-Cat any more!)
4 - Oops! I was supposed to photograph that last night. Sorry, I got caught out past dark doing emergency yard work for a neighbor. It completely slipped my mind. I'll try to take pictures as soon as I get home tonight.
Tom
--
Tom Benedict
Island of Hawaii
P-Cat 18 / Sail# 361 / HA 7633 H / "Smilodon"
--
- Rank: Lubber
- Registered: Nov 15, 2012
- Last visit: Jan 23, 2013
- Posts: 9
Hey Tom,
This is Jeff, who sails with Bill. I think I should have Bill's e-mail address...because I've been the phantom with all your correspondence!! Sorry about that. I had not completed all the steps in subscribing to Beach Cat...and when I tried to reply, my application got kicked back because enough of my information was still recored from the first application so it would not allow anyone trying to open a new account using already existing information...so that took some sorting out.
Anyway...here I am!!
First off Tom....let me start by saying how beautiful your P-Cat is!! I will enjoy seeing any pictures you have of your boat.
The P-Cat that I have now, was modified from the original set up. I have not seen all the pictures Bill has posted on our P-Cat, but I'm sure you've noticed a few differences....like the bailing tube in the well has been filled in so as to anchor a 2' cable that relocated the jib pulley off the transom and put it closer to the shrouds...thus eliminating some of the line congestion for the guy with the tiller.
I'd have to look at some of my old photos of my first P-Cat to be sure just exactly what its hull number was, but 291 seems right. I did not buy it new...I bought it from Wayne Mort, someone I worked with on the movie industry. I parted ways with that hull when I realized how much it was going to cost me to repair all the stress fractures on the hull....it was going to be a lot cheeper to simply buy a better hull...which is what I did (reluctantly).
One of the things I have missed from the first P-Cat was the traveler set up (like you have). But I don't miss all the gymnastics it takes to get from one side to the boat to the other!! Of course...it took some time for me to deliberate whether or not I was actually going to alter the P-Cat "look" by changing its rigging design. One of the things that helped me make the change was the fact that the design of the P-Cats rigging had ALREADY been altered with the jib pulley! YOU, however...are in possession of an original P-Cat! Even my first P-Cat did not have the Boom Vang on it (the hardware was on the boat for it) but Wayne had abandoned it long before I got it!
I'm going to have to find the box I put all my old photos in of #291...I'm sure I packed them away with my tow copies of Royce's Sailing Illustrated!!
Its good being in touch with you Tom..not many P-Cat owners around!!
We few...we happy few...we band of brothers!!
jt
- Rank: Mate
- Registered: Mar 20, 2012
- Last visit: Jun 16, 2014
- Posts: 248
Hey, cool! Glad to hear from you, Jeff.
If I do wind up modifying my rigging, I'll make every effort to make it a reversible change. Relocating blocks to existing tie points like the side stays, for instance, would be fair game. But I don't want to drill new holes in the hull or remove the tracks from the transom.
I'd love to see any and all pictures you have of #291 and your current hull. I haven't had much luck tracking down a manual from an original P-Cat, so every bit of information is good information to have. And I'll gladly take more pictures of my boat and post them.
One question I do have: A while back I jammed my main halyard in the winch that lives in the mast. I had to remove the winch to clear the jam (it was BAD), and in the process drew up the winch as-is so I could design a new one. But I'm sticking the original back in today (I hope). It's still prone to jamming in exactly the same way, though, so I'm not 100% keen on this.
Do you still have your main halyard set up with a winch? Or have you come up with a different way to route it? There are some distinct advantages to the winch setup. For example I couldn't raise or lower the main on the water on my P-16. Not without some serious gymnastics. Doing that on the P-Cat is simple by comparison. But I never had my Prindle halyard hang up quite as bad as the one on my P-Cat.
I'm all for maintaining the historical accuracy of the boat. But if I come across a change that makes for a better sailing experience, I'm going to consider it.
Cheers!
Tom
--
Tom Benedict
Island of Hawaii
P-Cat 18 / Sail# 361 / HA 7633 H / "Smilodon"
--
- Rank: Lubber
- Registered: Nov 15, 2012
- Last visit: Jan 23, 2013
- Posts: 9
Hey Tom,
Does your winch jam while your raising the sail or when your lowering it?? On #291, we did have a problem, when lowering the main, that if dropped faster then the winch could handle, which it was capable of doing, the excess cable would intertwine with itself. We'd be left to unspool the all the cable out in the middle of the marina....while trying to keep ourselves pointed into the wind so all the main sail that had not gotten reefed didn't catch the wind and cause havoc with us while we worked to "unknot" all that cable. Was that circumstance similar to how your halyard jammed?? (That must have been one massive jam if you had to extract the winch...my heart goes out to you!! A couple of time we thought that we might be better off setting the boai on fire and just swimming to shore, rather then try to unknot thar "birdnest"!!
I don't have that problem with the current P-Cat...quite the contrary...on this boat, there are sections that we have to pull the main down!! I prefer this current problem over the former problem!! With our mast being currently down, due to our repairs...I'm going to be replacing the old halyard cable...which I noticed had a few kinks in it.
Am I to understand that your winch was jamming before your big problem which warranted removing the winch?? Obviously you've examined your winch closely to ascertain why. What do you think might be the reason? I'm assuming that your cable is just fine. And why always in the same spot??
- Rank: Lubber
- Registered: Nov 15, 2012
- Last visit: Jan 23, 2013
- Posts: 9
Tom....
I had more to add to your letter, but I guess I pushed the wrong button....cause all of a sudden the letter was sent to you!
I wanted to say, in regards to modifying our rigging: that Bill and I have kept all the old rigging and we have documented how it all laid out on the boat, so if our efforts did not get the results we hoped for...we could always put it back!!
It might be a long time before I uncover where those pictures of 291 are....so please bear with me...they're buried in the garage...and that means taking out everything that's in the garage first!! (talk about Work vs. Reward!! it causes me pause!!)
Okay...now I'm done!!
Its good being in touch with you Tom (and I'm sure Bill's glad he doesn't have to carry on all the correspondence alone...typical...he does all the work and I sit on the dock, saying: "Good job, crew!!")
Until later...
jt
- Rank: Mate
- Registered: Mar 20, 2012
- Last visit: Jun 16, 2014
- Posts: 248
You guessed it: while lowering the sail. As you said, I think what happens is the halyard loses tension and the free loops of halyard go every which way. One loop jammed up in the ratchet mechanism so bad it cut strands in the halyard. In the end I had to cut the halyard with a Leatherman and drop the sail that way.
Even including the day when I was teaching a friend how to back a boat, and he ran our Prindle up on rocks at about 15 knots, AND the day when my dogbone separated while I was out on a wire trying to outrun a storm, AND the day when... yeah... the P-Cat Halyard Jam Day ranked up there with the worst. I was right there with you on just setting fire to the thing and swimming ashore. I swear my family thought I was Captain Bligh. Damn near got shoved out in the longboat for that one.
The winch jam was what prompted removing the winch from the mast. The halyard was in there so hard, there was no way I was getting it out without pulling the whole thing. I did finally get the old one out, though. Yesterday I put everything back together and installed a new main halyard. So far so good.
I think the reason this happens is that there is nothing on the P-Cat winch that actually constrains the halyard to stay on the winch drum. Adding a roller or just a rub plate to the bottom of the winch that spans the entire width of the winch drum would probably do the trick. It's easy enough to remove the rivets that hold the winch in the mast, so I might go back and do this at some point. There's plenty of meat on the winch frame to bolt something on that would do the job.
A better approach, and the one I started to draw on the new winch I plan to make, is to make the side plate on the ratchet side fatter, and to recess the ratchet into the side plate. That way the halyard just can't get in there to foul things up. But that's a project for another day. Meanwhile I've got my boat back and I plan to sail it. But I'm going to be a LOT more careful when lowering the main.
And no worries on taking time to post your pictures of 291. Some things take precedence over digging through dusty boxes. Sailing ranks pretty high in that list of things that take precedence! So does eating, sleeping, and spending time with family.
Cheers,
Tom
--
Tom Benedict
Island of Hawaii
P-Cat 18 / Sail# 361 / HA 7633 H / "Smilodon"
--
- Rank: Lubber
- Registered: Nov 15, 2012
- Last visit: Jan 23, 2013
- Posts: 9
Hey Tom,
I must have a pretty great Therapist (either that or I've been using some pretty good drugs) cause I've forgotten (or rather blocked out) a lot of those bad memories until I hear some or your stories!! Great...thanks to you...years of therapy have gone down the drain!! Its back to waking up in the middle of the night from "night terrors"!! (just kidding)
I'm remember now....that when it came time to lower the main sail...I had one hand on the 'stop lever' for the winch....should it become a "run-away" I could stop it before it coiled around itself!! Your idea for the new winch sounds pretty good...the rub plate sound like a great idea too!! Control, is everything!!
We took some pictures of the inside of the center cross-beam, that supports the mast....as just as soon as BIll can show me how to down load pictures...I'll send you some. (Bill: the attachment you sent me, when enlarged, was nothing but fuzzy pixels....there was no way to make about any of the words!! I'll call you tomorrow)
Tom, how did your day on the water go??
Until later,
jt
- Rank: Mate
- Registered: Mar 20, 2012
- Last visit: Jun 16, 2014
- Posts: 248
Aaaaaah... That makes good sense. Basically have one hand regulating the winch, keeping tension on the halyard, and the other yanking sail down. I'll use that trick next time I'm out. And I'll let you know how the rub plate goes. (Happy to make two, for that matter. If it works I'll send you the other one.)
I haven't had the boat back out on the water yet, unfortunately. But that's the plan for the weekend. I also found an actual factual BEACH I can launch from! It's on the opposite side of the island from me, so it's a bit of a drive. But the guys who sail there all sound like a friendly bunch. It should be good.
I'm looking forward to seeing the front beam innards when you and Bill can post those pictures.
Tom
--
Tom Benedict
Island of Hawaii
P-Cat 18 / Sail# 361 / HA 7633 H / "Smilodon"
--
- Rank: Lubber
- Registered: Nov 15, 2012
- Last visit: Jan 23, 2013
- Posts: 9
Tom,
To clarify myself better....I don't think that there is a practical way of regulating the speed of the winch (except for possibly your 'rub plate'). What I was trying to say in the other e-mail was that if the sail began to drop too quickly...ansd you became fearful about the cable on the winch balling up....was to have one hand on the 'lock lever' and force it back into the lock position, abruptly stopping the mail sail from dropping down any further...and hopefully stopping it before the cable had time to unspool off the winch!! Then when your sure nothing has unspool...you once again unlock the lever and continue the prodcess of lowering the mast. Chances are, as was in our case on the former P-Cat, as soon as you did that, the mail would just continue it freefall....to which you would once again engage the lock lever. And so it would go until enough of the main had been lowered that the weight of the mail sail did not create enough tension to pull the remaining sail down...which was somewhere around the top third of the sail!
Tom...with Bill's diligent help I have finally learned how to post some pictures...so...if you go to where you found Bill's pictures...I'm now right next to him!! I've got one picture of inside the area of the central 'cross beam'. I have more to post on the interior section but.....well....here's the thing: on my laptop, it doesn't matter how I'm holding the camera: I have the option of saying which way I want up to be. So...when taking pictures of the interior of the P-Cat, it was much easier to hold the camera upside down to take the picture looking into the center part of the boat...other wise I would have had to fit my whole hand inside the portal in order to snap the picture...but...if I turned the camera up-side-down I could take the picture with my hand still on the outside of the hole. Why am I telling you this? Because when I post those pictures on BeachCat...the pictures are all upside down. So, rather then having to write out an lengthy explanation about the picture being upside down...I thought I'd rather just try and take the pictures upside right. So....until then...you'll have to settle for this one picture. (Of course if the port side portal was hot temporally stuck shut I could have taken the center section easily enough from there!
Also...you can see pictures of Bill cutting the bent bolt off the toilet seat today!
BTW: What size cable are you using for your halyard? And...what is the cable's overall length?? (I'm going to be replacing mine)
We'll also be dealing with the stress fractures on the base of the mast step hinge.
Have a great sail this weekend...please tell us how it goes, alright?
Until later,
jt
- Rank: Lubber
- Registered: Nov 15, 2012
- Last visit: Jan 23, 2013
- Posts: 9
Tom,
One more thing...congratulations of finding your beach to launch from. I didn't think the Big Island still had any beaches left!.
I'm certain that the beach is not very long....but 500 lbs. is still a lot of boat to push thru any length of beach...will you be alright?
One more thing...congratulations of finding your beach to launch from. I didn't think the Big Island still had any beaches left!.
I'm certain that the beach is not very long....but 500 lbs. is still a lot of boat to push thru any length of beach...will you be alright?
- Rank: Mate
- Registered: Mar 20, 2012
- Last visit: Jun 16, 2014
- Posts: 248
Should be. The beach is on Hilo Bay. I talked to some of the folks from the sailing club there, and they said with 4WD you can back the trailer right into the water. Thank goodness I tow with a Jeep!
If we wind up going there a lot, I wouldn't mind making some heavy duty beach wheels. But until then this'll do just fine.
Tom
--
Tom Benedict
Island of Hawaii
P-Cat 18 / Sail# 361 / HA 7633 H / "Smilodon"
--
If we wind up going there a lot, I wouldn't mind making some heavy duty beach wheels. But until then this'll do just fine.
Tom
--
Tom Benedict
Island of Hawaii
P-Cat 18 / Sail# 361 / HA 7633 H / "Smilodon"
--
- Rank: Mate
- Registered: Mar 20, 2012
- Last visit: Jun 16, 2014
- Posts: 248
Hey, thanks for posting those pictures. That explains a good bit I was scratching my head about. I knew there was some kind of bulkhead inside there, but I couldn't see what it was. Looks like a pretty massive piece of wood that's been glassed over!
And thanks for posting the page out of Royce's from 1968. I've got a more recent edition, and that page was substituted with the P-Cat2 rigging. It's different enough that I had to make some guesses on how ours is supposed to be set up. I'll go through the boat fore to aft:
First off, we don't have a forespar. We have a forestay. I don't know how it is on your boat. After lugging the mast and boom around, I'm glad we don't have a forespar! It looks like it's as heavy as the boom! Less weight aloft = good in my book.
What Royce calls the "luff spar trim line" I'm treating as the line that runs the roller furler on the jib. I'm guessing this was the original intent, even with the forespar. Our jib zips onto the forestay, similar to the jibs on most beach cats. Right now we don't have a jib halyard. The jib is shackled to the top of the forestay where it attaches to the top roller swivel, and the luff is set with a 1:1 jib downhaul line at the foot. This is almost identical to how it was set up on my Prindle.
It looks like we got the jib sheets right. (Yay!) Right now ours is in an almost stock configuration. Two differences: First, the rear jib blocks have a bail on them, so the jib sheet is tied off to the bail and not to a padeye on the inside of the footwell, the way it's drawn in Royce's diagram. Second, instead of having the jib sheet cross the deck on a diagonal, we run it to the cam cleat on the same side of the boat the sail is on. This makes it operate a lot more like a contemporary beach cat. It makes for a bunch of taut lines inside the footwells on the leeward side, but it makes for a cleaner deck. (I'll take pictures tomorrow when we go sailing.)
The mainsheet that came with our boat was aftermarket, as far as I can tell, and had been left out in the sun too long without enough love and attention. I had to replace it. I picked up a Hobie mainsheet off of Ebay that fit the bill: Three independent upper blocks, just like the stock mainsheet, but the lower blocks are all one unit. I attached this directly to the traveler. It means the mainsheet is coming out at some unspecified location on the rear crossbar, unlike the stock mainsheet that always comes out on the centerline of the boat. But again, this is how it was set up on my Prindle so I'm used to it.
The traveler also appears to be aftermarket. It's a 3:1 (Royce calls for a 2:1). But on the P-Cat2 diagram he shows a 3:1 system. I'm guessing someone at some point decided to stick a P-Cat2 traveler on this hull. I like the 3:1 because you can sheet the traveler in and out even under pretty heavy load. But it makes for a lot of line pulling to get the thing to move any appreciable distance.
Our tiller is completely stock. (I love the idea of having teak tiller arms on a beach cat. It seems so... decadent!) But I wish Royce had put a little more detail into how the rudder blades are held down. ARGH! That was a major confusion point for us. It looks like a previous owner came up with a couple of modifications to the rudders and rudder housings, so I don't know what's stock and what's not. We ran with what we had and came up with a bungee system that works. But I'd like to see what Carter Pyle originally intended when he designed the things.
I wish wish wish wish wish Royce had detailed the spinnaker setup. I have yet to see a spinnaker on a P-Cat. I'd love to see how it was set up. For the life of me I can't figure out how to get a spin pole onto the thing that won't either foul the jib or stab oncoming waves. There's just not a lot of vertical room up front. (If you have your spinnaker, I'd love to see photos!)
On the halyard, here's what I ordered from Murray's:
33-0012 #2 Swage-It Kit
01-0034 3/32"-1/8" Stainless Thimbles
02-0033 Wire Rope 3/32" 7x19 Bare
If you have swaging tools and thimbles, skip those bits. I got 110' of wire rope. When I measured the leftovers of my old halyard it looked like it was double the length of the mast (I have a 26' mast on mine, if I remember right.) So I got twice as much as I needed, threaded it through the masthead sheave, ran the free ends to the base of the mast and cut it off there. Now I have spare halyard material for the next time I jam it in the winch and destroy it. (Ugh.) I think 55' would give you plenty to run a single halyard and still be able to cut it to length.
What I learned when I disassembled my winch is that the halyard passes in through a hole in the winch drum, after which a stopper knot is tied in it. The knot is then jammed back inside the hub of the winch drum and the excess halyard is pulled back out. It works, but it's kinda ugly. Anyway, the extra length on the halyard means you always have at least eight to ten wraps on the drum. So that knot never actually takes any load.
Sorry for the long rambly post. Figure the more we P-Cat sailors share, the less guessing and head-scratching we'll have to do in the end.
Fair winds to you!
Tom
--
Tom Benedict
Island of Hawaii
P-Cat 18 / Sail# 361 / HA 7633 H / "Smilodon"
--
- Rank: Lubber
- Registered: Aug 20, 2012
- Last visit: Jan 29, 2014
- Posts: 48
Tom, I sent you a PM.
Bill
--
Bill
Nacra 5.5 SL
Redondo Beach, CA
--
Bill
--
Bill
Nacra 5.5 SL
Redondo Beach, CA
--
- Rank: Lubber
- Registered: Nov 15, 2012
- Last visit: Jan 23, 2013
- Posts: 9
Thanks Tom....
No worries about the length of the letter, I feel exactly like you about the information...and I am grateful to you for taking the time to share it with us! The man who works on our sails has a neighbor the use to own a P-Cat for quite a while. I've asked him to pass my phone number along to him when he sees his neighbor again. If his neighbor is knowledgeable I'm hoping to have him come out with us some time...so he can pass on any more knowledge to us....which we will share with you, post-haste!! Of course, that makes it sound as if we're getting together with his neighbor soon....when in fact...he might not want to share anything with us! But...pray God...he'll turn out to be a wealth of knowledge and a fantastic tutor...and we'll all be on the ground floor of a huge P-Cat come-back!!
Thanks for the info about the halyard cable, that's useful!!
I see that Bill has posted that he's sent you a PM...I'll talk with him soon and see if he has given you any additional information, that I would only be duplicating....so....I'll hold off writing more, until later.
Here's one thing, though...I have a question in regards to the 'luff spar' and what probably we both have on our boats now, the jib furler. Our jib zips onto the forestay, as well. Here's my question...well...its more like an observation, but....I'm questioning my observation....It seems to me, that if you were to have a Luff Spar, when you needed to furl your jib, it would wind much tighter around the diameter of the spar then (as we have) around the diameter of the forestay cable. The advantage of that would be seen if you were in need of 'reefing' the jib, to reduce sail in an ever increasing wind...that the wound sail around the spar would hold against the pressure against the sail's, exposed surface....as opposed to what I might imagine, on our version of the furled jib, which is only furled around a cable. (have I explained myself well enough with that scenario??)
I'm glad the pictures were helpful to you...I'll try and take some more up-side-right pictures early next week.
Until later...
jt
- Rank: Mate
- Registered: Mar 20, 2012
- Last visit: Jun 16, 2014
- Posts: 248
No, I think your observation is right on the money. And I think this is why most roller furlers on monohulls include a rigid forespar. With the wire rope forestay like I have on mine (and it sounds like you do, too), I've got two settings: sail furled / sail unfurled. With a rigid forespar it seems like you'd have everything in-between, too.
But I'd still take the lighter weight and what seems like easier setup the flexible forestay offers.
Tom
P.S. Wind is looking questionable today. I might be able to get out this afternoon, but it's looking a little sketchy. Sailing is no fun in zero mph wind. :(
--
Tom Benedict
Island of Hawaii
P-Cat 18 / Sail# 361 / HA 7633 H / "Smilodon"
--