Welcome anonymous guest

Please Support
TheBeachcats.com

2001 Escape Playcat Tiller Problem  Bottom

  • Hello, all!

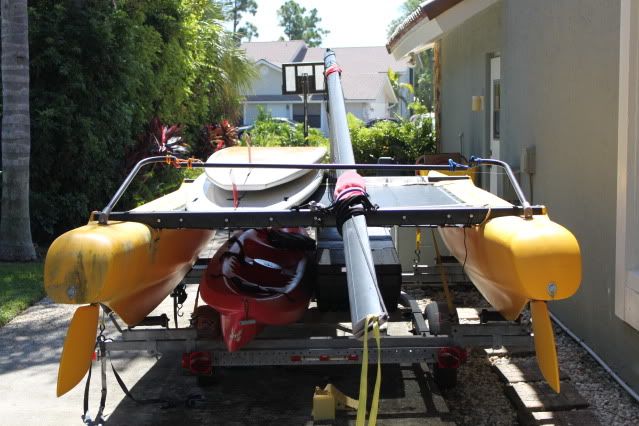
    I have a 2001 Playcat (essentially the same boat as the Playcat now manufactured by Nacra). But I have a problem with the tiller:

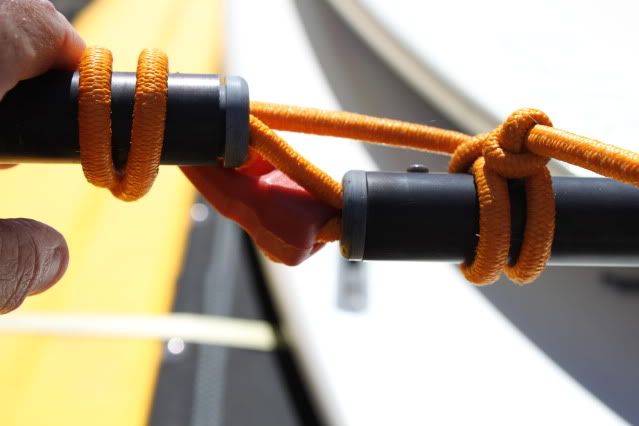
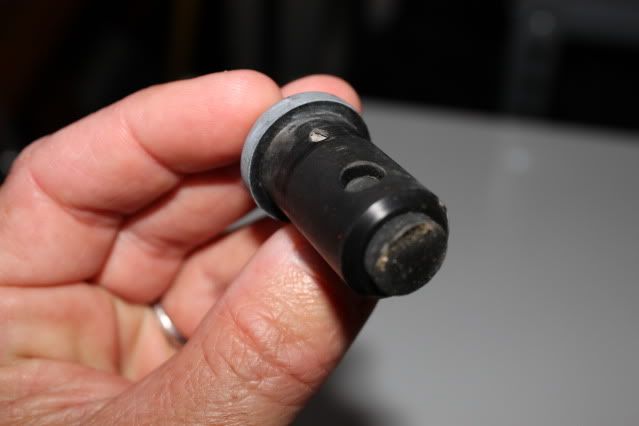
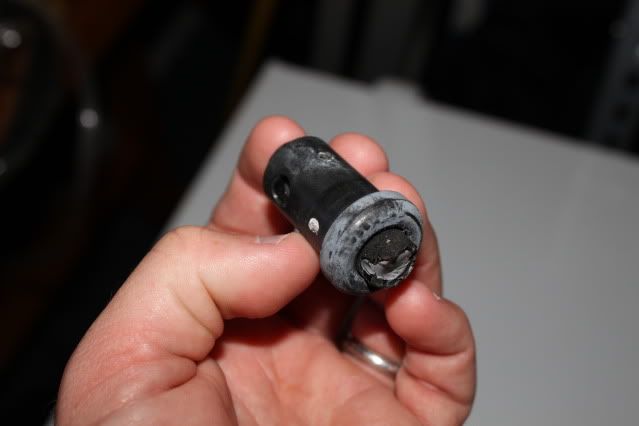
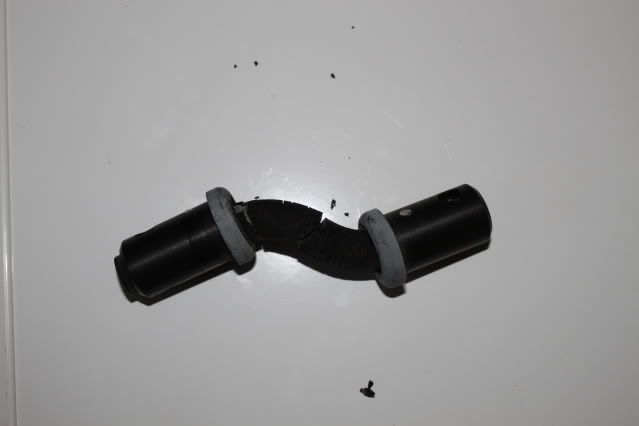
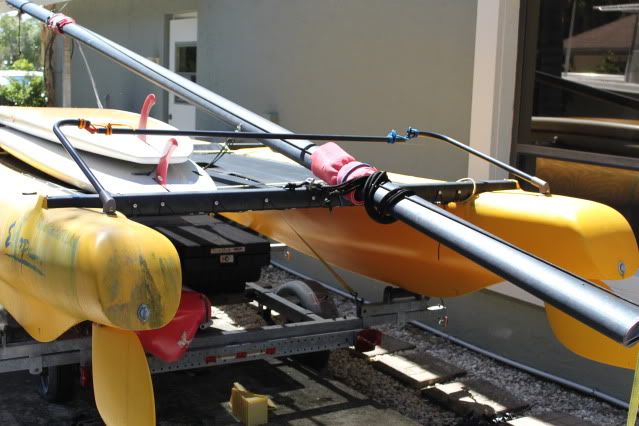
    The tiller bar connects to the risers (forgive me if my terminology is off) via two small rubber "bungies," for the lack of a better description. The old ones rotted and broke and a new pair that I managed to get from Nacra (after many, many phone calls) sheared immediately upon installation (I think their mounting holes were slightly different from the originals and this created torque). I plan to order two pairs of new ones and try another install (perhaps redrilling holes in the correct place) - should that not work, I plan to take the parts and the remaining new pair to a metal works near here and have them fabricate two small lengths of plastic-covered aircraft cable with eyes on either end to install in place of the bungies (which are held in place with a single cotter pin, so switching to cable should not be an issue - I have currently repaired it with regular bungies but they stretch to easily and it looks really jimmy-rigged - well, it is icon_smile ). This should be tougher and still have the flex of the "bungie." The other option I have thought of (more expensive) is to have the metal works straighten the tiller risers and attach a new (longer, maybe from a Hobie 18) tiller bar using bolts - essentially recreating a Hobie system. The Hobie system is so much more solid than this rubber system which seems ill-conceived (I'd hate to have one of these snap whilst sailing!).

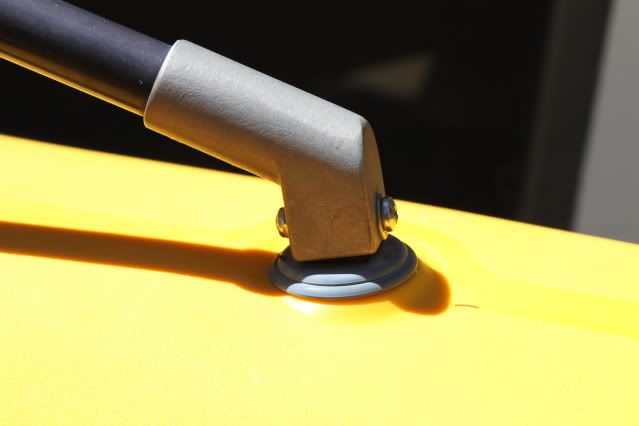
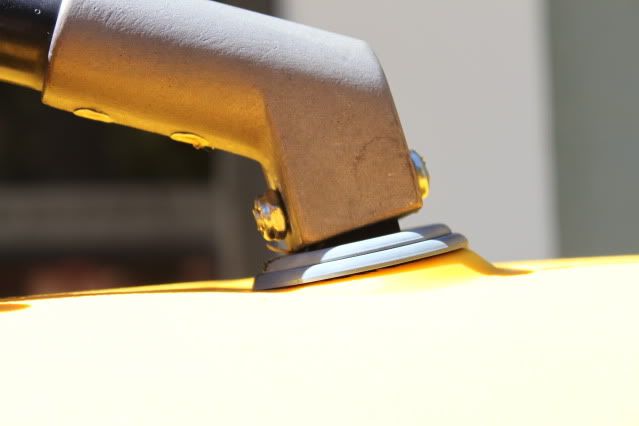
    The other issue I am dealing with is that one of the riser is significantly lower (lesser angle) than the other. There is play in both risers where they attach to the rudders, but the starboard one has more play and thus the lesser angle. I have thought about trying to find a large enough washer to install under it. If I could get ahold of Nacra (they want me to talk to the local dealer who has never seen a Playcat) and talk it through with them, I could find out what to do (with this issue and the "bungie" problem). Unfortunately, they haven't called me back.

    Has anyone else had these issues and how did you address them? Or, if you are familiar with the boat do you have any thoughts? Do you see any flaws with either tiller repair option, and do you have a preference?

    Thank you!

    James
  • James, any way you could post some pics of your issue(s), if we could eyeball the situation, we could offer optons. Go to Technical Help Gallery and open a new album, post your pics there.

    --
    TurboHobo
    H14T
    H16
    P18
    G-Cat 5.0
    P16
    --
  • I'll snap some shots today. Please don't laugh at my current repair. It works - just ugly.


    edited by: ripcurl869, Oct 10, 2010 - 06:12 PM
  • I think we have all lived with ugly jury rigged repairs. Tiller connections are usually pretty simple to fix and make more solid, just some stock aluminum tube (Home Depot usually stocks what is needed), a hacksaw and a hand drill will normally be all you need.

    Once we have a chance to look at it you will probably have a lot of suggestions based upon other peoples systems. Many of us have modified our tiller systems in various ways anyway since our boats come from the early 1980s and a lot has been learned since then.

    --
    Dave Bonin
    1981 Nacra 5.2 "Lucile"
    1986 Nacra 5.7 "Belle"
    Winnipeg, Manitoba, Canada
    --
  • I can't seem to get the Tech help gallery to load my images. I have made them small and nothing; It just goes to a "loading" page and never leaves. So, I'll do this the old fashioned way (with Photobucket). The knots are simply a redundancy in case the central fix goes awry. The pics of the old connector show how it is manufactured with an S-curved piece of rubber held in by a cotter pin (the silver dot). It is this cotter pin around which I have threaded the orange bungie. (please excuse the mildew on the hulls - she needs a good scrub, which shall be forthcoming)

    http://i112.photobucket.com/albums/n188/jannear/Playcat%20Tiller/IMG_0575.jpg
    http://i112.photobucket.com/albums/n188/jannear/Playcat%20Tiller/IMG_0576.jpg
    http://i112.photobucket.com/albums/n188/jannear/Playcat%20Tiller/IMG_0590.jpg
    http://i112.photobucket.com/albums/n188/jannear/Playcat%20Tiller/IMG_0591.jpg
    http://i112.photobucket.com/albums/n188/jannear/Playcat%20Tiller/IMG_0593.jpg
    http://i112.photobucket.com/albums/n188/jannear/Playcat%20Tiller/IMG_0594.jpg

    Tiller arm issue (note angle):

    http://i112.photobucket.com/albums/n188/jannear/Playcat%20Tiller/IMG_0585.jpg
    http://i112.photobucket.com/albums/n188/jannear/Playcat%20Tiller/IMG_0578.jpg
    http://i112.photobucket.com/albums/n188/jannear/Playcat%20Tiller/IMG_0581.jpg
    http://i112.photobucket.com/albums/n188/jannear/Playcat%20Tiller/IMG_0583.jpg

    The angle shown on the tiller arm base is also present on the port side but, as we know, an almost indiscernable difference in angle at the base can translate into a much larger difference at the distal end. My thought is to place a large washer under the metal base to raise the forward part of the base and, at least, raise the height of the distal part of the arm (at the connection to the tiller bar).


    edited by: ripcurl869, Oct 11, 2010 - 01:00 AM
  • nice tight rudder linkages are what you want in a performance cat, but the whole design of this recreational system seems to be working against you....

    those little rubber right angles look a lot like the ones on the ronstan hiking stick on my weta

    if you can get some round or square solid rubber from a rubber shop you make be able to bodge something that works better than factory by drilling it and using stainless bolts and washers, but it looks like there are certain design limits you will reach...
  • Excellent job on posting those pics ripcurl, next thing to do is to fill out your profile just in case there is a cat sailor in your neck of the woods, icon_rolleyes

    My 1st thought would be to replace the tiller connector bar, the bar that joins the 2 tiller arms. Find an aluminum bar the exact diameter of the plug-in end on the "S" shaped rubber connector and use that instead, with quick release or hitch pins. If there is no need to take the tiller connector bar on/off, maybe even rivit it into place.

    Your idea of using a large washer under the tiller arm base is a good one, but it looks like the plastic of the hull has folded in on itself, or maybe that is the rotomolded angle, ideally you would want 2 large washers, one on the inside of the hull, 1 on the outside, to reinforce that area

    What are your thoughts?


    --
    TurboHobo
    H14T
    H16
    P18
    G-Cat 5.0
    P16
    --
  • Ahhh! surfboards, now I understand the name "ripcurl", grew up surfing in South Africa, it was a way of life. icon_cool

    --
    TurboHobo
    H14T
    H16
    P18
    G-Cat 5.0
    P16
    --
  • Turbo - the hull is molded that way to create a forward angle. I can actually remove the rudder and put another washer on the underside of the hull if needed. I'll probably just try the topside first, though.

    As far as the rubber, that's a good thought erice. I'll think on that too. I am really considering the metal shop to straighten the arms and getting a longer tiller arm and simply drilling holes through them and attaching with bolts alal Hobie. I would feel more secure that way. I worry that the OD of the arms/bar is too small to be able to use a large enough diameter bolt. I shall measure a Hobie bolt at our Cat Beach and see if it can work.

    Turbo - I'm not visualizing your fix very well. Where would it be hinged to allow the arm and bar to move independently?

    Please keep the suggestions coming.


    Ah surfboards - my life, my love, and, sometimes, my entire bank account!! At least I won't be tempted to have multiple Cats? icon_wink


    edited by: ripcurl869, Oct 11, 2010 - 02:47 AM
  • James,
    The system itself looks pretty low end, I don't think you need the stretchiness as long as the cross bar articulates (moves and rotates simultaneously) you should be OK.

    I would suggest getting a piece of 1/16" or 3/32" sidewall thickness aluminum tube about 6" longer or so than your existing cross piece but the same diameter. Get 2 - 2.5" 3/16" 4 washers and 2 stainless nylock nuts. Drill a hole through the tiller arms about 1" from the end from top to bottom. Align your rudders so they are parallel and measure the distance between the holes. In your new cross bar drill two holes top to bottom with the same distance between the holes as between the ones on your tillers. Leave cut the cross bar leaving about 1" on the outside of each hole. Now place the cross bar on top of your tiller arms and attach them together with the bolts one washer on top and bottom and 2 between the two bars. Fasten with a nylock nut and you are in business. You can also drill a hole in the middle of the cross bar for a tiller extension.

    You can also use a kit like this with 4 extra spacers to accomplish the same thing as the stainless bolts for a bit of a cleaner look:
    http://www.murrays.com/mm…e=01-2061&Category_Code=

    I'm trying to find a picture of a Prindle 18-2 or old F18 cross bar this is similar to what I am suggesting here. Just mount a cross bar over the tiller and bolt through both bars but allow enough slop in the bolt so the tiller can still move and rotate. Ah, here's a sol cat mount which illustrates what I am talking about

    http://www.thebeachcats.c…pictures&g2_itemId=47805

    Except because your tillers bend 90 degrees the two pieces will be parallel and you don't need the fancy end caps (although you can buy the hobie end caps at murrays or your local hobie dealer and use them if you like.


    edited by: Wolfman, Oct 10, 2010 - 11:04 PM

    --
    Dave Bonin
    1981 Nacra 5.2 "Lucile"
    1986 Nacra 5.7 "Belle"
    Winnipeg, Manitoba, Canada
    --
  • Rip, your idea of a longer bar will certainly work, but I would not extend the cross bar over top or under both the tiller arms.
    In this photo the adjustable X tie is on the bottom, the tiller on top,(tiller would be rotated 90* clockwise, to point at the top of photo when installed)
    My Nacra came this way(I don't think it was factory, the previous owner did a Bondi bungle) If set up as shown, it very quickly wears the soft aluminum of the X bar & the tillers. Every time you push/pull the tiller it is akin to inserting a screwdriver in a crevice & working it back & forth.
    http://www.thebeachcats.com/gallery2/main.php?g2_view=core.DownloadItem&g2_itemId=76947&g2_serialNumber=4&g2_GALLERYSID=dff8c36c2f416c9b36b47e405d4fe333

    I built SS U brackets to make the connections,& used a horizontal bolt.
    Murrays sells a U-joint.(Again the X tie goes between the tiller arms) I would also use a couple of these little 80 cents gizmos,(the plsstic ones are $.80, the U joint $$) so as to distribute the load around the bar,
    http://www.murrays.com/mm5/graphics/00000001/56-5516sm.jpg
    http://www.murrays.com/mm5/graphics/00000001/01-0061sm.jpg
    The other problem you will run into if you redo the X tie bar, is aligning the rudders with each other, so you don't end up with toe in or toe out. In my first photo you can see the X tie has a threaded section. This allows you to fine tune the X tie to the exact length you need to ensure rudder alignment. Dan Berger usually has some used ones, or get your metal works people to make it, they are kind of expensive new.
    When all together it will look like this,(you might have to "save" the image & paste it into your photo viewer & enlarge it to get a better view) precise, no slop, & it won't wear much
    http://www.thebeachcats.com/gallery2/main.php?g2_view=core.DownloadItem&g2_itemId=74464&g2_serialNumber=3&g2_GALLERYSID=dff8c36c2f416c9b36b47e405d4fe333

    Here is a slightly different way to do the same thing, I would use the plastic concave chip between the bar & the nut, you can tighten it down then without deforming the bar. If you build your own U-joints, a 1/4" bolt/pin is fine, but leave enough room so the head of the bolt does not interfere when you move the tiller full travel.
    http://www.thebeachcats.com/gallery2/main.php?g2_view=core.DownloadItem&g2_itemId=75017&g2_serialNumber=4&g2_GALLERYSID=dff8c36c2f416c9b36b47e405d4fe333

    Here is another sailors rig, using the factory U-joint. The U joints do tend to move, & can get into a position where it locks up the steering, just lockwire the U on the tiller arm so it can't move, problem solved, cost 50 cents.
    http://www.thebeachcats.com/gallery2/main.php?g2_view=core.DownloadItem&g2_itemId=35660&g2_serialNumber=3&g2_GALLERYSID=dff8c36c2f416c9b36b47e405d4fe333

    Hope this helps, tight problem free rudders are essential. I see 40 pics added to your album, it seems to grind on forever, even single add ons are slow, but they all get there eventually.


    edited by: Edchris177, Oct 10, 2010 - 11:21 PM

    --
    Hobie 18 Magnum
    Dart 15
    Mystere 6.0XL Sold Was a handful solo
    Nacra 5.7
    Nacra 5.0
    Bombardier Invitation (Now officially DEAD)
    Various other Dock cluttering WaterCrap
    --
  • I apologise James, my suggestion would give you a fixed system, unable to steer, just a little South African humour.

    Seriously though, if the inner diameter of your tiller tube is the same as the standard Hobie 14/16 tiller tube, all you would have to do is order in the end caps, rudder adjusters and tiller connectors. The adjusters would fit into the tiller crossbar allowing you to extend or collapse the length of the crossbar so you can adjust the rudders toe in/out. The end caps would fit into existing tiller tube and the connectors would connect the mechanism together. Just make sure that when you fit the end caps that they are rotated up/down so that when you connect the crossbar, it floats above/below the tiller tubes

    End Caps http://www.murrays.com/mm5/graphics/00000001/50-10400010.jpg$13.60 *

    Rudder Adjusters http://www.murrays.com/mm5/graphics/00000001/50-60400011.jpg$17.50 *

    Tiller Connectors http://www.murrays.com/mm5/graphics/00000001/01-2061.jpg$12.00 *

    (* Murrays.com prices)


    The other option would be to consider cutting the 90* elbows off so that your tiller arms are straight, pointing fore & aft, and going H14/16 style as per picture below, but then you would have to get a longer tiller crossbar.

    http://www.thebeachcats.com/gallery2/main.php?g2_view=core.DownloadItem&g2_itemId=72246&g2_serialNumber=4&g2_GALLERYSID=d02421d1fe2dd583afbd6d4012394131

    PS you could also look in the "Used Catamaran Parts" section of this website to see if anyone is parting out Hobie parts, you just might be able to get everything you need at a reasonable cost including a longer (original) crossbar if you opt to do away with the 90* bends on your tiller arms. Just be sure of your measurements.


    --
    TurboHobo
    H14T
    H16
    P18
    G-Cat 5.0
    P16
    --
  • ripcurl869I can't seem to get the Tech help gallery to load my images. I have made them small and nothing; It just goes to a "loading" page and never leaves.

    Looks like your album was successful, probably just took a while to upload a bunch of images. Most peoples Internet uploads are a lot slower than downloading.

    Link to your tech album
    http://www.thebeachcats.c…pictures&g2_itemId=76793

    --
    Damon Linkous
    1992 Hobie 18
    Memphis, TN

    How To Create Your Signature

    How To Create Your Own Cool Avatar

    How To Display Pictures In The Forums.
    --
  • I don't think they should be ?S? shaped. Otherwise, they look like the same connector that is used to connect the tiller to tiller crossbar on the Nacra 20, F18 and Infusion bu they are straight. Any Nacra dealer should be able to help you.

    --
    Ron
    Nacra F18
    Reservoir Sailing Assn.
    Brandon, Mississippi
    --
  • Not sure what happened to my reply so here goes again (must be on my end?):

    Thanks Damon for the tech gallery help. Looks like my three attempts came through! Patience - must get me some of that.

    I really appreciate all the great feedback. A few really good, solid fix suggestions. I feel like, for my mechanical-all-thumbs skill set, that the simplest would be Turbo's suggestion: IF the Inside Diameter of the Playcat's tubes are the same as the Hobie 14/16. If not, I'll be forced to look at some of the more complex ideas (not that they're that complex but I'd like things to be badabing badaboom, you know?).

    Does anybody know what the ID of the Hobie tube is?

    Thank you all so much. Thank goodness for this forum!

    James

No HTML tags allowed (except inside [code][/code] tags)

  • Options

This list is based on users active over the last 60 minutes.