Took the Prindle 19 out for Wet Weds last week in 20 kts gusting to 24 in steep waves. I had a new guy with me probably weighing 210+ and 6'6", so a lot of righting moment on the wire. I am still proving this boat for Santa Barbara Channel crossings, so I was pushing it hard that night to make sure it would hold up.
It didn't.
I had two failures which I believe were simultaneous:
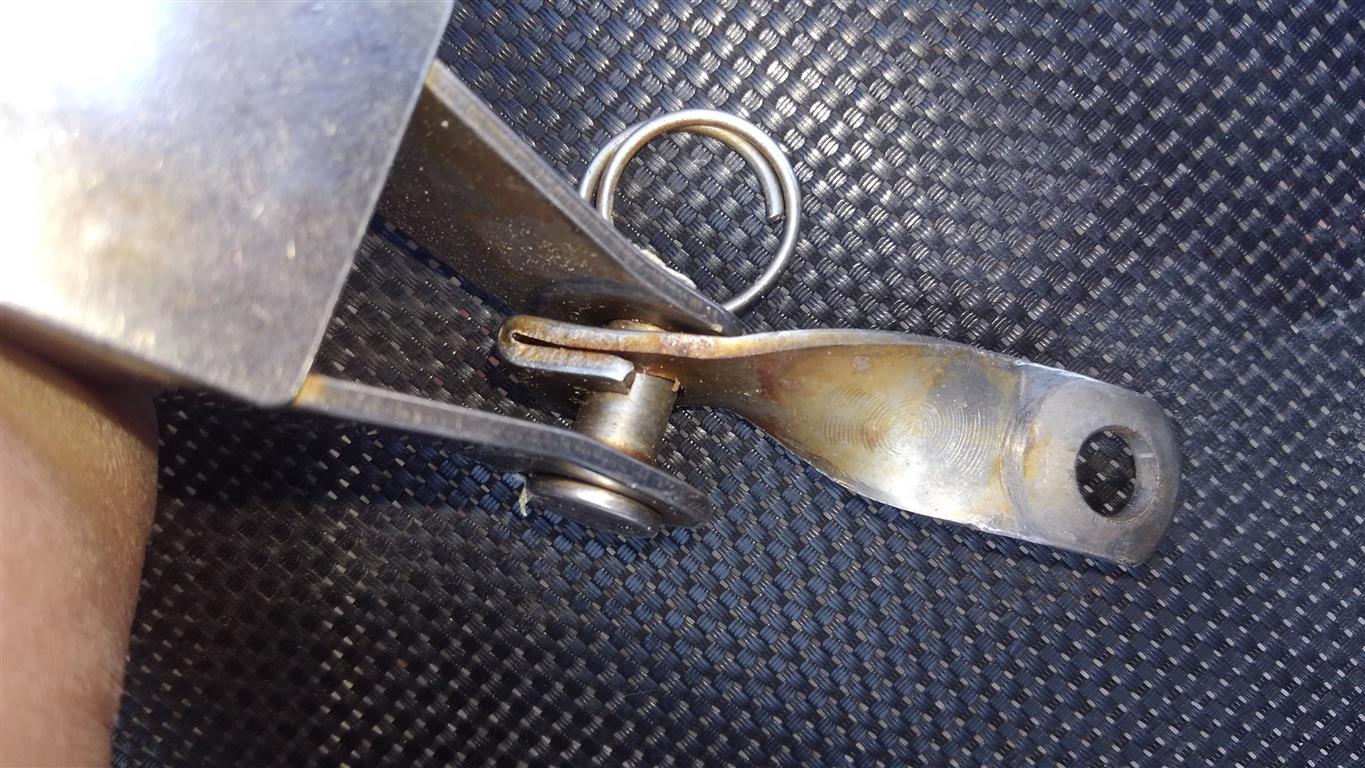
1. A failure of the twist toggle that attaches the shroud chain plate to the shroud tang. This dismasted the boat.
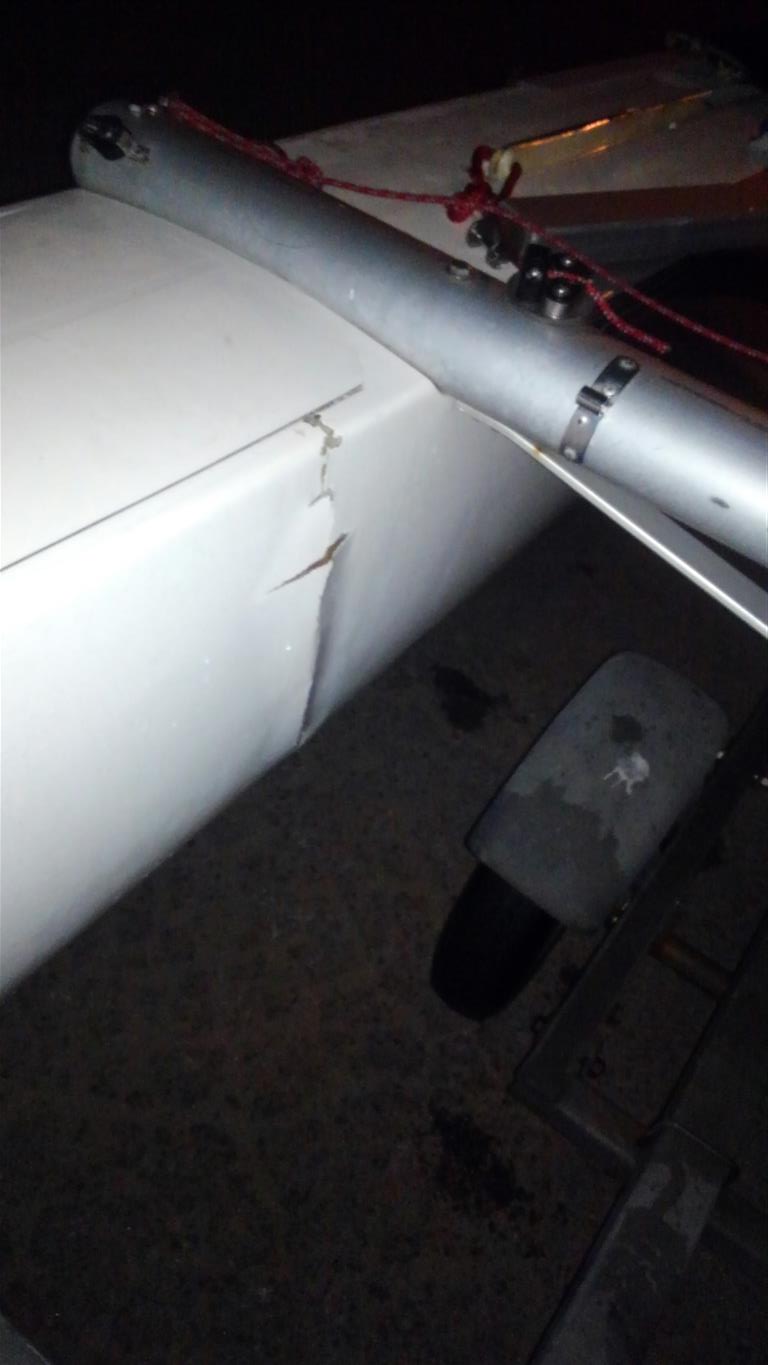
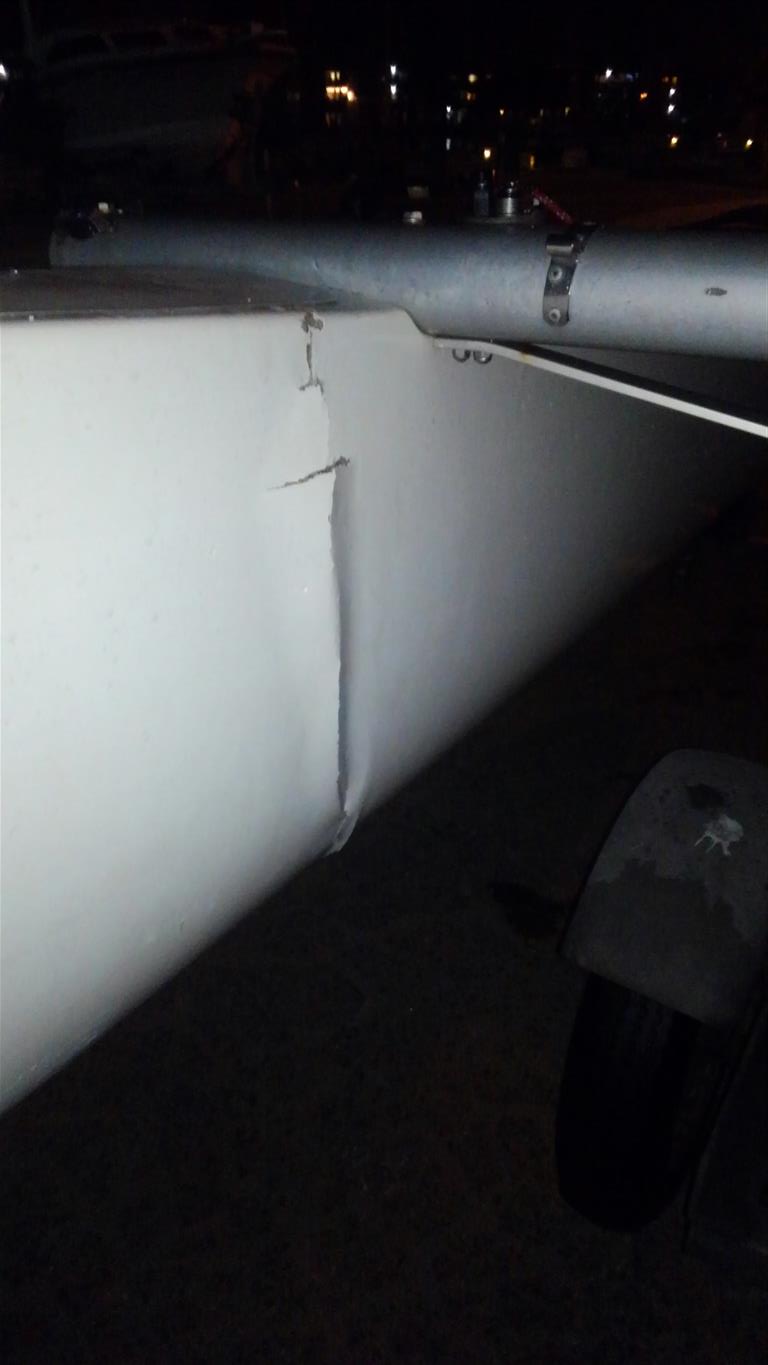
2. A fracture on the inboard side of the starboard hull just forward of the front cross bar.
Either the failure of the hull put a shock load on the shroud, or the failure of the shroud put a shock load on the forestay. The main reason I believe these happened at the same time is the fragility of the hull after the failure. I can move it side to side with my hand. Had the boat not stopped immediately at the time of the failure, I would have lost the entire bow.
The twist toggle:
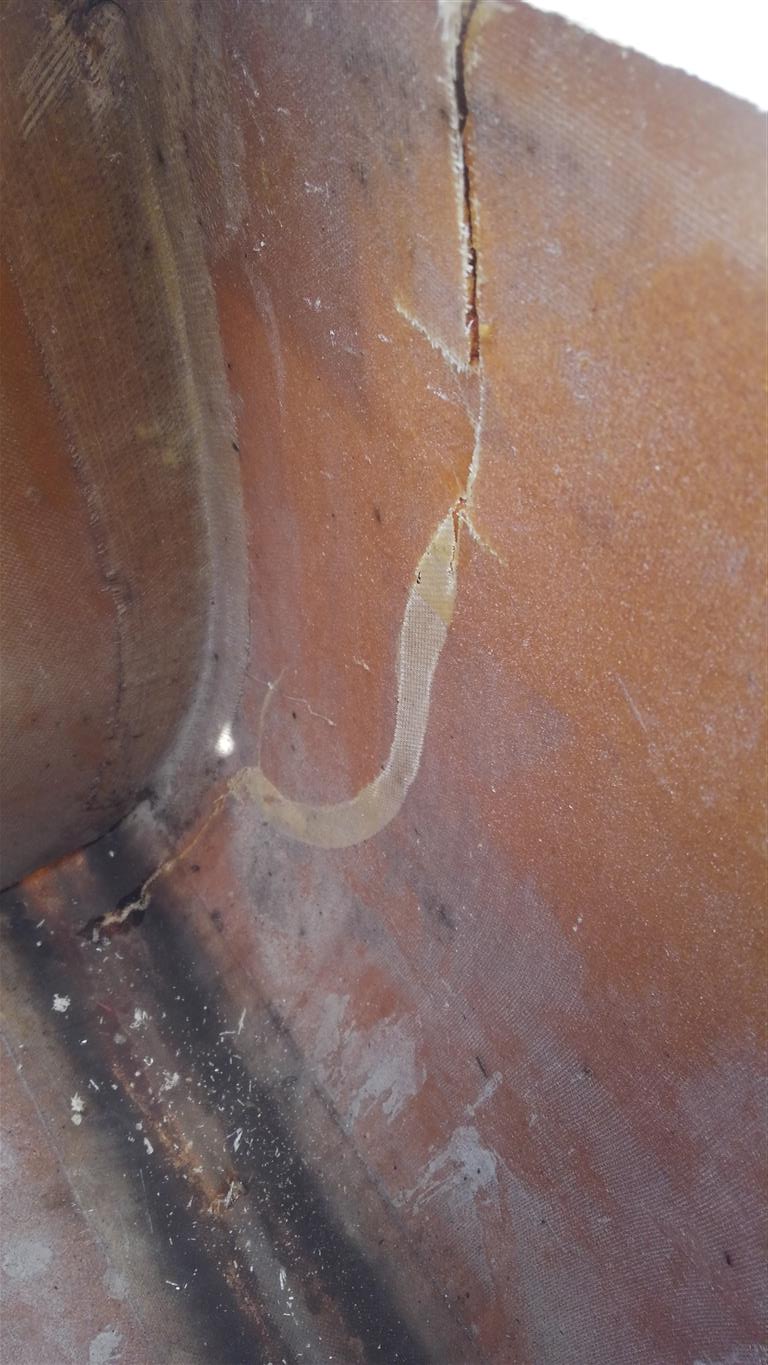
Outside of the hull:
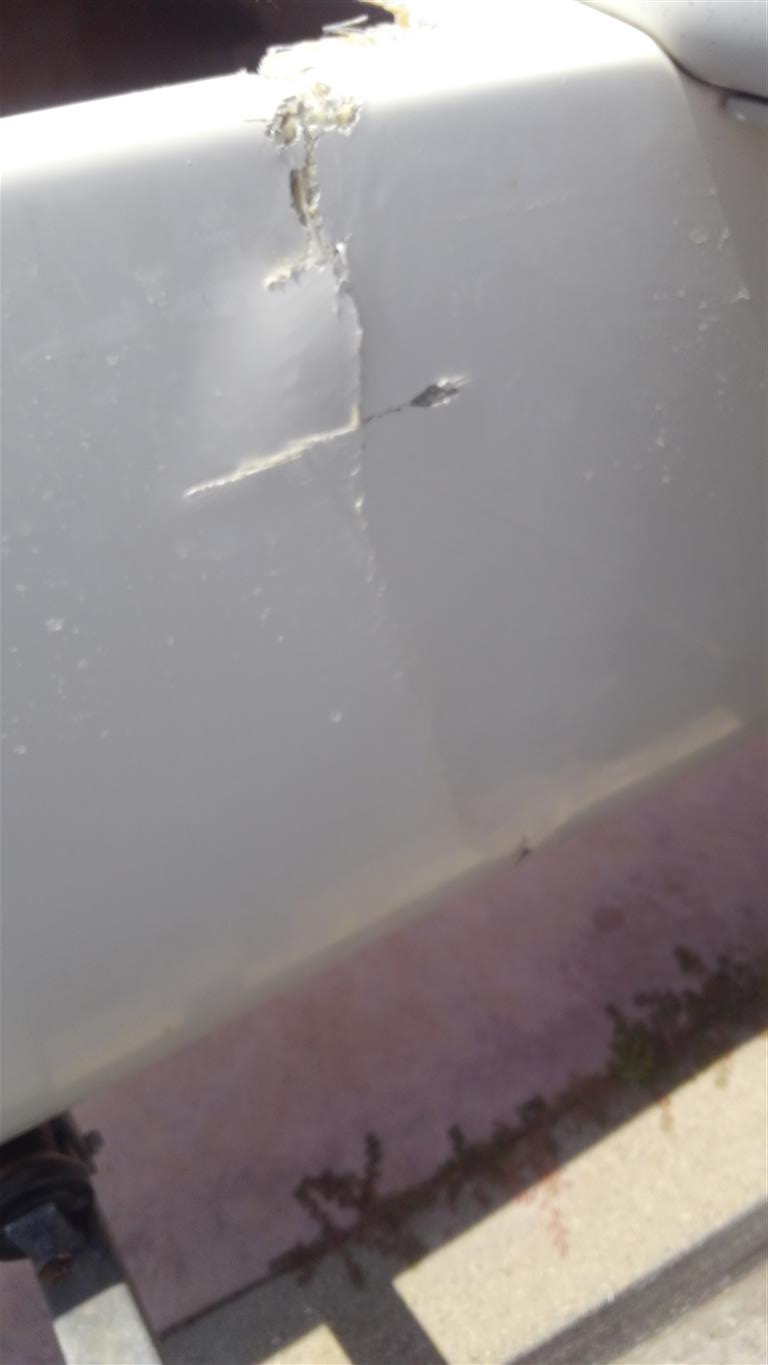
Inside of the hull:
The experts tell me this is repairable. Also, I've spoken with a veteran at NACRA on the history of this boat. This is a 1986. In 1987 the design added a sub deck to the bows. The 85 and 86 boats do not have it. My boat only has a bulkhead under the front crossbar, and another 16 inches in front of the leading edge of the crossbar:
So, in addition to the crack repair, I am going to reinforce both hulls. I am going to fabricate and install a fiberglass foam core sub deck running from the forward crossbar to the bows. The vertical position would be about 2/3 up the hull. That is by hunch only. Opinions welcome.
Additional options I am considering in addition to the sub deck:
1. A layer of carbon fiber cloth bonded to the inboard sides of the bows.
2. A layer of carbon fiber cloth bonded to the inboard AND outboard sides of the bows.
3. A layer of carbon fiber cloth bonded to the inboard sides of the bows, a layer of foam, then another layer of carbon fiber.
4. A layer of carbon fiber cloth bonded to the inboard AND outboard sides of the bows, a layer of foam, then another layer of carbon fiber.
Comments? Opinions? Advice?
Keep in mind that I am nuts, obsessive, and have a tendency to throw good money after bad with reckless abandon.
-- Bill Mattson
Prindle 19 "Gelli Bean"
Prindle 19 "Cat's Pajamas"
Nacra 5.2 (Will sail her a bit and let her name herself) --
Looks like you did a number on that one, glad you were able to make it home.
I did a bow reinforcement job on a Hobe 18 using Prisma Composite Preform planks from Jamestown distributors. I basically ran a stringer up each side of the hull (inside) from the centerboard trunk to the bow tang. Stiffness of the hull sidewall is night and day from before to after. You’ve got the advantage of being able to pop the deck off your boat. I had to work through small access holes cut in the deck and then glass them back in afterwards. Whatever you end up doing, be sure you keep weight in mind as it will add up quick.
Not recommended to use carbon , it will cause stress at repair because of different flex strength, want to stay as close as possible to original build up of laminate tapered into repair.
-- Tomcat 6.2
Supercat 20 / 17
Searunner 16 Tri home built --
My post was not clear in this regard. After the repair, the idea was to run the carbon the entire length of the bow, from the bulkhead under the crossbar all the way to the bow. The stress point would be at the bulkhead and in the "boxed" area of hull. Still may be an issue though.
-- Bill Mattson
Prindle 19 "Gelli Bean"
Prindle 19 "Cat's Pajamas"
Nacra 5.2 (Will sail her a bit and let her name herself) --
1. While half of that twist toggle is missing, what is still there looks intact and should not have released the stay. How did the side stay leave the boat? Did the pin part as well? Or the tang in the hull? Was this the leeward shroud?
2. The non-standard hardware on your front crossbar suggests that you use a bigger than normal, or second foresail. Were you running a spin at the time of failure?
Circa 1987 the P19 was offered in an MX configuration which had a larger, longer jib and a bowsprit to hold it down to the level of the base of the mast. Surfglas (the mfg at the time) added the sub decks specifically to prevent exactly what happened to you.
If you were running a spin, or have an altered bridle config to run a spin, that is what caused the failure in the hull, and the rest was collateral damage. That hull folded inward, your forestay got longer and loose real quick, and the mast jumped off the ball.
Are you shaking down for the Tri-Point race?
Glass it up, add the subdecks and rethink the size of your foresail. If you need a fiberglass guy, ask Bob (Dartman) Martinez. He sails the Channel single-handed and knows a fireman who does magic with Prindles.
Edited by klozhald on Aug 27, 2018 - 02:05 AM.
-- Sheet In!
Bob
_/)_____/)_/)____/)____/)_____/)/)__________/)__
Prindle 18-2 #244 "Wakizashi"
Prindle 16 #3690 "Pegasus" Sold (sigh)
AZ Multihull Fleet 42 member
(Way) Past Commodore of Prindle Fleet 14
Arizona, USA --
The people at West system epoxy will advise you advise you for free about best way to do repair with epoxy. When you start mixing fabrics, it's like engineering a bridge where points are under compression and and other are under tension and a lot can go wrong. I live in a area with a lot of boat builders and some said they do it all the time, think goodness I wasn't in a rush in doing the repair and talk to a engineer about layup on a boat I was thinking building and was told to do more research before proceeding. Using vacuum bagging or a least peel ply with a squeegy to reduce amount of resin used probably most effective way to get a strong lite repair while also using right type of fabrics for resin and repair being done. I have a boat where a repair failed where a local professional?? put to much cloth and did not taper it an created a hard spot that Did not flex enough to the area around it and cracked an leaked was later told when doing research on future repair.
I did find it interesting that there are ways to still use gel coat to finish over epoxy if interested. I would deviate from original construction and use epoxy for repairs though. I lean towards modern marine paint for the finish and have three boats that need paint now that I don't look forward to doing,
-- Tomcat 6.2
Supercat 20 / 17
Searunner 16 Tri home built --
I think your plan is sound. Some quick notes/recommendations
* use peel ply for interim finishes and for the final finish both internal (for ease of later repair) and external (for better bonding)
* there's a technique on the external finish (sand lightly, wash w water) so that gelcoat bonds well, this is to remove unused amines from epoxy that might mess up gelcoat cure
* use biaxial or dual bias (stitched) CF for max torsional stiffness w minimum weight
* plan your "scarfing"/taper on the points where material changes; abrupt changes in stiffness will create the next cracking & breaking point
* for the "work window" you've opened, plan to do both scarfing and some stringer or side flaps on the inside; needs support when a heavy crew steps right there...
I don't quite follow why you'd add foam; might be just my ignorance.
again really sorry to hear - this hurts
I have seen p19 do this before. we had 2 friends on the wire and the p19 buckled right there. they heard the sound and hit the brakes. they didn't have a full failure but it was creased and had to be fixed. At that time we found out this was a known issue
i have had 2 tangs fail on my 5.5 - 1 side, 1 bow
both times were at very low stress moments on the boat: once was at anchor, the bow tang went out in a 5 knot gybe
both required surgery, the bow tang being by far the most
for the bow tang ... after removing decks (not so cleanly) i saw a ton of cracks in the bulkhead under my beam (where 5 years earlier i had to cut through to repair the broken shroud tang), so I made some new/additional bulkheads (i wish i had the info posted above, but i had some guidance)
in retro- i would have skinned/vac bagged the bulkheads : i wanted to save weight but would rather have the strength with hindsight
Been down in LA and forgot my password to log in. Just got back to the home computer...
Definitely the windward shroud. The shroud tang coming from the hull is now bent inward. I figure when one half of the twist toggle let go (inboard side) , the pin was holding the remaining twist toggle half on one side of the tang, bending it at an angle, as the shroud pulled the pin up with the cotter ring now in shear. When the cotter ring sheared off it was all over.
From a previous owner, probably with a different set up. I am running radial laminate sails, with a square top main but a standard sized jib.
The addition of the subdeck in 1987 is what inspired me to add one. I believe the failure can be attributed to just pushing the boat way too hard in the conditions I was in, and perhaps a corroded twist toggle. The mast never jumped the ball as evidenced by a mark on the crossbar where the mast base contacted it as the mast when "timber". The aft part of the mast base holding the main halyard sheave was cracked off in the process. I have not figured out a repair yet, but have some ideas.
[/quote]
Tri point was a couple weeks ago. I took 3rd place.
Yep. Bob and I have discussed that option. We both do quite a bit of single handing. Most of my sailing on the Prindle is solo, including a couple trips to Anacapa. In that respect, I'm glad this happened when I was closer to shore, and had crew with me.
Thanks for all the info!
-- Bill Mattson
Prindle 19 "Gelli Bean"
Prindle 19 "Cat's Pajamas"
Nacra 5.2 (Will sail her a bit and let her name herself) --
Note that the corrosion was between the two portions of twist toggle, so this is more apparent with one side gone. Still, the corrosion would probably be visible on close inspection.
It gives me comfort to know that boat pictured was repaired. My situation could be worse, as that's worse.
-- Bill Mattson
Prindle 19 "Gelli Bean"
Prindle 19 "Cat's Pajamas"
Nacra 5.2 (Will sail her a bit and let her name herself) --
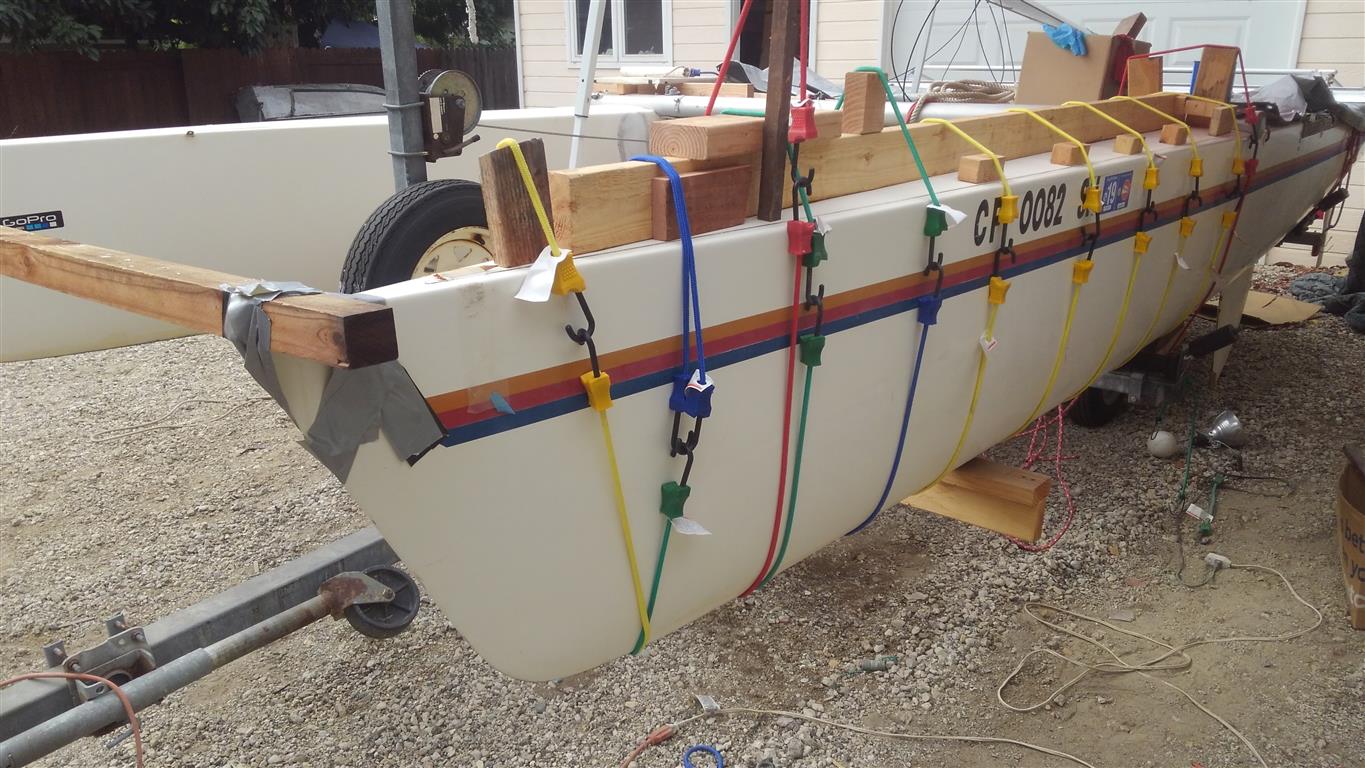
I took extensive photos of the whole project with my phone, and now can only find a fraction of them. Any way, here are the ones I have. Keep in mind, this was a result of talking to many people, some of them boat builders. I have limited experience with fiberglass repairs and foam sandwich. Some, but not much. For this project, I used 1/4 divinicell foam and I forget what fiberglass I used.
Gone are photos of the deck removal. One important note is the start from the front. The aft portion will not allow you to get a near horizontal angle with the putty knife, and you will damage the lip that the deck is glued to. Starting from the tip will allow that angle. Use a putty knife and hammer and start there. Note that there is a way wider portion of bonded glass at this location, so don't get discourage by what a pain in the ass it appears to be. It will get easier once you get beyond that point. You will also encounter more difficult progress near where the bridle tangs are, visible in some of the photos.
What was interesting is that the deck was bonded together with chopped glass that was not thoroughly wetted out. (You can see this in the photos later). And this was also the case with a friend of mine who also removed his decks. Either it was to make them easier to remove, or these was one guy installing decks at the factory that did not know what he was doing. I do know that whoever inherits my boat and want's to remove the decks will need a saw. If you find your decks are too difficult to remove, you could use a handheld jig saw, but you will then need to rebuild the deck lips.
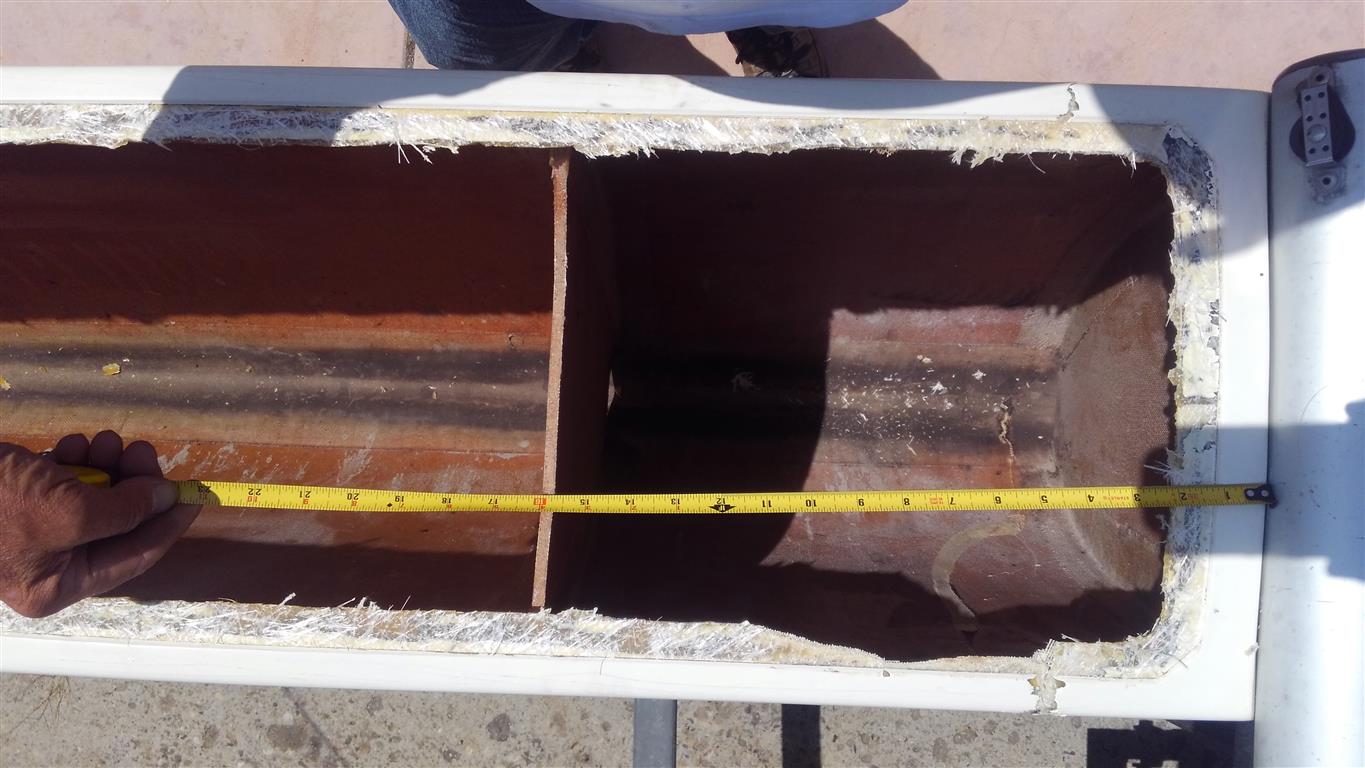
I started off by deciding where the bulkheads would go, and I went down about half the distance. (One foot, if memory serves).
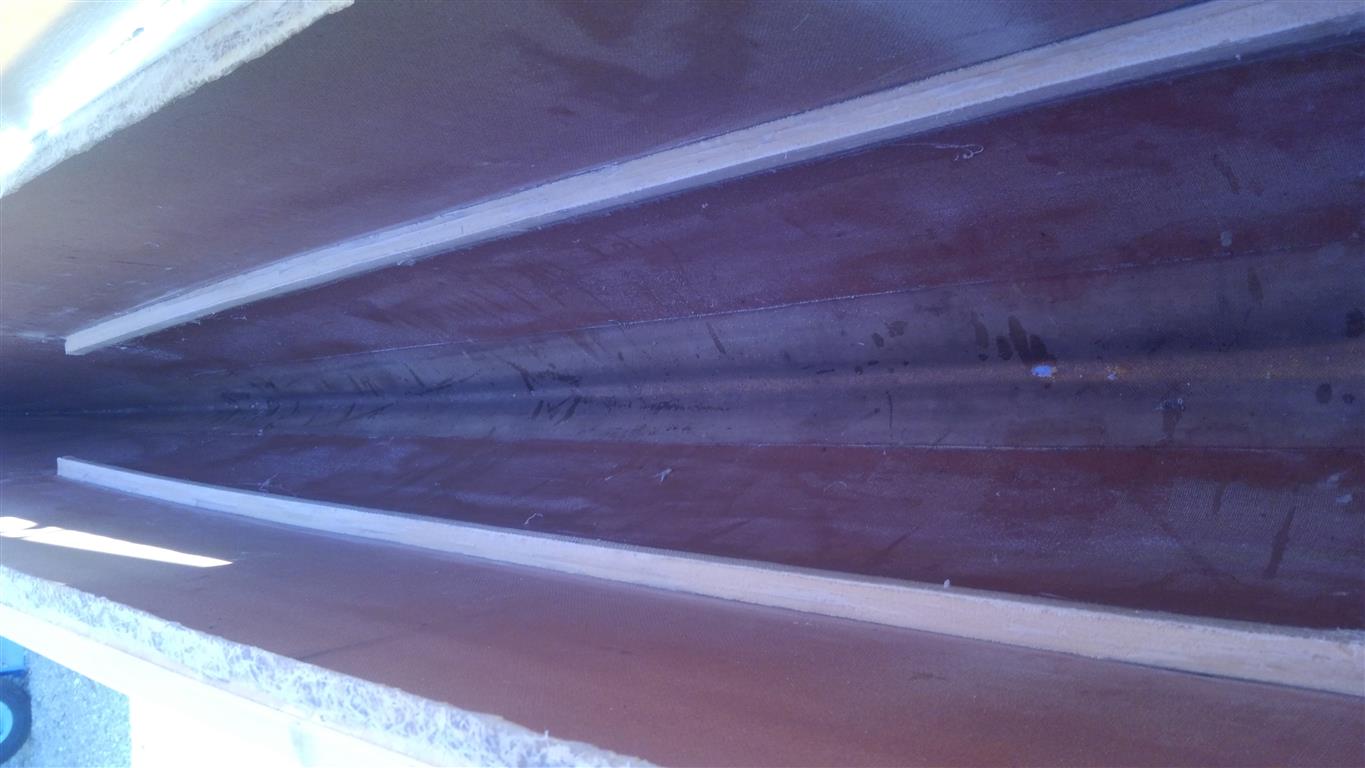
I made stringers out of the foam, using three layers, about a half inch wide, installing them at the desired height. More detail later.
I then made cardboard templates. One for the forward section, and one square one for the section just ahead of the cross bar. One challenge in making the sub decks was that the bulkheads were not square, either horizontally or vertically. This was very surprising. Over cut the templates slightly, then adjust with a utility knife as required.
I then used the templates to cut my foam and fiberglass cloth. I also cut 1/4 plywood to the same shape. I laid a section of plywood on my garage floor and covered it with poly drop cloth. Wetted the glass on the poly, then wetted the foam and put it on the glass. Wetted the foam, then the next section of glass, then laid the top layer of glass. (I cut one section of glass with the bias, and one against the bias. I figured this would give it more strength, but that's just me.) I put the 1/4 section of plywood cut from the template on top, then stacked the heaviest stuff I could find on it. I have two 3/4 thick sections of plate steel that I use for anvils, and found them not heavy enough. I added cinder blocks for more weight. I let sit overnight, and had a really nice panel when done. Note that due to the working time, this was all done with slow cure hardener.
Then it was a matter of trimming the excess glass on the sides down to the edge of the foam, then fitting them into the hulls trimming where required.
The sub decks were glued down to the stringers with thickened epoxy, and I placed my anvils on top to hold them down. I filled any gaps with thickened epoxy as well. I then bonded the top edges with wetted fiberglass tape.
The photos:
Below is the location of the forward bulkhead. I measured this for later reference for my myself and others. You can see how out of square the bulkhead is in this photo. Also visible is the damage to the deck lip where I made my first attempt to remove the deck. The damage to the outsides of the hulls is also visible, which I also repaired but have not documented here.
The stringers:
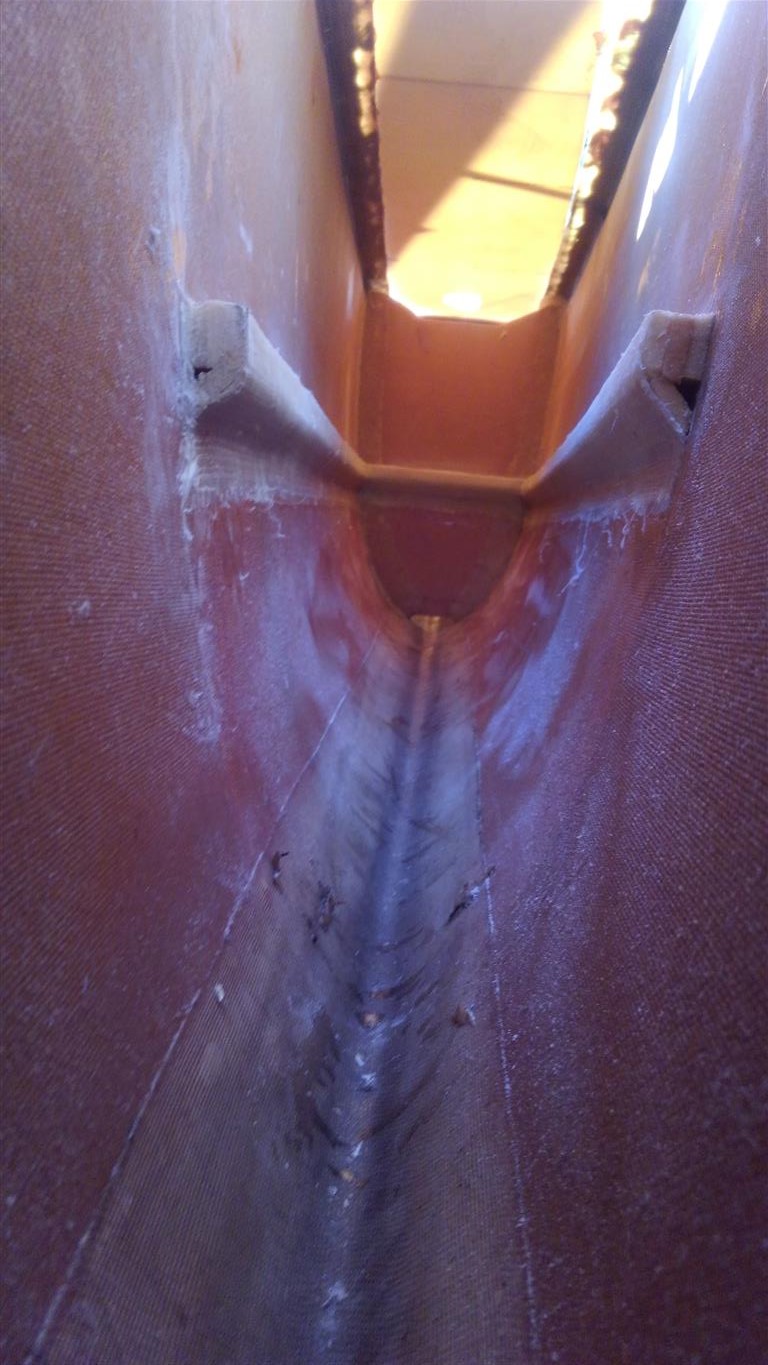
Note that I originally had only installed two layers of foam, and was going to cover them with fiberglass tape. On the advice of a boat builder friend, I added the small angled portion under the stringers so the tape would bond better. To make this easier I added a third layer of foam so the angle would be 45 degrees.
The installed subdecks. Note that I cut holes for ventilation and evaporation. I also only went forward to just forward of the spreaders, since I figured there was not a lot of loads beyond that.
Below, you can see the deck laying upside down at the top of the photo, and the extra area of bond you will need to release:
In addition to the bulkheads (and prior to installing them) , I added an extra layer of foam to the inboard side of the hulls between the bulkheads:
That was part of the repair to the hull fracture and I figured I'd do the other side as well as there were some stress cracks on the gelcoat on that side.
Again, this is somewhat amateur work, so make sure and consult the experts. One concern I have is the concentrated load to the bulkhead just under the crossbar. I figure that removal of the deck lid aft of the crossbar would be extremely difficult. If I could remove it, I think I would extend a bulk head a bit further. Otherwise I am thinking that I at least got to the crossbar where the hulls are "boxed" and should be okay. You'll want to talk to the experts on this if you are not already one. And I fully welcome any comments from anyone on what I have done here, especially the negative ones.
Note that I purchased the P19 as an island boat replacing my H18. After this failure, and getting inside of the boat, I concluded this was a poor replacement for that application. The H18 is a tank compared to this boat. If I were to land this boat on the typical rocky north shore of Santa Cruz Island, I would probably destroy it.
I have since obtained another P19 in far better shape, and have not even sailed the repaired one. One idea I had was to further beef up the repaired boat with a lot of glass to the keels and 6 inches or so up the sides to protect if from rocks. It would be way heavier and probably not competitive, but I could use the repaired boat for island trips, and race the newer one. It would also provide at least a weak argument to the wife as to why I need two boats.
Edited by mattson on Jul 04, 2019 - 12:10 PM.
-- Bill Mattson
Prindle 19 "Gelli Bean"
Prindle 19 "Cat's Pajamas"
Nacra 5.2 (Will sail her a bit and let her name herself) --
Epoxy thickened with high density adhesive filler and chopped glass. I pity the poor bastard who ever tries to remove them. Hopefully, it's not me down the road.
-- Bill Mattson
Prindle 19 "Gelli Bean"
Prindle 19 "Cat's Pajamas"
Nacra 5.2 (Will sail her a bit and let her name herself) --
West six-10 would be the ideal epoxy to use to bond the deck back on. It is pre-thickened and comes in a caulk gun style tube with a self-mixing nozzle. Just squirt out a bead all around the bond line, pop the deck on, and clamp.