Welcome anonymous guest

Please Support
TheBeachcats.com

NACRA 5.8 - large hole repair (looking for techniques/advice)  Bottom

Go to page 1 - 2 [+1]:

  • This is an 82 5.8 - it is all fiberglass.
    There are hollow tubes that go along the inside of the hulls - technically I am not sure what they are called - stringers maybe?
    Does anybody have any advice?
    http://www.thebeachcats.com/gallery2/main.php?g2_view=core.DownloadItem&g2_itemId=105767&g2_serialNumber=3

    --
    Rob Jones
    1976 Yellow p-16 - parts is parts - hulls cut up
    1978 Yellow p-16 - in good working order
    1979 White p-15 - parts is parts - hulls cut up
    1985 White p-15 - good working order
    1982 White NACRA 5.8 - project boat.
    1986 White p-16 - in good working order
    1975 White Hobie 3.5 - PM me if you want it
    --
  • i haven't dealt with a hole that size, nor from that vintage, but was wondering how far back from the bow the hole is? and where in relation to the front beam?
    j

    --
    Aquacat 12 (sold)...'87 Nacra 5.8 (sold)...'03 Nacra Inter18 (sold)
    Venture 15 (sold)....'89 Nacra 5.8 (sold)...'91 Nacra 5.8NA (sold)
    '99 Nacra Inter20 (sold)
    --
  • http://thebeachcats.com/pictures/?g2_itemId=105769&g2_imageViewsIndex=1

    --
    Rob Jones
    1976 Yellow p-16 - parts is parts - hulls cut up
    1978 Yellow p-16 - in good working order
    1979 White p-15 - parts is parts - hulls cut up
    1985 White p-15 - good working order
    1982 White NACRA 5.8 - project boat.
    1986 White p-16 - in good working order
    1975 White Hobie 3.5 - PM me if you want it
    --
  • Remove everything that is broken, but don't shape the hole to be round or square -- you need to leave as much good material as possible for the shape of the hull/patch.

    Lay up a very thin layer of glass on a flat surface (window or something w/ foil/seran wrap/wax/etc that is much larger than the hole.

    Let it cure, then trim it just enough to fit into the hole. It's fine if it is significantly larger as long as it fits.

    It should try to retain it's flat shape, but you can glue it in place and use short sheet metal screws (and wood backing if necessary, although it has to be glued on ahead of time unless you have a close access port) to pull it out so that it mimics the curve of the hull.

    After its glued in place, fill around the edges any gaps with fairing compound. Then take a grinder or sander and create your proper tapers and shape.

    Now you should be ready to vacuum some new glass on.

    It will not be the same stiffness, but that's how I fixed a couple similar holes. Take it fwiw.

    --
    Rob
    OKC
    Pile of Nacra parts..
    --
  • +1 above post. This was the instructional video from West Systems I used to guide me on my repair:

    http://www.youtube.com/watch?v=i97TlAdenv4

    --
    Zach
    Yorktown, VA
    1984 Nacra 5.7
    --
  • You don't say where the hole is, I can't make the link in your second post open.
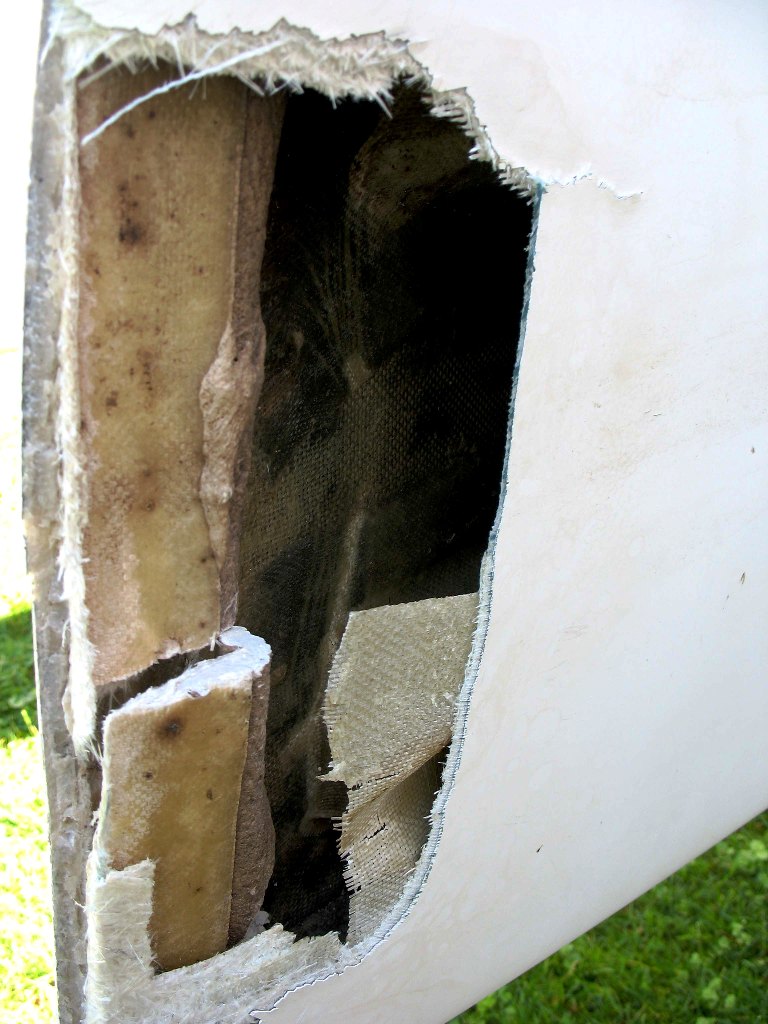
    Here are some photos of the inside of an early model 5.2. The tubes are just cardboard, soaked in resin & a layer of glass. They serve to stiffen the large areas.
    http://www.thebeachcats.c…ictures/?g2_itemId=82844
    Here is a link to how I patched a hole that had no access from the inside. Your damage is bigger, but can be fixed the same way.
    http://www.thebeachcats.c…ictures/?g2_itemId=77105
    I would remove the hull, so it can be laid on it's side as needed.
    If the area on the right of the photo in your initial post is the keel, fix that first, lay 1/2 dozen layers, or more right along the keel, & extend them up the side a couple of inches. That will give solid keel, & side, along with making the hole smaller. Now you will just have a relatively flat area to work with.
    Are those tubes also on the side where your damage is?
    If so, you will want to replace them with some sort of similiar stiffening device, easy to do.
    Once you solidify the keel, place hull on sawhorses with damage facing down, cut a sheet from some material that is sort of flexible,(a juice jug may not give you a large enough piece) make it several inches larger than the hole. Lay up 3/4 layers of matting on top of your flexible backing,(juice jug or whatever)& wet out, use the least resin you can & still fully wet the matt. Have the nylon strings attached to the backing. Let the patch set up, but not to the point of hard curing, you want it to be flexible still. If the adjacent hull has stiffening tubes, add them to the top of this inside patch,(you can pre make them from carboard tubes wetted & wrapped in matting) let them extend past the patch. Using a brush or gloved fingers, generously smear some resin,(you can thicken this some with additive so it doeasn't run) over the inside of the hull, covering the area the patch & added stiffener tubes will sit on. Now fold your still flexible patch, sort of like a taco shell,(fold as little as possible) just enough to get it inside the hull. Place it, then use the strings to apply enough tension to pull it against the hull. With the hull on its side, patch down, gravity will assist in pulling the resin into the proper place.
    Using any suitable scraper, gently remove excess resin on the outside, this will make it easier to add layers from the outside, without excessive build up.
    Let this cure, then flip the hull so patch is up. Now grind around the edge of the patch, working to remove gelcote for 1-2" from the edge. Very gently bevel this area, don't cut into your inside patch. Now add 2-4 layers of matt from the outside. You want max matting, with just enough resin to wet the fabric. Easiest way to do this is paint the area with only 1mm of resin, lay dry matt on, then gently draw the brush across matt, from center out, without adding resin to the brush. Don't try to get it all with the brush, use your fingers to "tap" the matting into the resin, it will wet out, with no additional resin needed.
    Add several more layers this way, you will be able to clearly see the fibres of the matting, yet it will be fully wetted. This is strong, but doesn't add much thickness. You can go 3 layers,without excess heat building, then let it cure.
    After the final layer, use a random orbit sander to gently smooth out the inevitable "points". Finally paint a very thin layer on to, to seal any fabric that was exposed by sanding.
    The patch will show up, easiest to just use some appropriate white paint to cover it up, if you want to gel cote, that's another challenge, bigger than the actual fix.
    Think this all through, you will need to be organized, once you wet cloth is not the time to remember you need strings attached, or more fabric cut. Contrary to some opinions, the patch will be stiffer than the original hull, though thicker.
    Do I need to say it again, organize & dry run in your mind how everything will go together is the most important thing, & prep. The actual fix,(other than full cure) is a 1 day job.

    --
    Hobie 18 Magnum
    Dart 15
    Mystere 6.0XL Sold Was a handful solo
    Nacra 5.7
    Nacra 5.0
    Bombardier Invitation (Now officially DEAD)
    Various other Dock cluttering WaterCrap
    --
  • The hole is forward of the front crossbar - you should be able to see it here:
    http://www.thebeachcats.com/gallery2/main.php?g2_view=core.DownloadItem&g2_itemId=105770&g2_serialNumber=4

    It doesn't seem like the keel is involved.

    --
    Rob Jones
    1976 Yellow p-16 - parts is parts - hulls cut up
    1978 Yellow p-16 - in good working order
    1979 White p-15 - parts is parts - hulls cut up
    1985 White p-15 - good working order
    1982 White NACRA 5.8 - project boat.
    1986 White p-16 - in good working order
    1975 White Hobie 3.5 - PM me if you want it
    --
  • Also - the hole is in between bulkheads and they are not involved at all.
    I am also thinking about filling the tubes that are intersected by the damage with closed cell expanding foam.

    --
    Rob Jones
    1976 Yellow p-16 - parts is parts - hulls cut up
    1978 Yellow p-16 - in good working order
    1979 White p-15 - parts is parts - hulls cut up
    1985 White p-15 - good working order
    1982 White NACRA 5.8 - project boat.
    1986 White p-16 - in good working order
    1975 White Hobie 3.5 - PM me if you want it
    --
  • rwj0j0
    if it were my boat, i would remove the grey hull cover on top and work the repair from the inside. that way, i could make sure the ribs/stiffeners were rebuilt in a continuous manner and i wouldn't worry about my repair cracking around the edges due to flexing.

    pop the top by carefully tapping around the edges using a hammer with a stiff putty knife to lift it off. once off, you'll have to grind down the factory 'resin putty' until you have enough clearance to reattach the cover with some waterproof epoxy (i use PC-11). gelcoat will not cure over this epoxy (and many other epoxies) so keep it under the lid only.

    first, form the hull shape. cut a piece of thin, semi-rigid plastic the exact size of the hole and stick that onto another piece of semi-rigid plastic using double-faced tape. as was mentioned before, keep the patch shallow to allow gelcoat surfaces to match later. overlay & tape this form tightly on the outside surface to duplicate the hull shape and give you something to lay the glass against from the inside. use something on the plastic to act as a release agent (but not wax, since gelcoat will have to stick to it later.)

    first layer would be glass fabric followed by several (many) layers of glass matt, then finish off with glass fabric as the inside surface. rebuild the ribs, replace the hull cover and start working on the outside.

    and definitely take the hull off and work this repair horizontally to keep the resin from running.

    this is what i use for gelcoat. air cures with no need to seal with PVA, plastic, etc. great stuff.
    http://www.boatersland.co…q67Yrq17kCFShp7AodejAAAg
    j


    Edited by arch on Sep 19, 2013 - 12:26 PM.

    --
    Aquacat 12 (sold)...'87 Nacra 5.8 (sold)...'03 Nacra Inter18 (sold)
    Venture 15 (sold)....'89 Nacra 5.8 (sold)...'91 Nacra 5.8NA (sold)
    '99 Nacra Inter20 (sold)
    --
  • Excellent! I wasn't sure how those tops were constructed - they flex a little and could be stiffened up if I take them off.

    I'm taking in a lot of knowledge here - thanks so much for the help. I actually have a professional fiberglass guy coming to look at the boat over the weekend - I'm not sure he would have this knowledge though - it seems very specific.

    I'm not sure if I will gelcoat the repairs - I thought I might paint the boat - gelcoat is probably better though.

    --
    Rob Jones
    1976 Yellow p-16 - parts is parts - hulls cut up
    1978 Yellow p-16 - in good working order
    1979 White p-15 - parts is parts - hulls cut up
    1985 White p-15 - good working order
    1982 White NACRA 5.8 - project boat.
    1986 White p-16 - in good working order
    1975 White Hobie 3.5 - PM me if you want it
    --
  • BTW - do all 5.8s have the bridle foil thing?

    --
    Rob Jones
    1976 Yellow p-16 - parts is parts - hulls cut up
    1978 Yellow p-16 - in good working order
    1979 White p-15 - parts is parts - hulls cut up
    1985 White p-15 - good working order
    1982 White NACRA 5.8 - project boat.
    1986 White p-16 - in good working order
    1975 White Hobie 3.5 - PM me if you want it
    --
  • no, all do not have the bridal foil. if you have one, take care of it....they're becoming very hard to find.
    PM(private message) me with your email and i'll send you some pics of the hull cover removed

    and check out this major nacra repair....
    http://www.radesignz.com/nacra5.2redo.htm
    http://www.radesignz.com/graphics/sailing/08/redo/IMG_2422.jpg
    j


    Edited by arch on Sep 19, 2013 - 12:52 PM.

    --
    Aquacat 12 (sold)...'87 Nacra 5.8 (sold)...'03 Nacra Inter18 (sold)
    Venture 15 (sold)....'89 Nacra 5.8 (sold)...'91 Nacra 5.8NA (sold)
    '99 Nacra Inter20 (sold)
    --
  • I'm not sure if it does or not - I only have the boat and mast so far - I've seen the rudders though.
    I will be getting the rest of the boat the weekend of the 28th.

    Will send PM

    --
    Rob Jones
    1976 Yellow p-16 - parts is parts - hulls cut up
    1978 Yellow p-16 - in good working order
    1979 White p-15 - parts is parts - hulls cut up
    1985 White p-15 - good working order
    1982 White NACRA 5.8 - project boat.
    1986 White p-16 - in good working order
    1975 White Hobie 3.5 - PM me if you want it
    --
  • arch
    PM(private message) me with your email and i'll send you some pics of the hull cover removed

    Arch,
    Could you create an album in Beachcats Technical with the Nacra Deck Removal pictures? This comes up fairly often and would be great to have illustrations.
    http://thebeachcats.com/i…es&type=&g2_itemId=10570

    --
    Damon Linkous
    1992 Hobie 18
    Memphis, TN

    How To Create Your Signature

    How To Create Your Own Cool Avatar

    How To Display Pictures In The Forums.
    --
  • d,
    i'll make a note to add some photos to an album.
    j

    --
    Aquacat 12 (sold)...'87 Nacra 5.8 (sold)...'03 Nacra Inter18 (sold)
    Venture 15 (sold)....'89 Nacra 5.8 (sold)...'91 Nacra 5.8NA (sold)
    '99 Nacra Inter20 (sold)
    --
  • QuoteI am also thinking about filling the tubes that are intersected by the damage with closed cell expanding foam.

    Don't do that. Even the low expansion foam "expands". I have seen some types push a door & window frame enough to jam the door. You might blow the tube off the hull. It will absorb water over time, also not good.
    From where the hole is, I think I would add some layers to the keel, the cracks might very well go further than it looks. You need to grind out the cracks to solid material. Your first post photo sure seems like it goes to the keel. Probe/grind all those cracks to their ends.
    Now that I see the damage is below the front decks, I would also do as Arch says & remove the cover. It's not too big a job, & will greatly simplify the work, especially adding the stiffening tubes. You don't need to line the tubes up exactly with the old ones, they could go just above, below the old ones, & overlap the ends of the old.
    I think those hulls are symmetrical. You can make a perfectly molded patch by placing Saran Wrap on the inside of the opposite wall. Then lay 1 or 2 layers on top og the Saran Wrap. When it sets up, you will have the exact contour of the inside of the hull. (You will have to add some material to the "1/2 tubes" for stiffening.
    There is a very inexpensive power tool that will buzz those decks off. It looks sort of like a set of barber buzz clippers. A buddy who is resurrecting a Nacra 36 showed it to me. It vibrates horizontally while it cuts/separates. Makes a very clean job.
    Plan & organize, you can fix that hull to good as new strength, the cosmetics won't be as good as new though.
    Rough up the inside & wipe down with acetone before you lay the first layer up, be careful not to contaminate with grease etc. Buy a box of latex gloves for $10, you'll use quite a few.
    Here is lots of good info on additives & HOW TO. http://www.westsystem.com/ss/the-105-system/
    I can't find my link for materials like cloth tape & roving, I think it was Johnson Distributers??? Maybe somebody can chime in on that.
    Take lots of photos, (helps to have a GF take photos, you don't want to handle your camera while handling resin) make an album, we want to see the result, & it will be of great help to the next guy who does something similar.

    --
    Hobie 18 Magnum
    Dart 15
    Mystere 6.0XL Sold Was a handful solo
    Nacra 5.7
    Nacra 5.0
    Bombardier Invitation (Now officially DEAD)
    Various other Dock cluttering WaterCrap
    --
  • Let me revise my response:

    After seeing the pic, I would definitely remove the front deck to get access to the back of the hole & damage. That will make it far easier.

    I believe the guys that are really good w/ polyester & glass repairs would open the deck, remove all damage, then cover the front w/ mylar, then thin plastic/frp to hold the mylar in the shape of the hull flat against the hull, then build the repair from the outside in (through the opening where the deck would be) just like the original layup of the boat. Gelcoat, then CSM, then a few layers of glass. Done right this would leave very minimal finishing work and would actually retain the correct stiffness/flex of the hull.

    I'm not one of those guys. I'm an amateur at best, so I'd probably base what I did on how easily I could grind out the damage and taper the edges from the inside. The removal of the deck WILL allow you to spread the stiffness of the edge of the repair out, though, as well as add back some stringers if necessary (although I'd guess a little carbon would probably negate the need for stringers...dunno though.)

    --
    Rob
    OKC
    Pile of Nacra parts..
    --
  • QuoteYou can make a perfectly molded patch by placing Saran Wrap on the inside of the opposite wall.

    good idea edChris! better than my 'plastic' concept.
    but how about making a mold on the 'outside' of the port hull that is directly opposite from this hole. then afix it to the 'outside' gelcoat surface of the starboard hull (over the hole) and build from the inside, starting with gelcoat, then fiberglass, etc as yurdle describes?
    j

    --
    Aquacat 12 (sold)...'87 Nacra 5.8 (sold)...'03 Nacra Inter18 (sold)
    Venture 15 (sold)....'89 Nacra 5.8 (sold)...'91 Nacra 5.8NA (sold)
    '99 Nacra Inter20 (sold)
    --
  • None of my business but the more I think about this the more curious I'm getting.. Would you mind sharing how you got this hole in your boat? I'm guessing vandalism or some type of trailer accident?

    --
    ------------------------------------------------------------------
    Marc C.
    Cleveland, Ohio.
    Current love: Nacra 5.0
    Old loves: Int Laser, Int Europe, Int 470, Int 420, Vaurien
    ------------------------------------------------------------------
    --
  • Quotebut how about making a mold on the 'outside' of the port hull that is directly opposite from this hole. then afix it to the 'outside' gelcoat surface of the starboard hull (over the hole) and build from the inside, starting with gelcoat, then fiberglass, etc as yurdle describes?

    That works very well, & will give a mor professional finish, BUT, the first layer,(gelcote) is the hardest. Fibreglass is pretty easy to work with, gelcote takes more skill.
    It comes down to whether you want the boat out of commission, but end up with a better,(from a cosmetic point of view) repair.
    With the deck off, you could tightly secure "backing" to the outside of the hull.(Be sure to apply a good coat of wax or release agent to the surrounding gelcote) then begin work from the inside. The backing can be any flexible material, even 1/4" plywood. Lay Saran Wrap on the inside to provide an airtight barrier for the gelcote.
    Apply gelocote, then start the structural glass work. If you go this route, you need to do some research on gelcote application, that is the portion that is easy to screw up if you have never done it before. It might be possible to get it formed & prepped, then drive the hull to a shop & have them shoot it & apply 1-2 layers of cloth. IIRC you need to place resin/cloth on the gelcote while it is still tacky.
    The actual glasswork is pretty easy & goes quick. Ditto for reattaching the deck, then sanding the gelcote flush.
    The quick & dirty fix is to do the glasswork, then paint the patch, I guess it comes down to how much time/money you have, & how important are the final cosmetics.

    --
    Hobie 18 Magnum
    Dart 15
    Mystere 6.0XL Sold Was a handful solo
    Nacra 5.7
    Nacra 5.0
    Bombardier Invitation (Now officially DEAD)
    Various other Dock cluttering WaterCrap
    --

Go to page 1 - 2 [+1]:

No HTML tags allowed (except inside [code][/code] tags)

  • Options

This list is based on users active over the last 60 minutes.