


Hi,
The trailer that came with my Pacific Cat was fabricated by the previous owner. It's built like a tank out of 1/4" wall 3" steel tubing and U-channel. But the original paint job left a lot to be desired. At this point I could best describe its color as "rust and paint calico". (Fitting for a cat, actually...)
This trailer will be used in and around salt water. I took a look at the ramp I'm likely to use, and there's not much chance of keeping this thing dry. Right now my plan is to:
- Strip all remaining paint (not that big a task)
- Wire brush the whole thing to get rid of loose rust
- Treat the whole thing with Ospho (the previous owner gave me a gallon of the stuff with the boat)
- Paint it
So that last step is the $64 question. What would you paint an ungalvanized steel trailer with after treating it with Ospho? Right now I'm kinda leaning toward a good primer coat and Rustoleum. (If you find yourself laughing uproariously at this and thinking "What a clueless @#$%!", be kind and let me know.) Any other choices I should consider?
For what it's worth I don't have a facility for spraying, so this will be roll and tip (or just roll... it's a rusted trailer, after all).
Thanks,
Tom
--
Tom Benedict
Island of Hawaii
P-Cat 18 / Sail# 361 / HA 7633 H / "Smilodon"
--
Painting Non-Galvanized Trailer

-
- Rank: Mate
- Registered: Mar 20, 2012
- Last visit: Jun 16, 2014
- Posts: 248
 Posted: Mar 28, 2012 - 07:48 PM
-
- Rank: Lubber
- Registered: Jul 08, 2005
- Last visit: Aug 26, 2023
- Posts: 97
Posted: Mar 29, 2012 - 06:30 AM
Hi Tom,
If the overall condition of the trailer is good, then you might consider an etching primer under your topcoat, such as POR15. see link. Of course, Rustoleum and Duplicolor also have a version. I have used this on my flatbed and have been happy with the results.
http://www.por15.com/SELF-ETCHING-PRIMER/productinfo/SEPG/
just my .02$
Mike
--
Mike Conway
H16
Hilton, NY
-- -
- Rank: Mate
- Registered: Oct 11, 2011
- Last visit: May 14, 2014
- Posts: 104
Posted: Mar 29, 2012 - 08:20 AM
Tom,
I have a 25+ year old trailer that is half aluminum half galvanized but real solid. I went with a roll on coat of water based rustoleum primer with an oil based top coat. Reason being oil primers won't stick to galvanized or raw aluminum.
POR 15 is also great stuff I've used it on many jeeps many times.
Like you said it is a cat trailer... I spent 30 bucks on my paint job ( 2 qts) just rolled on in some cases over the the old paint some cases bare metal. It's not a showroom finish but at 5 feet away it looks pretty dam good. I use the $3 foam roller / tray combo from home depot and some rattle cans on the springs. I'll try to get some pictures up early next week.
One thing I did do was replace every bolt on the trailer. the U bolts were rusted through and the suspension bolts were probably ok but I replaced them with new grade 8 bolts just to be safe. New coupler new wiring and lights, bolts and paint I've gotten the full trailer refreshed and road worthy for under $200. Bearings and suspension were replaced recently and are in new condition.
I know it's overkill but I'd rater get the trailer sound than have my Cat scattered across the highway.
--
Bob Miller
1983 P16 Sail # 7312
"Miller Time" A work in progress; out of the water for 16 years
Barnegat Bay NJ
Beach Cat Lesson #1 - A free cat isn't
Find more Prindles on Facebook https://www.facebook.com/groups/173120656090532/
-- -
- Rank: Mate
- Registered: Aug 01, 2002
- Last visit: Sep 01, 2025
- Posts: 432
Posted: Mar 29, 2012 - 12:11 PM
Smart move. I've had one of the U bolts that connects the trailer and axle break. That was interesting.
benedict: I've had similar work done (but on a car) by a local industrial-type sandblasting/painting guy. I just asked him to throw it in when he was doing one of his jobs that was white, gray, or whatever. I had to wait a few weeks and it wasn't show quality, but he used the stuff they put on water towers and such (epoxy paint topcoated with linear polyurethane?). Holds up awesome and the price was reasonable.
--
Jerome Vaughan
Hobie 16
Clinton, Mississippi
-- -
- Rank: Mate
- Registered: Mar 20, 2012
- Last visit: Jun 16, 2014
- Posts: 248
Posted: Mar 29, 2012 - 12:19 PM
Hey, thanks, guys! This gives me good food for thought.
I'm heading into town this weekend to get supplies. I'll pick up stuff for the trailer at the same time.
Tom
--
Tom Benedict
Island of Hawaii
P-Cat 18 / Sail# 361 / HA 7633 H / "Smilodon"
-- -
- Rank: Mate
- Registered: Jan 24, 2012
- Last visit: Feb 26, 2016
- Posts: 173
Posted: Apr 01, 2012 - 10:40 AM
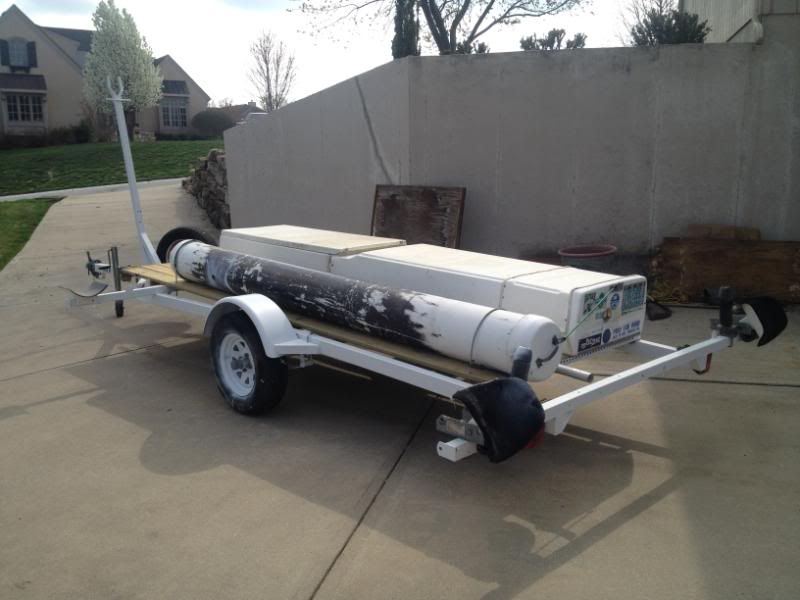
On the other side of stupid is what I did. I got a "free" trailer, it was much longer than the trailer that came with my 5.5, in fact long enough to leave the spinnaker pole on the boat long.
I took the trailer apart as far as I could this included the mast cradle and the suspension truck it is adjusatable so removing was simple.
It was mostly together when I took it to the sand blaster, he charged me 250 to all of it, not cheap but done in half a day. I then went to lowes and bought 1 quart and 1 spray can of primer and paint, the spray can to get to the nooks and crannies. spent the better part of half a day on each coat. Lots of work but the end result looks like new.
Edited by RicardOben on Apr 01, 2012 - 11:15 AM.
--
Lake Perry KS
H-18
N-5.5 UNI +spin
-- -
- Rank: Mate
- Registered: Mar 20, 2012
- Last visit: Jun 16, 2014
- Posts: 248
Posted: Apr 01, 2012 - 12:13 PM
That's pretty darned sweet. I'd really prefer to sand blast this thing, but I don't know anyone on-island who does it. I set aside today to strip and ospho the trailer, so I think I'm going that route. But between now and the next time I work on the trailer, if I find someone who will do the work I'll consider sand blasting.
Your photo raises another item on my to-do list: Sail box/tube. This trailer has diddly. I've been keeping my eye out for sewer pipe, but so far nothing big enough has come along. Meanwhile I'm reading through the various threads and photo galleries on making sail boxes, fishing for ideas.
Thanks,
Tom
--
Tom Benedict
Island of Hawaii
P-Cat 18 / Sail# 361 / HA 7633 H / "Smilodon"
-- -
- Rank: Mate
- Registered: Jan 24, 2012
- Last visit: Feb 26, 2016
- Posts: 173
Posted: Apr 01, 2012 - 01:12 PM
The sail tube came with the Nacra trailer and the Box came with the other trailer. The box needed some work and unfortunately the tube was already painted and I was too lazy to strip it.
For years I had another tube with a couple of buckets, one on each end worked fine. Look in the yellow pages for sand blasters, a lot of them paint also. This one did not. Also I sprayed the inside of all the tubes to prevent rust from the inside out. Ricardo.
--
Lake Perry KS
H-18
N-5.5 UNI +spin
-- -
- Rank: Mate
- Registered: Jul 06, 2008
- Last visit: Jul 19, 2018
- Posts: 986
Posted: Apr 01, 2012 - 11:54 PM
I just took my trailer on a rod trip to pick up a couple boats and the wife pulled into a gas pump a little sharp and bent a 2 in crossbar back about 30 degrees at the first bolt connection. I had to scramble to do a quick patch job so I could stack 2 boats on that evening. In the process I ended up having a 96 inch piece of 2 inch steel tubing cut for about $24 after tax. I didn't end up using it for the patch but this week end I pulled that piece out hit the surface rust with "naval jelly" and drilled my mounting holes. I then hit it with a spray can of Rustoleum gray primer followed by Rustoleum "Aluminum" which is kind of a semi shiny but not glossing silvery finish. It looked great so I will likely do the entire trailer at some point.
I have another trailer in the same condition as yours and I plan to get a 4 in grinder with a twisted wire wheel and strip to metal and do the same thing to it. it's not high on my list right now though.
Anyone know where I can get some good end caps for 2 inch steel tubing to help keep moisture out and protect shins.
--
Dustin Finlinson • Magna, UT
Member: Utah Sailing Association
1982 Prindle 18
1986 Hobie 17
1982 Prindle 16
1980 Prindle 16(mostly)
1976 Prindle 16(mostly)
Check out "Prindle Sailors" on Facebook.
-- -
- Rank: Mate
- Registered: Mar 20, 2012
- Last visit: Jun 16, 2014
- Posts: 248
Posted: Apr 02, 2012 - 12:11 AM
Whoever built this trailer also cut parts for the upright to hold the mast. The bottom end welds onto a bracket to attach it to the trailer, and the upper end is capped with two pieces of angle iron, welded back to back, torched and ground to fit the profile of the tube, and welded on.
I think something similar could be done with your tube. Cut steel to the right size, weld on, grind smooth, and paint.
Yeah, yeah, that style cap relies on your having a welder. I don't, but I wish I did. Luckily I have friends who can. A friend of mine welded the upright over the weekend. I should be able to paint it tomorrow. I'll take pictures of it as I go.
Tom
--
Tom Benedict
Island of Hawaii
P-Cat 18 / Sail# 361 / HA 7633 H / "Smilodon"
-- -
- Rank: Lubber
- Registered: Jul 08, 2005
- Last visit: Aug 26, 2023
- Posts: 97
Posted: Apr 02, 2012 - 06:24 AM
Quarath, for your plugs try McMaster-Carr. Here's a link if you are looking for push in plastic pugs. I used these on an outboard motor stand and they work great.
http://www.mcmaster.com/#standard-tube-insert-plugs/=gxh620
--
Mike Conway
H16
Hilton, NY
-- -
- Rank: Mate
- Registered: Jul 06, 2008
- Last visit: Jul 19, 2018
- Posts: 986
Posted: Apr 02, 2012 - 03:04 PM
No welding skills here. I wish I did it would help a lot. My Neighbor can but I all ready bug him for a lot of stuff he can do for me at his work. My Dad has a welder I just don't know how to use it.
--
Dustin Finlinson • Magna, UT
Member: Utah Sailing Association
1982 Prindle 18
1986 Hobie 17
1982 Prindle 16
1980 Prindle 16(mostly)
1976 Prindle 16(mostly)
Check out "Prindle Sailors" on Facebook.
-- -
- Rank: Lubber
- Registered: Sep 24, 2009
- Last visit: May 17, 2019
- Posts: 96
Posted: Apr 02, 2012 - 03:39 PM
Quarth,
Get a couple pieces of steel and give welding a try. Especially if your Dad has one. It is not difficult and you can ask your neighbor how its done if you need to. Nobody taught me and I trust the welds I produce, they're just not pretty. But that is why God created grinders!!
I have a wire feed welder. I learned that the best welds come from steel that is free from rust and grease. Also, the best welds happen when you keep the weld point moving. It helps if your hand is shaking slightly. Also, get a auto darkening face shield. It is a pain to keep raising and lowering the visor.
Good Luck!


