Newbie - Did I waste $1700? Mast kink on Mystere 6.0

- Rank: Lubber
- Registered: Sep 26, 2021
- Last visit: Jun 08, 2023
- Posts: 70
So I found a Mystere 6.0 for sale that had pretty solid hulls and was in relatively good condition. After I got it home and took the mast of the trailer to clean I noticed this kink/bend in the mast. Did I waste my money? It is side to side and looks like the bend is right where the diamond spreaders are so could this be the result of poor tension balance?
- Rank: Lubber
- Registered: Jul 14, 2015
- Last visit: Jul 22, 2025
- Posts: 81
Is it a kink or is it a bend? A bend can often be straightened, a kink cannot. A bend is gradual over a distance and can usually be straightened. Remove all the rigging, find a couple of trees spaced an appropriate distance apart, a come along, strong horse, or trusted friends who follow orders and apply counter pressure until you achieve the desired result. A kink is a hard visible dent at a single point and if that's what you have, you're f'd.
--
Dart 20
--
--
Dart 20
--


- Rank: Master Chief
- Registered: Jun 20, 2006
- Last visit: Dec 04, 2024
- Posts: 7090
some bent masts are better off left alone = the rigging tention will correct it
othere can be sleeved, welded, or braced
pics would be helpful
Lesson here: Never by a boat without rigging it, and a test sail if possible - i wouldn't buy anything without a test drive personally
othere can be sleeved, welded, or braced
pics would be helpful
Lesson here: Never by a boat without rigging it, and a test sail if possible - i wouldn't buy anything without a test drive personally

- Rank: Chief
- Registered: Nov 26, 2009
- Last visit: Sep 03, 2025
- Posts: 2532
Read the FAQ, there is info on making an album that will get you started.
Get hold of Yves Sansoucy, Mystere catamarans, if your mast is junk. There are quite a few of these boats around his area,(near Montreal). He was quite accommodating when I needed a new tramp for my 6.0XL
--
Hobie 18 Magnum
Dart 15
Mystere 6.0XL Sold Was a handful solo
Nacra 5.7
Nacra 5.0
Bombardier Invitation (Now officially DEAD)
Various other Dock cluttering WaterCrap
--
- Rank: Lubber
- Registered: Sep 26, 2021
- Last visit: Jun 08, 2023
- Posts: 70
This picture was taken standing at the top of the mast looked toward the base.
Here is a picture of the mast. It looks like the bend is right around the diamond spread which is what made me think it could be unbalanced tension
Edited by jgregs on Sep 27, 2021 - 12:37 PM.
- Rank: Lubber
- Registered: Jul 14, 2015
- Last visit: Jul 22, 2025
- Posts: 81
Have you released all the tension on the diamond wires?
--
Dart 20
--
--
Dart 20
--
- Rank: Lubber
- Registered: Sep 26, 2021
- Last visit: Jun 08, 2023
- Posts: 70
I have not. I would assume that is step number one to get a true view of it? Do I do that by loosening the tensioners near the base?
The previous owner put some kind of silicone sealant all over the connection points I removed to allow the wires to move more freely when I loosen them - not sure if this was the right choice but I hadn't seen it before when I was doing more dinghy sailing.
JG
Edited by jgregs on Sep 27, 2021 - 12:36 PM.
- Rank: Lubber
- Registered: Jul 14, 2015
- Last visit: Jul 22, 2025
- Posts: 81
Yes
Remove all that crap, you need to see everything to properly assess the condition of the pieces
--
Dart 20
--

- Rank: Mate
- Registered: Aug 18, 2003
- Last visit: Jul 22, 2025
- Posts: 885
Then replace by something like this, it's to protect the jib:
And something like this for the shroud ajdusters, to protect your feet:

- Rank: Lubber
- Registered: Sep 26, 2021
- Last visit: Jun 08, 2023
- Posts: 70
Good thats what I thought
I'm hoping because no one has posted

That this isn't catastrophic? . . . my girlfriend told me I need to practice being optimistic. I will work on getting the diamond spreaders off and give and update this afternoon
- Rank: Master Chief
- Registered: Jun 20, 2006
- Last visit: Dec 04, 2024
- Posts: 7090
don't remove the spreaders
release the tention on the spreader wires
and take/post a dozen other pics
from both ends, put a light at one end,
at the point of concern
- Rank: Master Chief
- Registered: Jun 20, 2006
- Last visit: Dec 04, 2024
- Posts: 7090
And something like this for the shroud ajdusters, to protect your feet:
FEET? - you have 2! you don't need to worry about your feet
those are to protect your ring-dings from getting snagged on your shorts and the ring-ding getting bent and falling out (and you demast)
FEET? - you have 2! you don't need to worry about your feet
those are to protect your ring-dings from getting snagged on your shorts and the ring-ding getting bent and falling out (and you demast)
- Rank: Lubber
- Registered: Sep 26, 2021
- Last visit: Jun 08, 2023
- Posts: 70
So just enough so they are loose?
- Rank: Mate
- Registered: Nov 22, 2012
- Last visit: Jan 27, 2025
- Posts: 419
At this point, I would suggest removing the diamonds and spreaders off completely. This will give you a true sense of what you are looking at. Bends are not bad. If it was a kink, I would suggest placing a doubler plate on the mast either side of the spreaders. When you pull the spreaders off, be mindful of the thread adjusters. I think the Mystere used the same spreaders as the Nacra and Prindle where there is a threaded stock for the adjustment. My 18-2 spreader screws are completely frozen. I have not pushed to free them up as the thread can shear easily. Since then, I have acquired a spare set. I say pull everything off so you can inspect the fittings. More than likely, they have not been pulled apart. Do beware that this can become a rabbit-hole if you are OCD. Check the spreader tips for wear. You will see where the diamonds have worn a grove about 1/16" deep; this is normal. Where the wire fork attaches to the tangs, check the hole size carefully. This is one area pins can be point loaded. Check the turnbuckle ends also. This will become a good time to pull the turnbuckles apart and clean them well. I would recommend replacing the diamond wires completely while you have them off. This way you now know the age of them. Even if the previous owner said they just replaced them, that could have been 5,8,10,12 years ago. And... you have no idea how they maintained the wires after sailing... did they wash the boat down? Did they spray a corrosion inhibitor on the wires while in off season? If you are choosing to keep the existing diamond wires, take a tissue and wipe the wires down. This will show if there are any broken wires along the wire. If there is a bend that the diamonds will not straighten, you can add a second set of diamonds to help straighten the mast up. While you are inspecting things, check the tangs for corrosion.
--
Scott
Prindle Fleet 2
TCDYC
Prindle 18-2 Mod "FrankenKitty"
Tornado Classic "Fast Furniture"
Prindle 19 "Mr. Wiggly"
Nacra 5.8 "De ja vu"
Nacra 5.0
Nacra 5.8
Tornadoes (Reg White)
--
--
Scott
Prindle Fleet 2
TCDYC
Prindle 18-2 Mod "FrankenKitty"
Tornado Classic "Fast Furniture"
Prindle 19 "Mr. Wiggly"
Nacra 5.8 "De ja vu"
Nacra 5.0
Nacra 5.8
Tornadoes (Reg White)
--
- Rank: Lubber
- Registered: Sep 26, 2021
- Last visit: Jun 08, 2023
- Posts: 70
I'm working on getting the diamond wires loosened and figuring out whats happening with the mast.
The last major repair I have is this panel here. It looks like the old glue has simply given up. Each individual piece is strong but without this glued down, the side of the hull flexes when the trampoline is weighted. With this and the mast repaired, my boat should be just about seaworthy.
Can I simply epoxy this down? That's what it looks like was done originally.
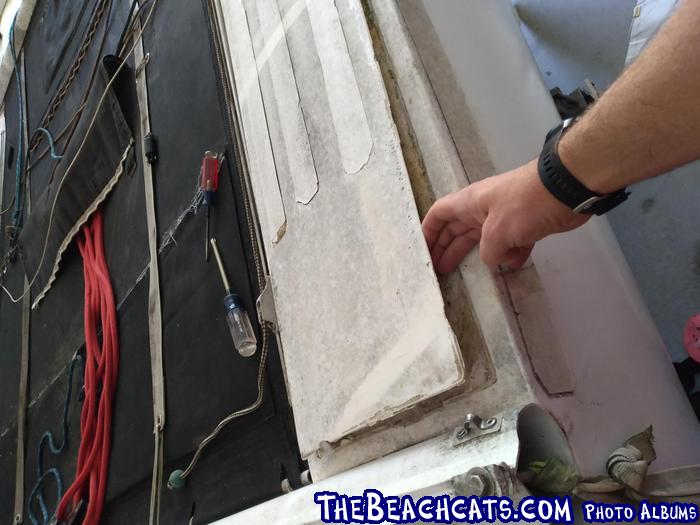
- Rank: Lubber
- Registered: Jul 14, 2015
- Last visit: Jul 22, 2025
- Posts: 81
I'm not familiar with the mystere line of boats but from your photo, it looks like someone peeled the deck plate open to inspect the hull for some reason. They don't just come unglued. Perhaps a daggerboard trunk leak. You need to do a through inspection of the hull. Probably remove the deck plate the rest of the way so you can clean it up and reattach it properly.
I'm sure someone with more experience with this boat chime in with more information, but this is an old boat and you need to look over everything very carefully.
--
Dart 20
--
I'm sure someone with more experience with this boat chime in with more information, but this is an old boat and you need to look over everything very carefully.
--
Dart 20
--
- Rank: Mate
- Registered: Oct 20, 2011
- Last visit: Apr 03, 2023
- Posts: 167
Jgregs
A neighbor has a Mystere and has stopped using it in favor of another boat.
It needs hull work, but has good rigging and a straight mast.
PM me if you wish his contact info
Best
Windwardde
--
Supercat 15
Windrider 17
Several Sunfish and Sunfish clones
Ratboat built from Zuma and Sunfish parts
Shallow water sailor in the Delaware Bay
--
- Rank: Master Chief
- Registered: Jun 20, 2006
- Last visit: Dec 04, 2024
- Posts: 7090
dup
Edited by MN3 on Sep 28, 2021 - 09:39 AM.
Edited by MN3 on Sep 28, 2021 - 09:39 AM.
- Rank: Master Chief
- Registered: Jun 20, 2006
- Last visit: Dec 04, 2024
- Posts: 7090
I have removed the bow decks from my mystere 5.5, and have seen many mystere's with the decks removed for repairs.
https://www.thebeachcats.…nc=viewtopic&topic=16179
https://www.thebeachcats.…ictures?g2_itemId=123629
I find it unlikely someone removed that deck part way to do repair or inspection as i would THINK the deck would be much more beat up. I had to use a crowbar and sledge hammer to break into mine and it was ugly.
I would guess the glue did in-fact dry-up and get brittle and simply fail. You will probably find chunks of it in your hulls. it is thick white toothpaste like glue - brittle and strong but will crack in half with force. the areas by the beam bolts take a lot of torque (esp the one up front) and many mysteres have some stress cracks in those areas. I am not surprised to see some glue fail after 25+ years
I would look inside , take lots of pics so you can blow them up - stick bright lights out side of your hull to see through and see cracks and when you are 100% certain the cat is solid reseal those lids with west system six10 (3 tubes per lid if i recall, perhaps 4. The pics may help you in the future as well if you have to deal with something (side stay failure, bulk head failure, beam bolt plate issues, etc. This may be the right time to add some thicened epoxy to your bulkheads to siffen them up - they are know to come separated, esp in 6.0's (I have done both my boats. The 6.0 i just did this where i could via the 4 deck ports. the 5.5 had the bows lids off and i added bulkheads for stiffness.
When you glue it back down, suggest you put strps of wood on the deck that are 1" x 8' (this so flexable) and then put weights on top of the wood to weigh down the deck lid overnight as it cures.
Edited by MN3 on Sep 28, 2021 - 09:44 AM.
- Rank: Lubber
- Registered: Sep 26, 2021
- Last visit: Jun 08, 2023
- Posts: 70
Time to learn fiberglass repair!
Yeah I noticed one on the port side was loose so I will give them a once over.
. . . this boat's going to be bomb proof after all these repairs
Yeah I noticed one on the port side was loose so I will give them a once over.
. . . this boat's going to be bomb proof after all these repairs
- Rank: Master Chief
- Registered: Jun 20, 2006
- Last visit: Dec 04, 2024
- Posts: 7090
dup
Edited by MN3 on Sep 28, 2021 - 12:11 PM.
Edited by MN3 on Sep 28, 2021 - 12:11 PM.
- Rank: Master Chief
- Registered: Jun 20, 2006
- Last visit: Dec 04, 2024
- Posts: 7090
No fiberglass work in this thread (yet)
Just use that six10 product (thickened epoxy and catalyst in a tube with a mixing nozzle) - i recommend a power caulking gun (maybe worth renting) but a $4 one will work too
Read surface prep through Bonding with Fillets. pg 30-33. (actually read the entire thing if you have the time
https://www.westsystem.co…ads/User-Manual-2015.pdf
there are other epoxy products but this is a pretty simple and proven product -
- Rank: Master Chief
- Registered: Jun 20, 2006
- Last visit: Dec 04, 2024
- Posts: 7090
Pretty sure his son Yannick is running the show now -
see Yannick -Voile Sansoucy Owner https://voilesansoucy.com/a-propos/
also read the histroy
- Rank: Lubber
- Registered: Jul 14, 2015
- Last visit: Jul 22, 2025
- Posts: 81
Hmm, these mysteres are truly mysterious boats
--
Dart 20
--
- Rank: Master Chief
- Registered: Jun 20, 2006
- Last visit: Dec 04, 2024
- Posts: 7090
Great design, made to last until the manufacturer warranty expires - then explode
- Rank: Lubber
- Registered: Sep 26, 2021
- Last visit: Jun 08, 2023
- Posts: 70
Would you use the six10 for stabalizing the bulkheads as well as re attaching the top panels?
I'm having trouble getting the panel all the way off. It appears that the original owner did some repairs in the area and only reglued half the panel.
I'm having trouble getting the panel all the way off. It appears that the original owner did some repairs in the area and only reglued half the panel.
- Rank: Master Chief
- Registered: Jun 20, 2006
- Last visit: Dec 04, 2024
- Posts: 7090
yes
you probably do want to wet in the fillet (wet the hulls with unthickend epoxy before adding the thickened epoxy for a better bond)
so you may need to get a small epoxy bottle and small catalyst
sounds like boatbore was correct
you will have to verify his repairs prior to sealing them
Edited by MN3 on Sep 28, 2021 - 02:23 PM.
- Rank: Lubber
- Registered: Sep 26, 2021
- Last visit: Jun 08, 2023
- Posts: 70
[/quote]
sounds like boatbore was correct. you will have to verify his repairs prior to sealing them[/quote]
Do you know any way to breakdown the glue or to get it up? My worry is snapping the panel
sounds like boatbore was correct. you will have to verify his repairs prior to sealing them[/quote]
Do you know any way to breakdown the glue or to get it up? My worry is snapping the panel
- Rank: Master Chief
- Registered: Jun 20, 2006
- Last visit: Dec 04, 2024
- Posts: 7090
Break it down?
flame thrower or dynamite
you can try using a metal scraper or putty knife but i doubt that will get you too far
we used a hammer and chisel in spots it would come apart and a small sledge hammer and crow bar in spots it wouldn't - it got ugly but the point of load (impact) was on the hull lip, not the deck lid
You can get a camera on a selfie stick in there and take a ton of pics or video - before you go nuts to get the entire lid off (creating a ton of work) are you sure it is needed?
- Rank: Mate
- Registered: Jun 30, 2018
- Last visit: Sep 07, 2025
- Posts: 603
Man, I'd follow the advice and get a good look inside the thing first with a camera. There may be no need to remove it and reattaching with epoxy may be all you need to do. Thickened epoxy to glue it down and then seal around the edges with regular thin, then fair it out/fill in cracks with thicker, if needed. May just need to attach it back down, enure it's sealed and go. For other areas that are still glued down, but you're worried about, you can do the inject-epoxy thing.
--
Chuck C
NACRA 500 Mk2
Hobie 21se (sold)
--
--
Chuck C
NACRA 500 Mk2
Hobie 21se (sold)
--
- Rank: Lubber
- Registered: Jul 14, 2015
- Last visit: Jul 22, 2025
- Posts: 81
Yep, absolutely do this, look extra close at the daggerboard trunk and bulkheads. But don't glue the cap down until you're sure there's nothing more you ever want to do inside the hull ever again.
The previous owner started a repair but never finished it. Why? Did he decide removing the deck was too much trouble or did he do the repairs and just not glue the deck down. A mysterey.
Removing the deck is not fun, you need the thickest putty knife/scrapper with a slab tang you can find, sharpened to a chisel edge, a hammer, determination, and patience. The hardest part is the beginning and that's done.
It's a 25 year old boat you can assume was ridden hard and put away wet. How are you going to use it? On the ocean or a little inland lake where you can swim to shore if it disappears from underneath you.
And what's up with that mast?
The Bore
--
Dart 20
--
- Rank: Lubber
- Registered: Sep 26, 2021
- Last visit: Jun 08, 2023
- Posts: 70
It looks like he tried to do some repair around the daggerboard trunk but the bulkheads don't appear to have been touched. I'm pretty sure the original owner had no ideas what he was doing because there is a lot of sloppy work. I'm sure it was functional but I really don't trust it.
[quote=boatbore]
My biggest worry is breaking the deck panel or the "shelf" it sits on trying to get the panel off. I have no problem doing the work needed. My fear is making it worse and doing something that is prohibitively expensive to repair or is unfixable and having to scrap the whole project for lack of skill and expertise.
I'm having trouble getting the diamond wires loosened to look at the bare mast. I have an uncle I was talking to who is a captain and an experience sailor who was optimistic an experienced rigger could help sort it out so I have been looking for someone but Atlanta (where I am) doesn't have a very robust sailing community so finding experts nearby who could help are few and far between. I have reached out to my local yacht clubs but no one has responded.
- Rank: Chief
- Registered: Nov 26, 2009
- Last visit: Sep 03, 2025
- Posts: 2532
This is not rocket science, or a job for a rigger.
You either undo the tension adjustment at the bottom, or undo the spreader bars. I can’t remember how mine tensioned, but it’s usually a sharp awl through a hole in the turnbuckle, in combination with an open end wrench to turn it.
If that fails, remove all the crap from where the spreaders are attached to the mast. Remove the cotter pins. Sit down, put your feet against the mast, & pull, (one hand on each side of the spreader). It doesn’t take much force. This will bow the mast a bit, & release tension on the pins. Have a helper push the pins out, the spreader bars will now come off.
Once one spreader is off, the other will have no tension, & can be easily removed.
I do this each year with the N5.7 & H18 masts as they won’t go through the basement window for storage with the spreaders attached. The N5.7 & the Dart mast fit through.
The mast can now be examined at its natural state.
Reassembly is the opposite.it takes only a few minutes, then re-take the ring dings, & tension using a Loos gauge.
--
Hobie 18 Magnum
Dart 15
Mystere 6.0XL Sold Was a handful solo
Nacra 5.7
Nacra 5.0
Bombardier Invitation (Now officially DEAD)
Various other Dock cluttering WaterCrap
--
- Rank: Lubber
- Registered: Sep 26, 2021
- Last visit: Jun 08, 2023
- Posts: 70
yeah, the hardware is just stuck and stubborn so I'm trying to be careful and use plenty of WD-40
My uncle was more refering to a rigger could get the mast I have straightened up
Edited by jgregs on Sep 29, 2021 - 03:57 PM.
- Rank: Chief
- Registered: Nov 26, 2009
- Last visit: Sep 03, 2025
- Posts: 2532
The fittings are not a really tight tolerance. If the pins are a bit corroded, just have buddy tap a pin punch on them while you pull.
Another option is to undo the spreader at the pointy end. It consists of a small triangle with 3 pins. You only need to remove one of them.
Your photos don’t look like the mast is unusable, no sharp kinks evident, but photos often don’t show the complete story. Tip the mast on edge & sight down the sail track. Gentle bends can be fixed.
Edited by Edchris177 on Sep 29, 2021 - 03:22 PM.
--
Hobie 18 Magnum
Dart 15
Mystere 6.0XL Sold Was a handful solo
Nacra 5.7
Nacra 5.0
Bombardier Invitation (Now officially DEAD)
Various other Dock cluttering WaterCrap
--
- Rank: Lubber
- Registered: Sep 26, 2021
- Last visit: Jun 08, 2023
- Posts: 70
Thats good to hear and very much were we are. I'm learning there is a big difference between and kink and bend and I'm glad to say I believe we are dealing with the latter.
- Rank: Master Chief
- Registered: Jun 20, 2006
- Last visit: Dec 04, 2024
- Posts: 7090
mysteres are known for some leaks in the dagger board wells - its harder to work in there too
yup i mutilated spots of mine - it was ugly and my deck are no wheres neat show room condition after the surgery but i have 1 pretty boat (the 6.0) and one that i have sailed 3000 times and it shows
wd40 is not gonna do anything on stuck fittings on these boats - you need Blaster if there is any corrosion involved
More PICTURES PLEASE
- Rank: Master Chief
- Registered: Jun 20, 2006
- Last visit: Dec 04, 2024
- Posts: 7090
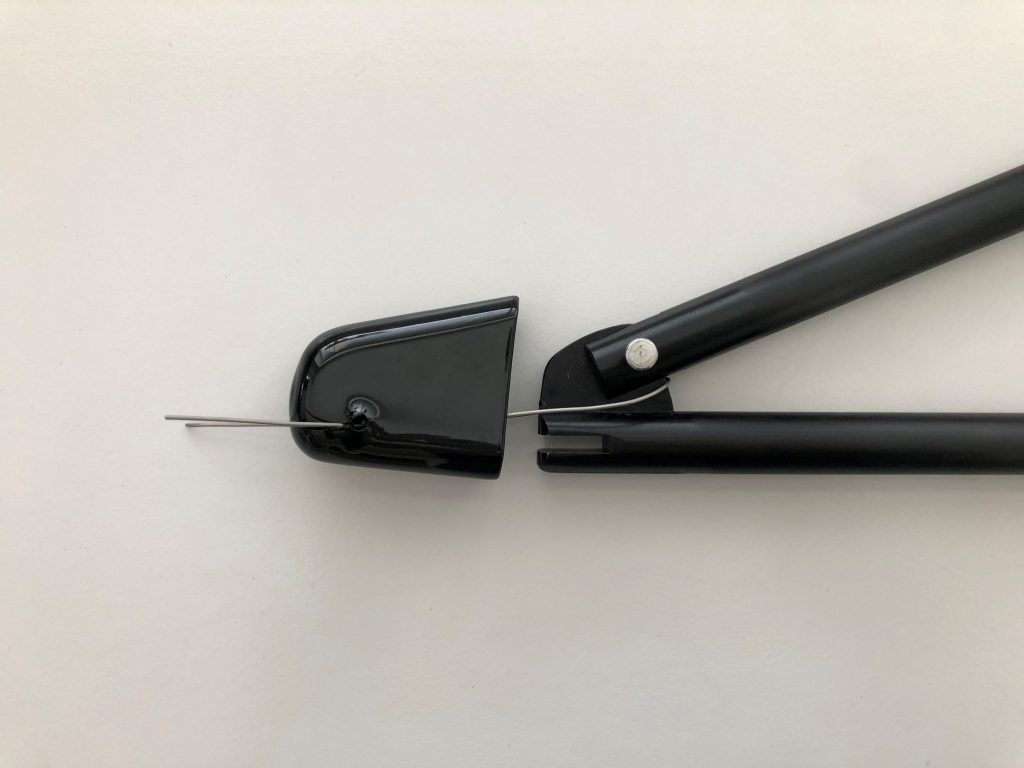
Does yours diamond wire/mast area look like mine?
is that what is stuck?
top left on image (the center barrel that has nuts on the top and bottom)
Edited by MN3 on Sep 29, 2021 - 04:14 PM.
- Rank: Lubber
- Registered: Sep 26, 2021
- Last visit: Jun 08, 2023
- Posts: 70
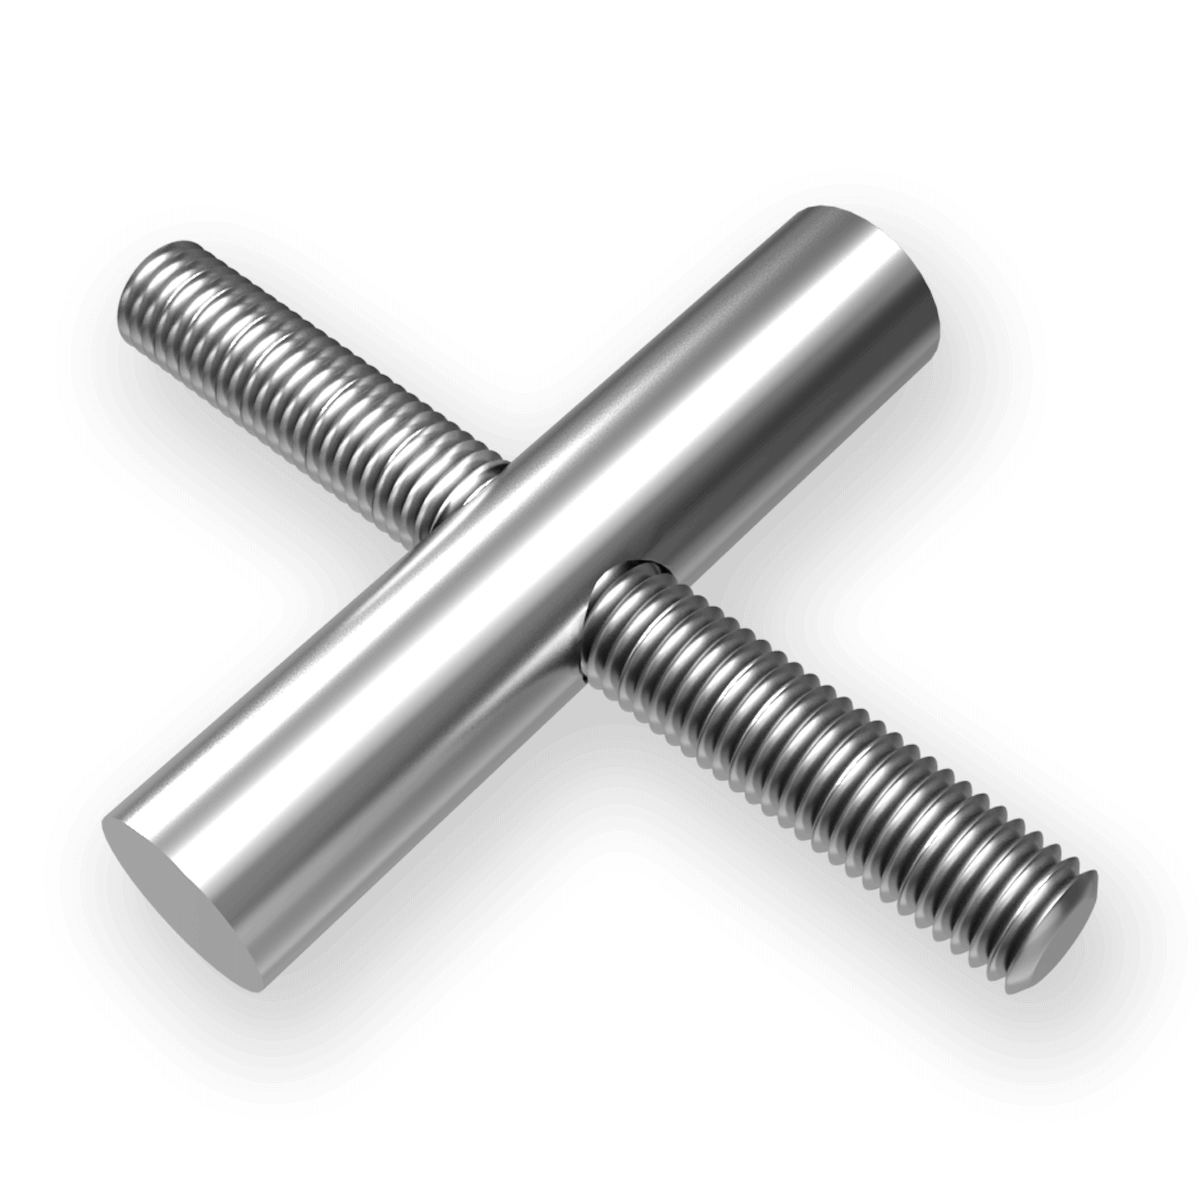
Yup. Looks like the similar hardware. Where it anchors it isn't a nut but instead is a aluminum cylinder with a threaded hole (like that pictured below)
Its the barrel that doesn't want to move. When I try to twist that, it twists the entire wire so I'm going to support it as best as I can and put some more muscle behind it.
Edited by jgregs on Sep 29, 2021 - 05:57 PM.
- Rank: Master Chief
- Registered: Jun 20, 2006
- Last visit: Dec 04, 2024
- Posts: 7090
where the wire connects to the threads, there should be a flat spot - you put a vice grip on it there, one above and one below). Someone else (since you need to hold both) will then put a small allen wrench (or similar sized punch) in the hole in the middle of the barrel for leverage OR you use vice grips but it will scar the crap out of it and i don't think i have ever had much success that way.
you should soak everything over night with blaster or some other enzyme product that will help free up frozen hardware
and post pics of YOUR setup please (we know its a pita)
- Rank: Chief
- Registered: Nov 26, 2009
- Last visit: Sep 03, 2025
- Posts: 2532
I think mine had the same setup as you are describing. The threaded rod does not have to turn in the barrel it’s anchored into.
Undo both top & bottom nuts. (They will turn opposite way to loosen). Then hold the “flat spot” Andrew alluded to, I use a crescent wrench, & turn only the barrel, via a thin pin punch in the barrel hole.
We used an awl a few times, but twist it firmly in, & be aware they can break.
Heat the barrel with a propane torch, just enough so the heat load doesn’t fully transfer into the threaded part of the wire.
If all fails, (you should probably source new standing rigging anyway), cut them off
Thus photo is from an album I made showing the complex line rigging for the jib, but you can see the Diamond wire anchors.
https://www.thebeachcats.…070&g2_imageViewsIndex=1
--
Hobie 18 Magnum
Dart 15
Mystere 6.0XL Sold Was a handful solo
Nacra 5.7
Nacra 5.0
Bombardier Invitation (Now officially DEAD)
Various other Dock cluttering WaterCrap
--
- Rank: Lubber
- Registered: Jul 14, 2015
- Last visit: Jul 22, 2025
- Posts: 81
Looking at your photo of the half removed panel, I see what looks like chips from the tool the po used to open the deck as far as he thought necessary to do the repairs. He did some patching, got discouraged with the results and abandoned the project. Time passes and he’s lost all interest in the boat and puts it up for sale.
Now it's your project. You have to decide if you can do the repairs with the access you have or do you need more room to do it right. The hardest part of getting the deck off is the first couple inches. He did that with very little damage to the panel. It can be done. Sharpen up a scrapper and give it a try. If you damage the hull side it's easy to reinforce it from the inside with some fiberglass and resin, the deck is a little harder to repair. It's very important that the scrapper you use is sharp. Knife edge, not blunt.
Word! Get pb blaster, kroil, or automatic transmission fluid and acetone mixed together and hit every fastener on the boat, repeatedly. When reassembling coat mated surfaces with lanocote or tefgel.
--
Dart 20
--
- Rank: Lubber
- Registered: Jul 14, 2015
- Last visit: Jul 22, 2025
- Posts: 81
Yeah you need all new standing rigging if you haven't heard yet. Say hello to Murray's for me.
--
Dart 20
--
- Rank: Lubber
- Registered: Sep 26, 2021
- Last visit: Jun 08, 2023
- Posts: 70
Murray's doesn't have premade rigging for a Mystere 6.0 but if I measure what I have, I assume they can remake it? The shroads appear in pretty good shape. Should I replace these for good measure anyways?
I was able to get it off and take a look at the bare mast. The bend is still there but when we put it up on to some table gravity brought the mast back to straight so it should be fixable right?
There are two things I'm trying to figure out in the hulls. I have gone around with a spackle knife, hammer, and razor blade to get the panel off but I can't get the panel off past this point. It seems to be glued down or fastened around the centerboard cutout. I have gotten the knife under the edge almost everywhere else but this is as far as I can take it off.
Lastly, as I have been looking in the front of the starboard hull, I can see some light coming through the base so this will HAVE to get patched. I assume fiberglass to reenfore the weak areas and cover any hole is the right proceedure here? Should I also look at re-covering the outside with gel coat or filler? You can't see the gaps in this shot but I wanted to show the space I will need to work in.
- Rank: Master Chief
- Registered: Jun 20, 2006
- Last visit: Dec 04, 2024
- Posts: 7090
YES
you should replace all old standing rigging diamond wires, side stays. bridal wires and forestay or find a local rigger, there are lots of options here.
This looks bad to me, you have a bend and a twist. Where are you located? If this was me, I would have a professional rigger do a marine inspection on it. If that isn't an option, have your uncle evaluate. IF just a little weight in one spot corrects everything - you have nothing to do = you will have 100's and 100's of lbs of rigging tention as soon as you rig it and sheet in. that will auto fix a small bend - as i said - it looks worser than that to me but your pics are pretty hard to see a kink 20' away in low res pics and i am not a professional marine inspector
Some light is not a big deal, there are thin areas
IF they are worn down, through the gel-coat into any fiber - yup need to fix that.
you need to do some research here
i highly recommend the west marine video tutorials for an understanding of what a fiberglass/ epoxy work is gonna take
others will chime in too i am sure
Edited by MN3 on Oct 01, 2021 - 01:37 PM.
- Rank: Lubber
- Registered: Sep 26, 2021
- Last visit: Jun 08, 2023
- Posts: 70
Does "nothing to do" mean good to go or "nothing to do" as in there is nothing I can do about it and it is trash?
Edited by jgregs on Oct 01, 2021 - 02:49 PM.

- Rank: Mate
- Registered: Oct 07, 2020
- Last visit: Feb 29, 2024
- Posts: 359
I read that as you are good to go. The force to straighten it is roughly zero, the forces on the rigging will be large. But, I can also read MN3's reply as doom and gloom.
My only sailboat work has been on our H16. So I'm not a rigger. I've done a lot of work with aluminum on aircraft. From what I can see, and if it was my boat, I'd probably try and tweak it straight and true with the wires off.
I did replace the mast on my H16. Not because I had to, but because I bought a parts boat for hulls. It had a better mast hound, no cracks for the stepping hinge, and later I found out the halyard sheave was much better. So that is always an option too - look for a mast.
--
Bryan in Poplar Grove, IL
Supercat 17, unknown year. Future project
Hobie 16, 1977 - died a spectacular death https://youtu.be/Y7O22bp2MVA
Hobie 16, 1978 - current boat
--
- Rank: Master Chief
- Registered: Jun 20, 2006
- Last visit: Dec 04, 2024
- Posts: 7090
a little bend in a mast, not under load MAY be fine under load. when everything is sheeted tight and the mast has force on it, it doesnt impact the integrity and would cost time and money to "chase" making it look straight on land
IF a bend, kink, twist, corrosion, or other is in a location or with a level of severity that compromises the mast under-load, you need professional help. Hopefully you can find a marine welder/fabricator/rigger to do any
the cost of the work could quickly pass the value of a replacement mast (est $1000 to source a new/used mast give or take)
Edited by MN3 on Oct 02, 2021 - 10:25 AM.
- Rank: Master Chief
- Registered: Jun 20, 2006
- Last visit: Dec 04, 2024
- Posts: 7090
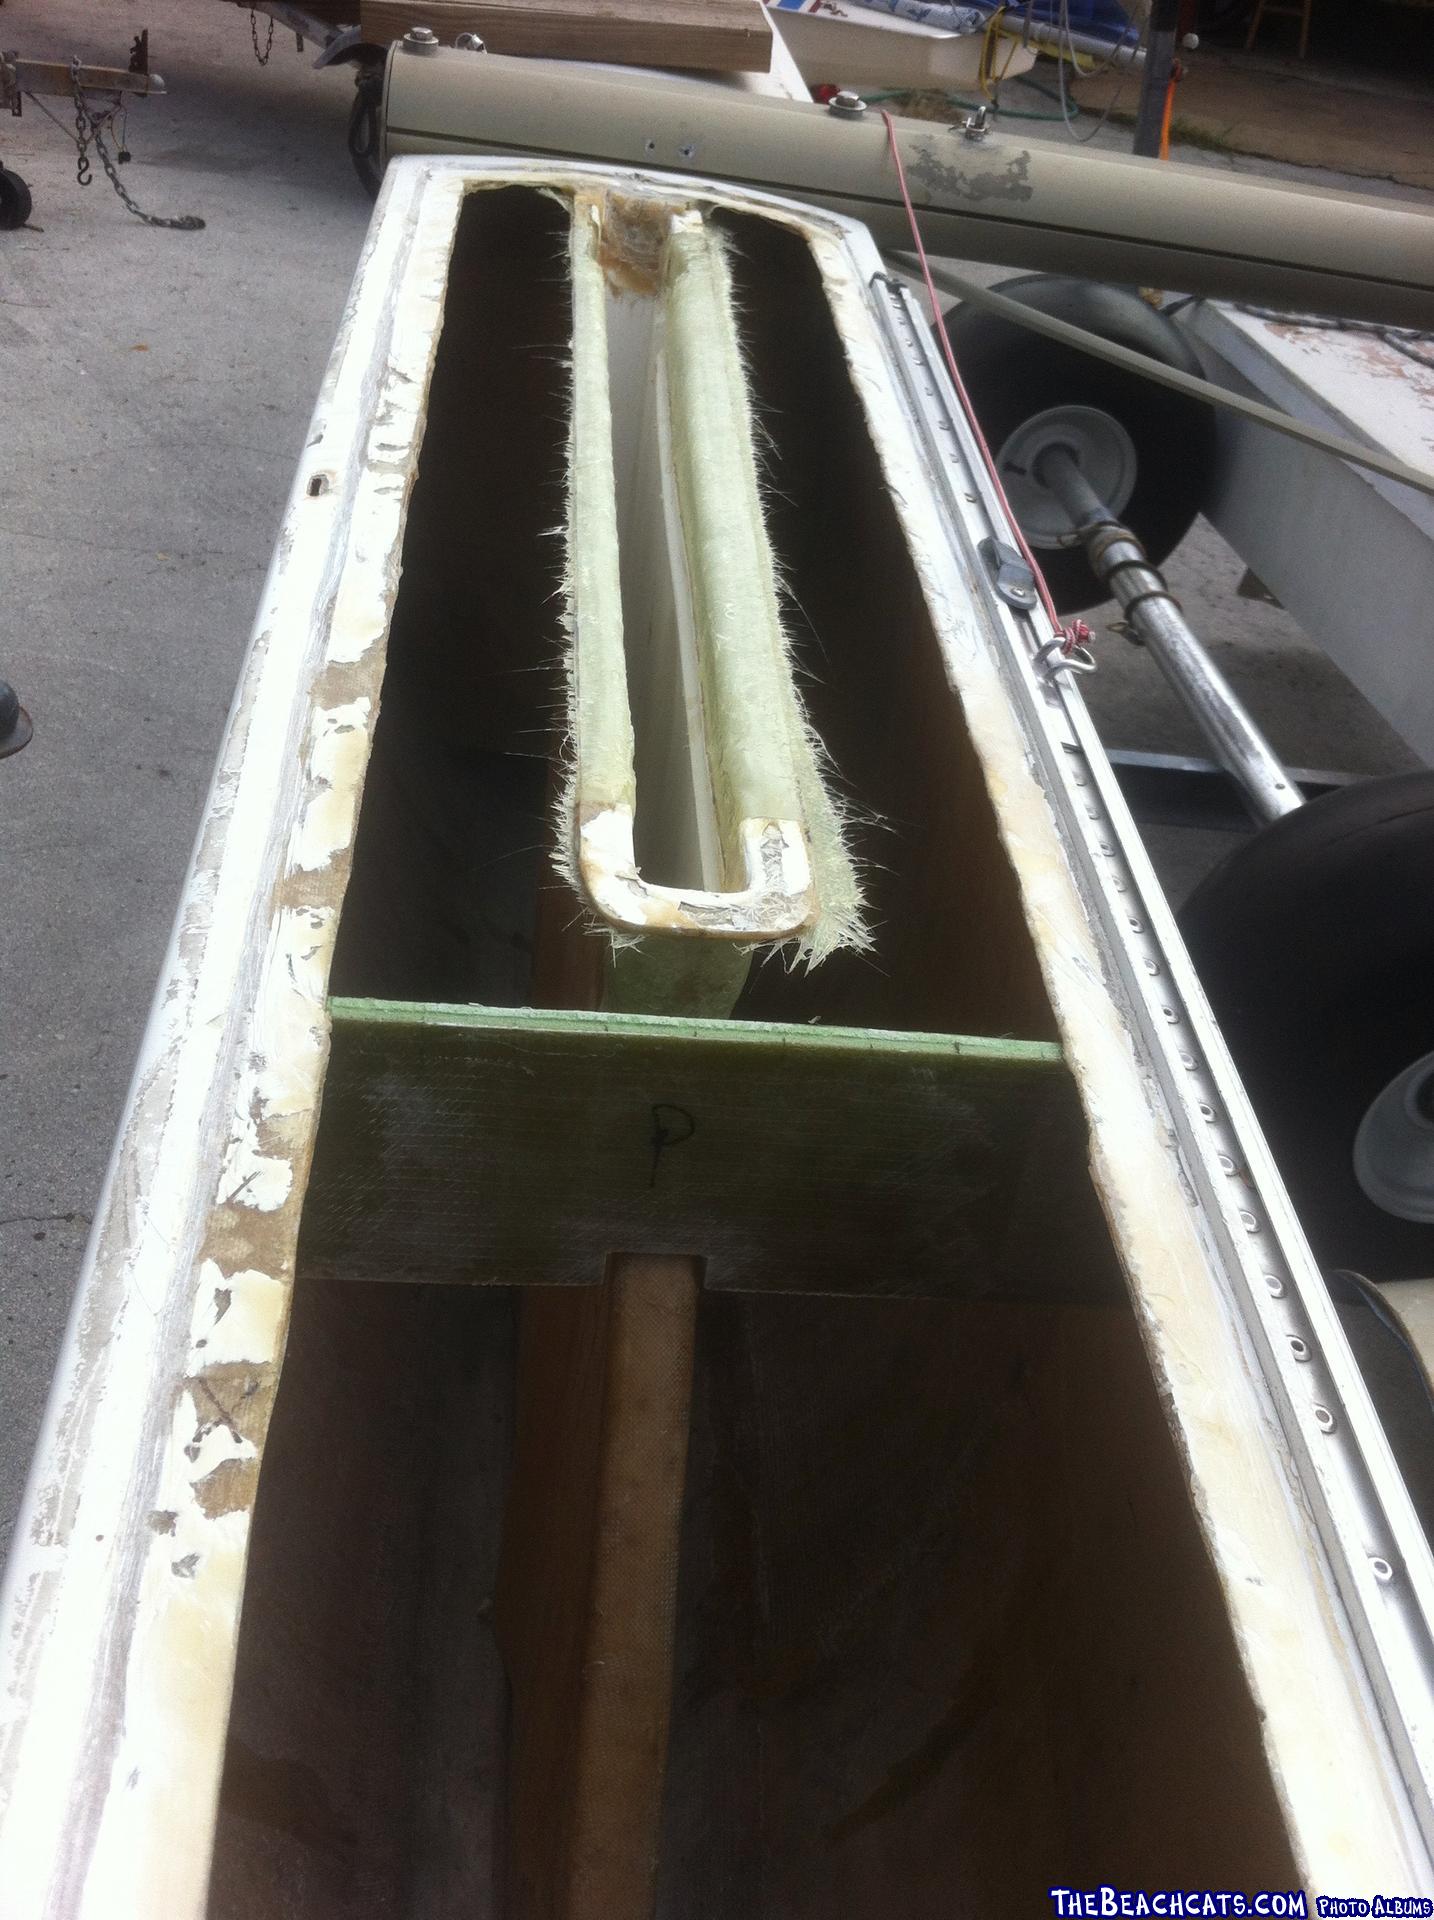
been thinking about this pic
I see an issue - you are missing all your bulkheads
you should see a bulkhead about 2' forward of the deck port and there should be a horizontal one too creating an inclosed box under that deck port. there is another bulkhead missing forward of that too - I can see where it used to be
if you recall i mentioned earlier that it's a known issue for the bulkheads to fail - my 5.5 forward bulkheads were fractured and looked like they were hit by lightning. Lots of flex and torque going on in these hulls
if you get the deck lids off - it's not that hard of a fix assuming time, money and skills are available
You can see the 2 bulkheads in this pic of my 5.5 (note the 5.5 does not come with the horizontal bulkhead)
If I am correct, these are the bulkheads you may need to recreate - this is when i was adding horizontal bulkheads to add extra stiffness to my 5.5 since i was in there replacing bow tangs
Edited by MN3 on Oct 02, 2021 - 10:39 AM.
- Rank: Lubber
- Registered: Jul 14, 2015
- Last visit: Jul 22, 2025
- Posts: 81
I think you might have meant west systems, not west marine. https://www.westsystem.com/instruction-manuals/
--
Dart 20
--
- Rank: Lubber
- Registered: Sep 26, 2021
- Last visit: Jun 08, 2023
- Posts: 70
yup. the bulk head fell down as I was getting the panel off. and the picture was taken just in front of the second one. I bought some fiberglass and resin which I will use to reenforce and attach them.
- Rank: Lubber
- Registered: Sep 26, 2021
- Last visit: Jun 08, 2023
- Posts: 70
So I have gotten the entire deck up EXCEPT right where it connects to the front of the Centerboard well. Looks like the PO put a bunch of glue in beneath where the top panel wraps down into the opening. I can't get a scraper or chisel down there. Any suggestions for getting that up? My first thought was try and use a long bar and come up from the bottom but I haven't tried it yet.
I was talking to someone and they said to just cut the thing with a dremel and repair the fiberglass which seemed extreme but is a better alternative than missing something and having the hull fill with water.
I was talking to someone and they said to just cut the thing with a dremel and repair the fiberglass which seemed extreme but is a better alternative than missing something and having the hull fill with water.

- Rank: Mate
- Registered: Jul 29, 2015
- Last visit: Aug 28, 2025
- Posts: 612
We don't know what kind of adhesive was used, however Marine Debond formula will go through very tough adhesives like 3M-5200 with time. It won't dissolve epoxy or resin bonds. It might be worth spraying it into the adhesive and see if it softens.
--
Tom
NACRA 5.7 (1984 Sail 181)
Pennsylvania
--
--
Tom
NACRA 5.7 (1984 Sail 181)
Pennsylvania
--
- Rank: Lubber
- Registered: Jul 14, 2015
- Last visit: Jul 22, 2025
- Posts: 81
Look closely at mn3's photo of his boat with the deck off. It looks like there's a big wad of resin at the place I think you're talking about. I think you've arrived at the hardest part where you're most likely to break the deck. I like your idea of a long bar (sharpened of course) coming up from the bottom. You have to make your own tools and try to make the cut where the glue meets the inner surface, that's its weakest point. It's easier to reinforce inside the hull than repair the deck.
--
Dart 20
--
--
Dart 20
--
- Rank: Lubber
- Registered: Jul 30, 2015
- Last visit: Oct 14, 2021
- Posts: 2
Your mast bend to totally fixable....I have straightened the mast thru leverage with fixed points and bending slowwwwlyyy...! Then get another small section of mast that fits your profile...cut small section ...then rivet it on top of the bend....it works...
Did this on my 24 ft seawind...after rigger said it was not fixable...!
Did this on my 24 ft seawind...after rigger said it was not fixable...!
- Rank: Lubber
- Registered: Sep 26, 2021
- Last visit: Jun 08, 2023
- Posts: 70
Thanks for all of the input. I'm trying not to get overwhelmed with repairs at the moment but instead do one small project at a time. At the moment, I'm trying to focus on the hulls since those can't be replaced. Where I am currently is:
1) Still struggling to get the starboard top panel off around the centerboard housing.
2) There are several small cracks and hole on the bottom of the hull which was was going to repair with Bondo Fiber on the outside to fill the hole and add a layer of new fiberglass to the bottom to reenforce and ensure a good seal.
3) Refasten the bulkheads which have fallen down.
- Rank: Lubber
- Registered: Sep 26, 2021
- Last visit: Jun 08, 2023
- Posts: 70
SUCCESS!!!! After multiple sessions just trying to get that panel off success is mine! I was able to get it off and inspect the hull. GOOD NEWS! Everything appears to be waterfast. No holes, punctures, or anything that would let water in (that I saw). Some of the bulk heads have to get fixed since they are being help up by a hope and prayer but thats easy enough.
What I'm curious about is some places that seemed "thin". They have no give or flex but the light I shown underneath them was visible (on the bottom of the hull). I was thinking I will put a layer of fiberglass on the inside to add thickness but then sand and use fiberglass filler (Bondo Glass) to smooth out some patchy repairs the original owner did on the outside.
Thoughts on this approach? Or would it be better to let sleeping dogs lie? It is sealed and waterfast to the best of my knowledge
- Rank: Mate
- Registered: Nov 22, 2012
- Last visit: Jan 27, 2025
- Posts: 419
great job. I would be more concerned about areas between the bulkheads/stringers and the hull. Look for any cracking or separating. Remember, the hull without gelcoat is translucent. If the gelcoat has worn off, you will see "daylight" and be perfectly fine. Take a look at the outside and see if there are layers worn down. You can easily add a layer of glass or two if there is a concern. Lay it up, sand, paint/gelocat, and sail. keep it simple.
--
Scott
Prindle Fleet 2
TCDYC
Prindle 18-2 Mod "FrankenKitty"
Tornado Classic "Fast Furniture"
Prindle 19 "Mr. Wiggly"
Nacra 5.8 "De ja vu"
Nacra 5.0
Nacra 5.8
Tornadoes (Reg White)
--
- Rank: Lubber
- Registered: Sep 26, 2021
- Last visit: Jun 08, 2023
- Posts: 70
Nothing like that around the centerboard slot or the bulk heads. The bulkheads are loose so I'm going to resecure those.
There are some deep scratches on the bottom of the hull that I believe can be filled with fiberglass filler and sanded down.
- Rank: Chief
- Registered: Nov 26, 2009
- Last visit: Sep 03, 2025
- Posts: 2532
My H18 shows light through the very bottom, & it has no wear.
If you do decide to add a strip, go to Johnstown Distributers, or any fibreglass supply place & buy a roll of 2” tape.
It has formed edges, so you can lay it down just like masking tape, and not have hairs & uneven edges. It’s really easy to do on the inside, just thinly paint some epoxy along the bottom, (dried & wiped with acetone), then thinly wet out the tape. You can loop it, like drywall tape, put it inside the hull, stretch it out, then “paint” along its length to push it onto the hull & remove any bubbles.
You don’t have to worry about drips & runs, & no sanding or finishing is required.
Edited by Edchris177 on Oct 22, 2021 - 10:01 PM.
--
Hobie 18 Magnum
Dart 15
Mystere 6.0XL Sold Was a handful solo
Nacra 5.7
Nacra 5.0
Bombardier Invitation (Now officially DEAD)
Various other Dock cluttering WaterCrap
--
- Rank: Lubber
- Registered: Sep 26, 2021
- Last visit: Jun 08, 2023
- Posts: 70
So you wouldn't worry about it? Thats good to hear. Is there a way to test waterfastness without putting it in the water? I was going to try that before I put the top panels back on so I can make any internal repairs if needed
- Rank: Mate
- Registered: Jul 29, 2015
- Last visit: Aug 28, 2025
- Posts: 612
You can put water in the hulls to see if it leaks through. Normally we test for water-fastness and leaks by slightly pressurizing the hulls with a few pounds of air pressure, then testing the outside with a soap solution. With the decks off, that won't work. I would recommend using a gel-coat on the bottom that reasonably matches the hull color. Even after sanding and polishing, this will create an opaque coating that will block the light that bothers you, seal any areas that are permeable due to loss of the original gel coat, and add a wear layer. The best thing you can do to maintain that bottom treatment is beach wheels.
--
Tom
NACRA 5.7 (1984 Sail 181)
Pennsylvania
--
--
Tom
NACRA 5.7 (1984 Sail 181)
Pennsylvania
--
- Rank: Chief
- Registered: Nov 26, 2009
- Last visit: Sep 03, 2025
- Posts: 2532
I would not bother with putting water in the hulls. In a liquid, pressure is determined by depth. Putting only an inch or two of water in a hull might not show a leak, especially if the leak is higher up. However, the hull might leak once submerged halfway while sailing.
You definitely do not want to fill the hull, water is heavy, 1 cubic meter = 1 metric ton.
I would run a thin gasket around the lip where your deck fits, (just cut a strip of that thin foam packing material), place deck on top, then secure with bags of sand.
Pressurize the hull slightly with a balloon pump & mop soapy water around the areas you want to test.
https://www.thebeachcats.…ictures?g2_itemId=118697
--
Hobie 18 Magnum
Dart 15
Mystere 6.0XL Sold Was a handful solo
Nacra 5.7
Nacra 5.0
Bombardier Invitation (Now officially DEAD)
Various other Dock cluttering WaterCrap
--
- Rank: Lubber
- Registered: Sep 26, 2021
- Last visit: Jun 08, 2023
- Posts: 70
I was thinking of taking it out and putting the whole thing in the water so I can look down into the hull and see any problem areas. Not filling it with water.
Edited by jgregs on Oct 25, 2021 - 10:37 AM.
- Rank: Master Chief
- Registered: Jun 20, 2006
- Last visit: Dec 04, 2024
- Posts: 7090
no
Edited by MN3 on Oct 25, 2021 - 12:54 PM.
Edited by MN3 on Oct 25, 2021 - 12:54 PM.
- Rank: Chief
- Registered: Nov 26, 2009
- Last visit: Sep 03, 2025
- Posts: 2532
I read your earlier post, saying, “ Is there a way to test waterfastness without putting it in the water?”
The problem with putting open hulls in the water- it’s very difficult to submerge them to only an inch of freeboard. They have a lot of buoyancy, you need smooth water & a way to get them deep & hold them there.
--
Hobie 18 Magnum
Dart 15
Mystere 6.0XL Sold Was a handful solo
Nacra 5.7
Nacra 5.0
Bombardier Invitation (Now officially DEAD)
Various other Dock cluttering WaterCrap
--
- Rank: Master Chief
- Registered: Jun 20, 2006
- Last visit: Dec 04, 2024
- Posts: 7090
i would be concerned about moving and flexing the hulls without the lids -
we know your seam glue has failed in many spots. you risk flexing the boat and creating a new void in your seams that may not be noticeable
we know your seam glue has failed in many spots. you risk flexing the boat and creating a new void in your seams that may not be noticeable

- Rank: Mate
- Registered: Aug 17, 2010
- Last visit: Oct 31, 2021
- Posts: 104
Don’t hesitate to contact Yannick Sansoucy who now runs Mystere, he’s very helpful and most of the parts for your cat are still available from them. He can also give you some info on repairs and/or construction of your hulls (he did for me). For example he once told me the deck lids are originally glued down in a way to make them removeable in case the need for repair arises.
ysansoucy@gmail.com
--
Jason Kasper
2000 Mystère 5.0XL
Lake St Francis (St Lawrence River)
Lancaster, Ontario, Canada
--
ysansoucy@gmail.com
--
Jason Kasper
2000 Mystère 5.0XL
Lake St Francis (St Lawrence River)
Lancaster, Ontario, Canada
--
- Rank: Lubber
- Registered: Sep 26, 2021
- Last visit: Jun 08, 2023
- Posts: 70
I emailed Yannick but haven't heard back yet.
I also found a local rigger who suggested that a mast for a Hurricane 5.9 could be a suitable replacement. It would be much cheaper but I don't know enough to say whether this would work. Any thoughts?
I also found a local rigger who suggested that a mast for a Hurricane 5.9 could be a suitable replacement. It would be much cheaper but I don't know enough to say whether this would work. Any thoughts?
- Rank: Lubber
- Registered: Sep 26, 2021
- Last visit: Jun 08, 2023
- Posts: 70
Update: No progress on straightening the mast yet. I finally found a local rigger who will look at it but since the hulls are dismantled (lids off) I don't feel great about driving it the hour and a half to the nearest rigger.
Once I have the hulls finished then I was going to worry about the mast.
Thanks for all the support on the progress thus far. Hopefully I will have it finished in time to sail this summer *fingers crossed*
Once I have the hulls finished then I was going to worry about the mast.
Thanks for all the support on the progress thus far. Hopefully I will have it finished in time to sail this summer *fingers crossed*

- Rank: Lubber
- Registered: May 06, 2021
- Last visit: Apr 05, 2022
- Posts: 15
Hi jgregs, i own a 98 mystere 5.5 based in Quebec City, keep up the work, mysteres are solid and resilient, MN3 gave you solid structural advice with pictures, like he said make sure all bulkhead are present. While the lids are opened, add some epoxy around the base of the centerboards well, this is where most of the water ingress happens, i sealed them from outside by filling the void, 2 layers of resin and gelcoat around the inside of the base. Making it a smooth one piece well. Result, bone dry hulls. I changed my full rigging last year, i would go for it as well, tiny cracks are probably there already after 20+ years. You dont want cable break after doing all this.
FYI, Yannik has most parts and can make you cables (he did mine), i drop by the factory from time to time for parts and advice (had a spreader screw machined in the fall, the old had a bent arm). He may as well have decommissioned boat mast available as he slowly retires the school mystere fleet. Although no longer made, there is a lot of mystere "material" there. Be patient with mail replies though
For the mast bend, if your are not planning to power sail it, i support that correct rigging tension will more than cover for the integrity. If the curve is spreaded mostly equally across the spreaders, rigging tension will correct it, if only above or below, the diamond wire tension will exacerbate the curve.
I can tell you that a mystere will give you tremendous sailing pleasure once properly rigged. You will acquire confidence in it, go step by step. Always treated like an old "V8" big car in multi type regatta, believe me, the "heavy underdog" is giving some serious heat to the Tigers, Vipers, Nacra and such, scoring midpack of better and not very far from pole position. (Its not just the boat, skipper counts!)
Bonus, i can sail 4 adults for a sunday ride without wetting anybody and still have plenty of buoyancy reserve. (that will please your wife and friends if they are not into racing!) The boat is very safe, we had an unexpected squall last summer with 30+ knots wild gusts, i was alone and managed through it, but the more agressive boats capsized being unable to depower in time.
Lots of very knowlegable and experienced sailors/cat maintainers in these thread, listen to what they say like i did in the past, you will make it to the water.
Hope that it will fuel your motivation throughout the project. When you are going to be at rigging time, you can PM me, i'll share my mystere journey for tuning.
Cheers
Norm
Edited by normmyst55 on Apr 04, 2022 - 09:03 PM.
--
Norm F.
1998 Mystere 5.5 Spi "Berkana"
Quebec, Canada
--
- Rank: Lubber
- Registered: Sep 26, 2021
- Last visit: Jun 08, 2023
- Posts: 70
I was able to get the mast straightened with some help from my brother and father.
Now I'm working on finishing the hulls and getting the waterproof. Once thats done its sailing time!
Now I'm working on finishing the hulls and getting the waterproof. Once thats done its sailing time!