| Vol 1 - Issue 6 | February 1997 |


|
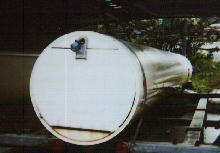
PVC Sailbox A Home-Built Solution for Storing All Your Gear By Bill Mattson For transporting and rigging your boat, a good sailbox can make life easier. You can get by without one, but unless you want to leave your boom and sails strapped to the boat, you’ll need a pickup truck or very roomy car. |
|
A sailbox keeps everything protected, locked, and “together”. Here in California, it is not uncommon to go an entire season without rain. Thus, I am able to keep all my sails and gear in the sailbox at all times. When the mood hits, I hitch the trailer and know I have everything I need. My sailbox was originally built by Frank Pineau, and was included with a Hobie 14 I bought from him about 5 years ago. Later I bought a Hobie 16 which included a “coffin” type box. I found this box to be a hassle compared to Frank’s design, and ended up switching the boxes prior to selling the 14. Some of the major differences: |
|
| Ease of use: | The coffin type box needed 2 people to open it, unless I wanted to climb under the boat to get a good grip on the cover. The PVC box has openings at each end. |
| Ease of access: | The coffin type box required me to climb under the boat to lift out the sails and boom. Trying to slide the sails out from the front or rear carried the risk of tearing the sails on the lip of the box or the rudders/hiking stick. Sails can be easily slid out from the rear of the PVC box with no risk of damage. |
| Segregation: | The coffin type box had everything piled together, including the sails and items that could tear them. The PVC box offers separate compartments for the sails. |
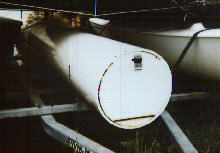
| Security: | While the access areas are not bullet proof, the PVC box offers a substantial degree of security, which could probably be enhanced somewhat over the design we offer here. While the coffin type box was locked at both ends, one could pull the middle of the lid up and in half with a good pair of work gloves. |
| Weight: | Unfortunately, the PVC box is substantially heavier than the coffin style box. I estimate the weight of our box to be over 200 lbs! |
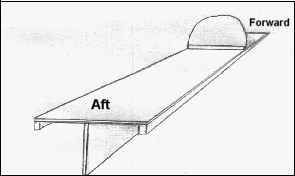
| The weight of the box is due to the 5/16 inch wall of the pipe. When Frank purchased the pipe, he noted a 1/4 inch wall on side he was examining. Unfortunately, this side of the pipe was “beveled” to allow it to be fitted to another pipe, and was thinner. Once the beveled end was trimmed, the entire pipe had a 5/16 inch wall. Very solid, but very heavy. One advantage of the thickness is that the box is strong enough to be stepped on when attaching the forestay during rigging. The box contains 4 specific areas of storage. Two long sections on the bottom of the box are used for the sails. (Note that for my Hobie 14, one side was used for the main, and the other for a spare sail. For the 16, one side is used for the main, and the other for the jib. If you would like to keep the sails together in one bag, it is suggested that the center bulkhead be removed.). The top/aft section is carpeted, and used for the rudder assembly, hiking stick, and paddle. Trapeze seats, gloves, and other small “soft” items are kept here as well. The forward compartment contains a shelf for lifejackets. A toolbox is kept in the lower section. |
Aft Compartment (Note carpeted shelf) 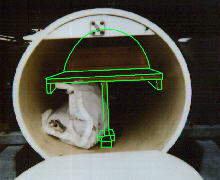
|
|
To some extent, this was a “design as you go” project. This article is a result of reverse engineering the box, which is why step-by-step photos are not included. Use this article as a base for your project.
Frank purchased his pipe from a PVC supplier for about $200.00. This does not suggest that making this box was much of a bargain, although it is much stronger than anything you would find on the market. Deals can be made on PVC, especially broken pipes in which you can cut off the broken area and still have enough material for your box. |
|
Be advised that all plans here assume a PVC pipe with an inside diameter of approximately
17 1/2”. Obviously, some of your measurements will vary with a different sized pipe. The size of
the shelf supports and bulkhead anchors specified here are suggested dimensions. Use whatever size
is easily available and provides sufficient structural support. Note that PVC endcaps were first considered as material to use as doors. Unfortunately, they cost approximately $50 each. The plastic cutting boards were a far cheaper alternative. |
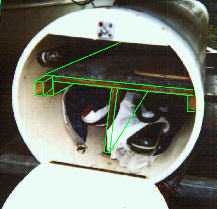
 Interior structure (Isometric View)
|
|
|
 Figure 1. Interior parts (Side and forward exploded views) Not to Scale Assembly (All attachments are with drywall screws unless otherwise noted) |
| 1. | Trim the PVC pipe to 9’ 9” long, removing any bevel. (Retain the scrap piece for later use). | ||||||||||||||||||||||||||||||||||||||||||||||
| 2. | Attach the shelf to the starboard/port bulkhead.
| ||||||||||||||||||||||||||||||||||||||||||||||
| 3. | Attach the carpeting to the shelf (glue/staples?)
| ||||||||||||||||||||||||||||||||||||||||||||||
| 4. | Attach the bulkhead support to the top of the shelf.
| ||||||||||||||||||||||||||||||||||||||||||||||
| 5. | Attach the bulkhead anchors on the bottom of the box, building a "slot" for the
bulkhead to slid into. The bulkhead will need to be 15" from the forward end of the PVC pipe.
(See figure 2.)
| ||||||||||||||||||||||||||||||||||||||||||||||
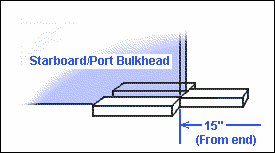 Fig 2. Bulkhead anchor 6. | Slide shelf/bulkhead assembly into the pipe, fitting the bulkhead into the anchors.
| 7. | Position the shelf supports into the pipe in a manner which will hold the shelf in the proper position. (Temporarily support with clamps.)
| 8. | Use a chalkline (or other creative method) to mark the shelf support location onto the outside of the pipe.
| 9. | Drill holes from outside of pipe into shelf support, and install dry wall screws.
| 10. | Secure shelf assembly by either screwing aft portion into the supports, or installing a block on the inner wall of the pipe, just aft of the shelf.
| 11. | Using the scrap PVC piece (from step 1), trace a line on the plywood for the forward/aft bulkhead.
| 12. | Cut the radius on the bulkhead.
| 13. | Install the forward/aft bulkhead onto the bulkhead support.
| 14. | Drill holes from the outside of the pipe into the forward/aft bulkhead and secure with screws.
|
| 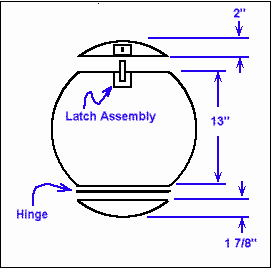 Fig 3. Door Assembly (Exploded) (Perform the following steps for each door, referring to figure 3 above) 15. | Using the scrap PVC piece (from step 1), trace a circle onto the cutting board.
| 16. | Cut a 2 inch section from one side of the cutting board.
| 17. | Cut a 2 inch section from the opposing side of the cutting board.
| 18. | Trim an additional 1/8” from one of the small pieces of the cutting board (this will be the bottom).
| 19. | Install the hinge on the bottom section of the cutting board.
| 20. | Install the hinge on the large section of the cutting board.
| 21. | Install the bottom section to the inside wall of the pipe with drywall screws, mounting it flush with the edge of the pipe.
| 22. | Close the door, and install the top portion in the same manner as the bottom.
| 23. | Mount the latch assembly.
| 24. | With the help of an assistant, (or 2 or 3 or 4 depending upon the wall thickness of your pipe), position the sailbox on the trailer.
|
| 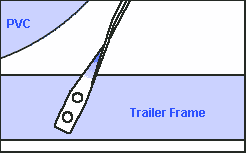 Fig 4. Strap Attachment 25. | Attach the pipe using the straps in whatever manner best works for your trailer.
We ran the straps around the entire pipe (front and rear), twisted the strap ends 90 degrees, then bolted them to the trailer crossbars. The straps were
then bolted at 4 or 5 locations onto the pipe. Use only stainless hardware for this. Don’t skimp here. You don’t want to lose the box and end up on the evening news.
|
| | ||||
|
Note that there are many configurations for sailboxes, both homebuilt and store bought. You may want to
research which box is best for you. If you have a cheap source of large PVC pipe, however, our plan
can provide inexpensive, convenient, and very strong storage. Properly built, this sailbox should
provide many years of service. Should you have any further questions regarding the plans shown here, feel free to email me, or Frank, the original designer and builder. Bill Mattson mattson@earthlink.net Back to Features |