| Vol 3 - Issue 1 | October 1998 |


|
Installing Deck Ports An Alternative to Using Silcone By by William Wallick This is an alternative to using silicone to seal your deck ports. Although silicone is a great sealer and a good adhesive it does have it’s drawbacks. It generally looks messy where it surrounds the flange. It also discolors in a very short time. And the UV breaks the silicone down way too fast for my liking, not to mention it is a pain in the a#! to scrape all the old stuff off when the time comes to repair or replace it. This article came about as a result of my first port installation on a Hobie 16. Wanting to do a first class, super watertight seal, I loaded the flange up with silicone. Swapped out the wimpy looking plastic nuts and bolts for stainless steel ones. Then I torqued them all down nice and tight so it wouldn’t leak. When I tried to screw in the lids the next day I was surprised to find that they wouldn’t thread in because I had slightly deformed the flange with my over- torquing. That was a bummer, but an even bigger bummer awaited me when I tried to remove the well siliconed flange from the hull. I cracked one flange and then managed to get the other one out intact after a long and careful extraction process. After that I did a few more port installations and got more conservative with the silicone and remembered not to over tighten the flange bolts because the flange contour does not exactly match the hull curvature (H-16). Even so, the silicone does not look so good, the UV eats it up too fast, and the removal is always a pain. So on my most recent installation (on a Hobie 18) I gave up on silicone and tried using closed cell foam as a simple gasket between the flange and hull. It proved workable, and now the ports are going into their second season with no leakage whatsoever. If I need to replace it - it comes right off. If I need to remove the flange for more access to work inside the hull - it comes right off. If I accidentally over tighten the bolts now, I can just loosen them and the foam re-conforms to the hull contour. So when we did Chad’s boat, a Hobie 16, I photographed the procedure for this article. Here are the steps we followed. I used closed cell foam that is 3/8” thick for the port flanges (it comes in 54 inch wide rolls). If you buy a half foot you can make ten port gaskets for about $1.50. 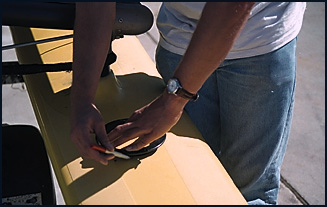
1. Using the flange as your template, draw a circle on the top of your hull where you want to install the port. 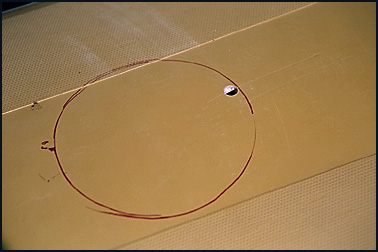
2. YOU ARE ABOUT TO DRILL INTO, AND SAW A BIG HOLE IN YOUR HULL. Make sure you drew correctly and the placement is where you want it. There is a saying in carpentry, “Measure twice, saw once.” When it comes to putting a hole in your hull I would say measure twice, think it over, re-measure, think it over again, measure again, …well you get the idea. This photo shows the marked off area and a pilot hole already drilled (INSIDE the circle). I know you knew that already. 
3. Using a jig saw, Chad very carefully cuts along the dotted line. Power tools go through fiberglass like a hot knife through butter. Work slowly. Charge by the hour. 
4. Using the flange as a template (as in step #1) draw another circle on the foam. This will be the identical size circle you drew in step #1. Using scissors cut out the circle you just drew. 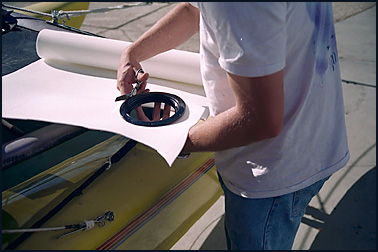
5. Set the flange in the hole in the foam that you have just cut out. With your scissors, cut the foam along the outer rim of the flange. Doing it this way instead of tracing the second circle (and then cutting both of them) will avoid the two circles being off center. 
6. Trusty assistant holding two custom foam doughnut gaskets ready for installation. 7. Set the flange in the hole in your hull. If it drops through re-read step #2. Just kidding. Don’t use the foam gaskets yet. We are only going to mark the holes for the bolts. Align the flange so the contour best matches the hulls contour. When placement is correct mark the bolt holes with a Sharpie pen or suitable whatever. Drill the appropriate size holes for your bolts. We are not drilling through the foam gasket because we do not want that large of a hole in the foam. It could contribute to leakage around the bolt. 
8. Slip the foam gasket over the flange. Using a small pointy thing (I used a 12 volt continuity tool, but a small finishing nail or similar weapon will work just as well) poke through the foam where the bolts will pass through. This will allow the bolts to go through without ripping or tearing their way through the foam, but it will be a very snug, watertight fit around the bolt. If you can see through the hole you just made it is too big! 9. Assemble all the pieces and tighten appropriately. (Note: if you pierce the foam with everything in place you will not have to align flange holes, hull holes and foam punctures.) 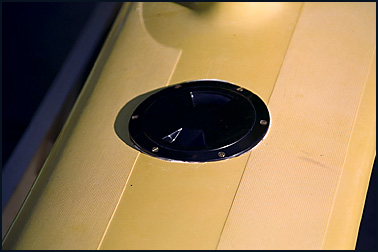
10. The finished port with no messy silicone oozing out the sides. Chad’s is now the second boat I have done using foam gaskets and his doesn’t leak either. If you don’t like the installation, for whatever reason, it is easily removable and you can silicone the port in place if you prefer that type of installation. ANOTHER TIP: The port lids do not float (Hello: who makes these things anyway! These are used on boats, ya know. And, to top that off, they won’t sell you just the lids - you have to buy the whole kit). Again using your closed cell foam, cut a piece to match the unusual contour on the inside of the lid and glue it into place. Try it in your sink to check flotation. I use one layer of the 3/8” foam and they float high in the water. Now if you lose the port lid overboard you will be able to retrieve it ala man overboard. 
I have included full size lid templates for the Viking 5-inch and 6-inch port lids. This will ensure that they do not sink should you happen to lose one overboard. Simply use your right mouse button on either photo below to download the full size image. |
 Viking 5"
|
|
|
UPDATE: On the early installations I used 1/8” closed cell foam on the deck port gasket. Almost immediately after finishing this article my ports started taking in a small amount of water. I replaced the foam gaskets (I did both ports in about 11 minutes, working slow, talking with firends) with 3/8” foam this time because the 1/8” was completely compressed in some spots. Although the flanges are now a little higher above the deck on my H-18 (probably even more beneficial for matching the contour on the H-16) you can see from the accompanying photo that it is not objectionably high. 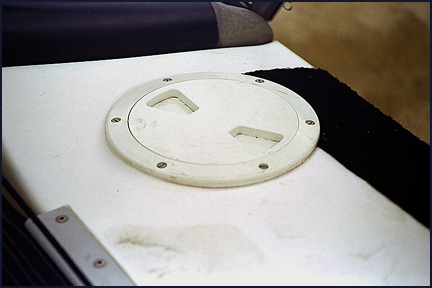
|
All text and photos © William Wallick, 1998. wallick@concentric.net Back to Features |