

|
Installing Hobie 20 Style Tiller Connectors An Illustrated Guide By Gary Willcox All Hobies, except the 20 Miracle, have a rather crude tiller connector mechanism. By tiller connector, we are referring to the point between the rudder arm and the rudder crossbar. The purpose of this article is to show the steps to retrofit other Hobie catamaran models with the advanced H20 style tiller connection. The H20 sports an advanced tiller connection with features of easy disassembly, accurate turning, no binding, and reduced or eliminated slop. All other models, however, have a bolt with spacers, a spring, and a nylon lock nut. The same kit (part number 1953) from Hobie will add these features to the 14, 16, 17, 18, and 21 cruiser. There has been another alternative to the H20 style connector. Even before the H20 was born, Kisme Corporation out of Texas, designed, manufactured, and sold a device called the Kisme TLC. This design was a ball and socket single piece design claiming true 3 dimensional movement between the rudder arm and crossbar. In the last year, Kisme has stopped operation and sold its inventory to Murrays Marine (http://www.murrays.com). Having used all three style connectors, I have to choose the H20 as the best. The stock system is barely adequate and doesn't allow easy removal of the rudders or crossbar. The Kisme TLC, while was great for its time, also forced you to trailer with your rudders on. One major drawback is that it could break. And break it did, at least for me. The first weekend in May, I was at a Hobie Division 10 regatta (http://www.coyote.accessnv.com/sdouglas/division.html). The wind was blowing hard (later I heard 35+ mph). I had purposely left out my lower rudder pin cotter pins (too much trouble I thought). During the first leg of the first race my wife and I capsized hard and fast. We quickly went turtle. The boat, being a 1990 H16, had somewhat worn rudder castings (the sleeves holding the pins). Out slid one of the rudder pins. I now had a turtled boat, one rudder on, one off. The wind was blowing so hard that I was able to power right (using the wind to right the boat) on my own at 180 lbs. Upon dragging the loose rudder up on the tramp, the forces placed upon the Kisme TLC were too great as it was twisted and manipulated in ways it wasn't designed to handle. It snapped just as I got it aboard the tramp. I was grateful I didn't loose one of my Hobie EPO rudders. I sailed back to the beach with one rudder. The tack back to the beach was such that my one operating rudder was the windward rudder. As I got to within 100 feet of shore a gust hit and I was flying a hull with my only rudder out of the water! To give the TLC's some credit. They were at least five years old, possibly seven. They were hard and brittle after years of being subject to sun and weather. I had three choices for tiller connections at this point: retrofit back to the stock system (an estimated $25); purchase parts for the TLC from Murrays provided they still had them (an estimated $30-$60); or go for the H20 system ($70). Needless-to-say, I went for the H20 system. I rationalized that it would give me great rudder feel, allow quick removal, and provide a system with good longevity and parts availability (Hobie lists all of the individual parts to the H20 style connector kit in their 1997 catalog). This install will require about 1 to 1.5 hours to complete. You will need the following tools/supplies: a drill; assorted bits; screwdriver; rivet puller; hammer; a medium sized nail; sockets or wrenches; a clamping device; a tap handle with #10-24 tap; a measuring device; a marking device; a file; and optionally some 3/16" shock cord. |
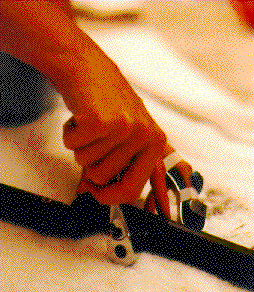
| We'll start by removing the existing rudder connectors. Both the TLC's and stock systems will have a bolt attaching the adjuster kit to the tiller crossbar. Remove the bolt and slide the kit out of the crossbar. |
 |
|
Now, remove the rudder arm end cap from the rudder arms. Drill out the two rivets on
each side of the rudder arm using about a 5/16" drill bit. Just knock off the rivet head
and stop. Then place the nail in the rivet hole and give a sharp blow with the hammer. This will force the rivet body into the rudder arm. Remove the end cap. Repeat for the other rudder arm. Next, we'll install the threaded delrin end cap of the H20 kit on the rudder crossbar. This piece is attached with two screws since rivets would get in the way of the adjustment arm that will screw into it. |
 |
| Insert the end cap into the PORT side of the rudder crossbar, hold it in place with a clamp, and drill two #25 holes 180 degrees apart 7/16" from the edge of the rudder arm. |
 |
|
Make sure that the threaded end cap is clamped tightly against the end of the crossbar
while drilling. This will help this relatively short piece not to wobble once the screws are
in place.
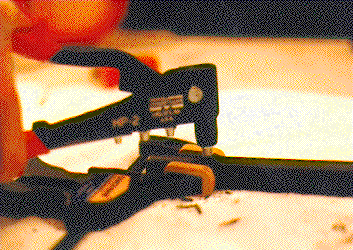
While still clamped, tap the two holes just drilled using a #10-24 tap: |
 |
| Now, insert two of the supplied #10-24x1/4" phillips pan head screws into the just tapped holes: |

|
| Insert the provided screw adjustment arm into the threaded end cap just installed: |

|
| Next, we'll install the solid end cap in the starboard side of the rudder crossbar. Attach it with a clamp and line up the hole in the H20 solid end cap with the existing hole in the crossbar. Lining up these two holes will ensure that the tiller yoke assembly (the Y piece that holds the hotstick) will be in the proper place. |

|
| Drill two #11 (3/16") holes 180 degrees apart 1/2" from the crossbar end. Fasten the solid end cap with two provided rivets. |
|
| Move on to the rudder arms. Insert the provided H20 post assembly in the rudder arms and hold with a clamp. Drill two #11 (3/16") holes 180 degrees apart 1 and a 1/4" from the end of the rudder arm. I placed mine so that they would end up on the rudder arm sides. Insert and pull provided rivets in new holes. CAUTION: don't be tempted to use the existing rudder arm end cap holes! The swivel mechanism within the post assembly extend deep into its sleeve. |

|
Repeat the swivel assembly installation for the other rudder arm. It wasn't until
installing and working with the H20 tiller connector kit did I realize that this post on the
rudder arm actually rotated. It appears from casually inspecting a H20 that the posts
are fixed in a vertical position. Once the post assembly riveted in place you can swivel
the posts as illustrated below:  
This gives the H20 tiller assembly a "two and a half" dimensional functionality. As the rudders are pushed hard to the side, it allows for the post not to bind with the crossbar as in the stock tiller connector system. It also keeps the rudders in alignment more than a 2D bolt would. |
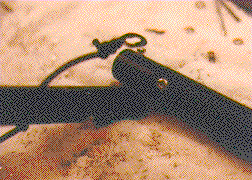
| The last step is to attach the provided retainer clips. This will not only keep you from losing them (don't, because they are over $7 each to replace), but it holds them in a locked position. The instructions that came with the H20 kit called for a 5/16" hole in the rudder arm. The kit also comes with 1/4" shock cord. This seemed like overkill to me. I also did not like the idea of drilling this huge 5/16" hole in the rudder arm. I felt I could get adequate tension with 3/16" shock cord. It would also be easier to tie on the retainer clip and remain fastened. |
| So, drill a 1/4" hole 3 1/4" from the end of the rudder arm. Position the hole such that it will be vertical when the rudder is on the boat. |
 |
| File the hole edges just drilled so that the inserted shock cord does not get cut. Insert the shock cord through the hold and tie off the bottom. Attach the retainer clip with a couple of knots. Repeat for the other rudder arm. |
 |
| Mount the rudders on the boat. Place the provided nylon spacer washer on each post and attach the crossbar with the PORT marking on the port side. Attach the retainer clips. |

|
|
Align the rudders by placing the boat on a trailer, rudders down, and measure the
forward edge distance compared to the trailing edge distance. Adjust the rudder
alignment by removing the port retainer clip and adjusting the screw adjustment arm on
the port side of the connector arm. If you trailer with your rudders off, you may want to
mark your parallel position on the threads (or count the threads) in case the screw
adjuster is turned accidentally off the boat.
For the H16, the measured rudder edge distance should be 1/8" to 1/4" less on the forward edge than the trailing edge. For other symmetrical hulled boats the rudders should be parallel. For parallel rudder boats you can get a more accurate alignment by having the rudders in the up position. This will give more length for the parallel measurement. Congratulations! You are now ready to go for a test sail. I have sailed a couple of times since installing this kit. The feel and reduced slop is excellent. Definitely well worth the cost and trouble to install. As mentioned earlier, my rudder casting rudder pin holes are worn. In a future article, we'll address installing the Hobie nylon inserts in the rudder castings. This will give even better rudder feel by eliminating slop. Gary Willcox Hobie 16 #911 Cincinnati, OH memphis@one.net Thanks to my wife, Mary, for the hand modeling in the photos. Also, her patience to endure projects like this in our apartment living room. Yes, that is a splint on Mary's finger. Yes, it was broken. Yes, it was broken in the violent capsize described in this article. I'm grateful that she is a sailing enthusiast and we can enjoy the sport together. Thanks to Matt Miller of Hobie Cat for providing me specifications on rudder alignment. Also, thanks to Bill Mattson and Frank Pineau for putting together and keeping up this ezine. Back to Features |