

|
Repairing Hull Bottoms How to Make Them New Again By Patti Lanphear This past spring, I redid the hulls on my Hobie 16. This was my first attempt at this type of a project, so I'm going to share what I remember of what worked, what didn't, and the method to my madness (where known). I only started with my experiences of watching/helping my brothers repair cars long ago, and my experiences of working on miniatures (No, we don't call them doll houses, we call them miniatures!!). The other sailors where I keep my boat didn't know much or were reluctant to share much (for fear of having to help me, probably) about what to do. So, I started by ordering the repair kit from the Murray's catalog. Overall, I think the kit was a good start. The kit contained some specifications on hull depth measurements. I don't know whose Hobie 16 they measured, but according to their measurements, my hulls added depth in some areas and lost a couple of inches in others! So, I disregarded their measurements. I did, however, measure my hulls at the points they specified (at the front and rear crossbars and half way in-between) and kept checking these points as I went along. I also discovered that one hull is about half an inch deeper than the other. I don't believe the difference in hull depth was caused by uneven wear since the hull showing the most wear is the larger hull. And, even with the wear, the larger hull is still a bit larger. So, I just treated each hull separated and guess-timated what measurement to use. I don't know if the difference in hull depth is normal, but it will definitely be something I check on a new boat. And, at this point in my sailing, the hull depth difference doesn't matter to me (if it makes a difference at all). |
|
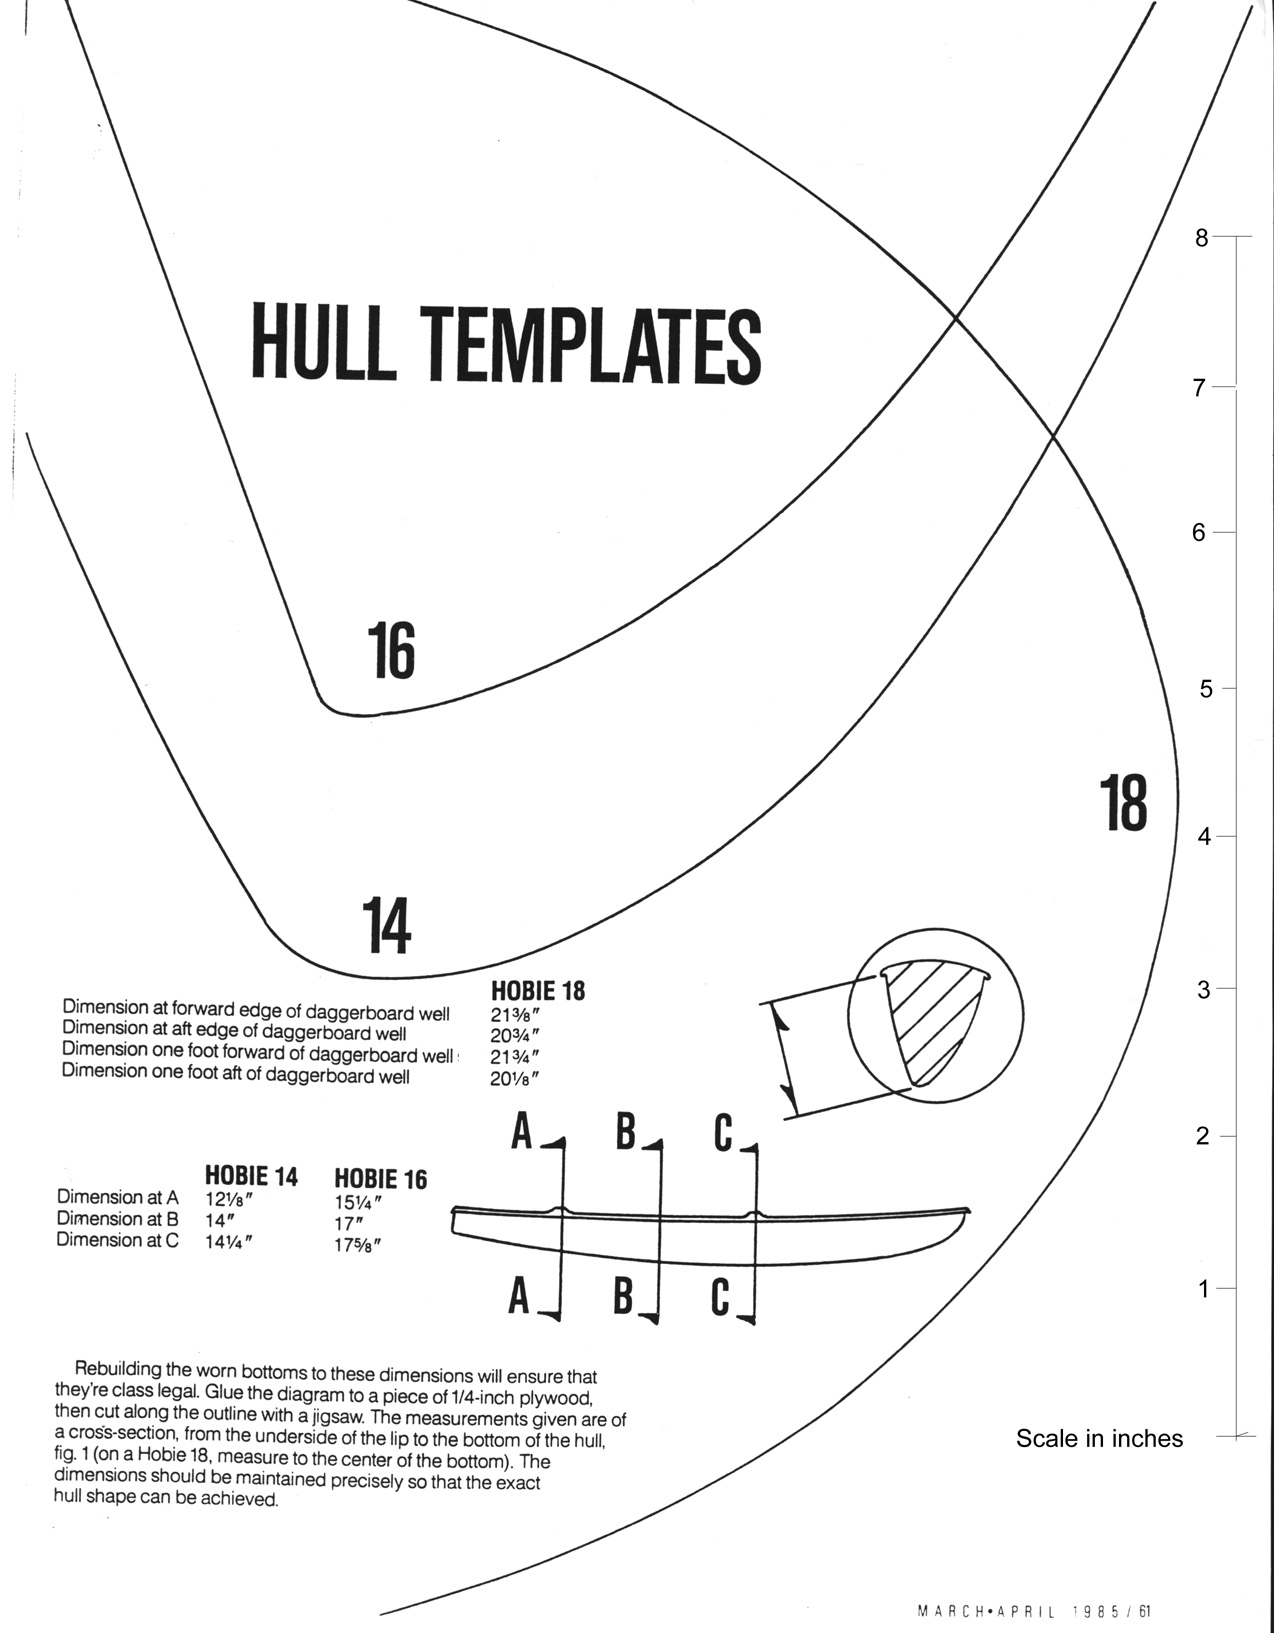
The kit also contains a hull template which I found useful. I copied the template
onto a piece of foam-core board and cut the inside out. I should mention that the
template only exactly matches a small percentage of the hull. Because of the design
of the hull, the surface flattens and curves to gently compensate for going from a
"pointy" bow to a wider stern. So, you'd end up with a set of templates, one for
each inch of the hull length! But, one template is plenty, even for a perfectionist
like me.
Periodically, I would use the template to check the areas where it matched exactly. In some of the other areas, I would use the bottom section of the template (where the straight outer wall meets the curved inner wall) to make sure I was maintaining the proper shape. But, after a while, you become ONE with your boat and you find yourself sensing the shape which leaves the template less and less useful ("Feel the force, Luke"). (-: |
 |
|
The kit also contains West System epoxy products and a technical manual. I followed
the technical manual to the letter (i.e., mixing ratios, preparation directions, etc.).
When I needed more products, I visited my local Boat U.S. which carries ALL the West
System line.
I layered my applications of epoxy. My first layer of epoxy was a straight mix (i.e., no white pigment or filler) and a single layer of polyester tape. I figured that this would be tougher and the pigment-less layer would be a warning that the wear was at a critical stage. The next layers were with pigment and filler. I probably could have had less layers of pigment and filler than I did, but being new at this, I was cautious. And, the last layer was with pigment, but no filler and a single layer of the polyester tape. I added additional layers of epoxy with pigment until I could no longer see the texture of the tape. I sanded and shaped between each layer. I was going to hand-sand, but I quickly abandon that idea and purchased a 5-inch orbital sander. I wished I would have used Saran wrap to reduce the amount of sanding and shaping I had to do, but I picked up on that trick after I got done. I protected the epoxy with a couple coats of polyurethane boat paint. Since my hulls are white, I used a white paint which matched really well where I feathered it into the old surface. I rushed through this step and didn't take care to cover ALL of the epoxy. So, I have some brown blotches to fix where the epoxy was exposed to the UV rays. Since the boat was upside down, I took the opportunity to remove the caulk from the hull lip (where the top deck meets the bottom). I recaulked with a good marine silicone. This was a good side job to do while waiting for the epoxy to harden. I also removed the caulk and recaulked the pylons once the boat was upright again. I would have remove the gungeons and recaulked them also, but decided that could wait. Even though the sander had a filter, I used a mask, and goggles. I also used "rubber" gloves when I applied the epoxy and when I wiped the hulls with acetone after sanding/before applying the epoxy. I got the gloves at the hardware store, and they were like heavier, transparent, green, surgical gloves. I had some other gloves I got from the hardware store that were more like surgical gloves, but the acetone ate them up. I would recommend all these precautions not only for easy clean-up, but for your short-/long-term health. Besides, if you loss your health, what's the purpose of redoing the hulls anyway. (-: I really didn't see any difference in the boat once I got it on the water. It didn't seem to be heavier to move around on the beach. I showed improvement in racing, which doesn't necessarily mean the boat is faster now, it just means that my learning curve was not affected. And, in one race, I finished third out of seven boats in light winds. I looked at the hulls as I was packing the boat away for the season. Except for the usual scratches, everything looks pretty good. On the larger hull, I can see the last layer of tape that I put on. In the spring, I plan to add more epoxy over the larger hull to cover the tape. On the other hull, I plan to just cover the scratches. Then, I'll repaint with the polyurethane (and do a better job of covering ALL the exposed epoxy this time). Be sure to leave yourself enough time to let the layers cure properly between applications. Because I started cutting into my sailing season, I wasn't as careful on the polyurethane step as I should have been. Thus, I have brown blotches to fix where the UV rays discolored the epoxy. Good luck. Patti Lanphear planphear@lucent.com Hull templates courtesy of Hobie Cat Corporation Back to Features |