

|
Towards the "No Slop" Rudder Rudder tuning tips by David Hall It's sad but there are many Hobie sailors who don't even know they're having problems with their rudder and tillers. They think the way their boat came from the factory must be optimum. Picture a situation where you're leaving the beach. Your rudders are, of course, up. As the wind pulls you away from the shore, you can see the water deepening. With the rudders up you have to steer as best you can with the sails. Looking ahead, you lift your tiller arms one at a time knowing that they will drop to the 45 degrees down position and not fall down to dig into the shallow bottom. Now you have more ability to steer, although still not very well, but you know you can get out into the deeper water with no trouble. Once there, and still looking forward, you lift your leeward tiller and push it back to push the rudder down. When you feel it plant itself into its home in the rudder casting, you drop the tiller arm and listen to the rudder cam "click" into the locked down position. Then you do the same to the windward tiller arm listening for the click. You are now sailing! What? That's not the way you do it? You mean once you release your rudders they fall all the way down with a hard "clunk" and drag your rudder tips through the rocks and sand. And you have to turn around and fiddle with both tiller arms, because they want to flop around and not seat themselves into position. And after pounding on your tiller arms, you're lucky to get your rudder cams to lock into place? Well, how much fun is that? |
| Properly set up, there should not be any slop in your tiller or rudder system. If you set up your steering system correctly, your rudders cams will work perfectly every time and not break once or twice a season. You boat will go where you think it's going. You won't have to wiggle your tiller to steer. And you'll eliminate the chore of replacing broken rudder cams. In fact the only maintenance you'll need to do to your steering system is periodically renewing the lubricant on your rudder cam locks. |
"...Good reliable steering was the magic formula that finally made sailing fun for me..." |
Good reliable steering was the magic formula that finally made sailing fun for me. Before I set up my rudders and tillers I would carry special tools and ropes so I could flip my rudder cams when I raised my rudders. (The tool I liked best was large channel locks, but they chewed up the rudder cam.) And what a pain to stop sailing to go into irons and hope I didn't flip the boat backwards while I was working back there. If you're in this category, you need to read this article. The purpose of this article is to show you how to take the slop out of your tiller and rudder system very inexpensively. When I say no slop, I mean you should not be able to grab any part of your steering system and feel any wiggle. This includes holding a single rudder, both rudders, or the tiller extension. Everything should be tight. Furthermore, once you've finished this, there should be no possibility of rudder damage by rudder-to-casting contact. First you need to understand what's wrong with the stock setup. The stock Hobie rudder system is made to accommodate a variety of ills: Rudders might not always be the same thickness, aluminum castings might not always be the same size, and the skill of the assembler (your local boat shop), might not always come up to Hobie standards. This means that if the manufacturing tolerances are too close, they might have to throw away some castings or rudders. And if the assembler has not learned under the master assembler, he might damage the parts going together. Hobie seems to have elected to err on the side of sloppy steering systems. |
| Look at your rudder castings. Look in the dark recesses where the plastic rudder sits inside the aluminum castings. Can you look inside and see either of the two bolts between the rudder and the aluminum? If so you have slop. Your rudders can slide back and forth on the bolts. Now look at your rudders. Do you have circular scratch marks where the aluminum castings have been rubbing against the plastic rudder? Of course you do. Everyone does, unless you were the first person to assemble your rudders, and you did it right. That weakens your rudders and could puncture through and allow water to fill inside your rudders. Bad news. Once we take the slop out of your rudders that rubbing will stop. | 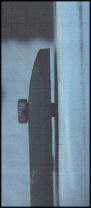 |
|
Now lift a tiller arm and try to wiggle it. Of course it wiggles! In fact it wiggles so much that it's not at all unusual to find a tiller that will overlap the cam. You can actually have the tiller arm come down and hit the cam with a very strong force - remember pounding your tiller arm to get it to lock down? Now that's slop. We can take care of that. When you lifted the tiller arm, did the blade fall into the vertical position with a hard "thunk?" Of course it did! It whacked against the bottom casting. Look at the front of the rudder where it whacked into the casting. See any damage? Of course you do. Now how can you control your steering system when it's that loose? Well, I think I've made my point. All new boats come this way. Hobie has left it up to you to fix this. Fortunately it's not hard or expensive. Why don't they do it? It takes time. Let's get on with this. First you need a little time. Then you need to eat a lot of butter or cool whip. I'd start with eating about 16 tubs of whipped dairy products. Why? Cause you need the tub lids to make plastic shims for your rudders. Remember looking at the bolts running through the castings and through the rudders. You need to fill those gaps completely with butter lid shims. |
| Here's the exact dimensions of the kit you can buy. The plastic shims are 3 inches in diameter with a 5/8 inch hole in the center. You can make your own by cutting a three inch circle out of a butter lid into and punching a 5/8 inch hole in the center. The kit costs about $8 last I checked (1989) and comes with 8 shims. KISME used to sell a kit for $8 with 16 shims. It's up to you what you use. | 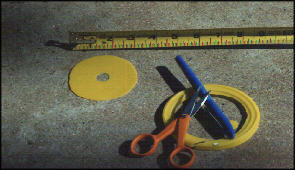
|
|
Before you take either of the two bolts out of your rudders, lock the rudders down and look at the gaps
you have to fill. Note the wide gaps and the narrow gaps in both the rudder casting and the tiller
connector casting. You'll need enough lids to fill all those gaps - more lids for the wide gaps and
less for the narrow. But remember you need at least one shim on each side of the plastic rudder, in
both castings, to protect it from grinding against the aluminum castings.
Once you've figured out about how many shims will fit between the gaps, you're ready to disassemble the rudder - there's only two bolts. Pull the bolts out one at at time, stuff the shims in, and put the bolts back in. You may need to tap the bolts with a hammer to push them through the shims. Be very careful not to tap the bolts through the rudder itself or crack the casting. | 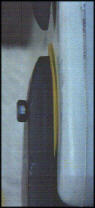 |
| This time when you tighten the nuts onto the bolts, be careful. When you get to the point of deforming the aluminum casting, you'll be pushing the entire assembly together and putting a squeezing force on the rudder. Here's how tight to tighten the nuts. Put the rudder in the up position. Lift the tiller arm. If the rudder fell past the 45 degree point, the nut is too loose. If it did not fall that far, it is too tight. Adjust the nuts until the rudder does not fall past 45 | 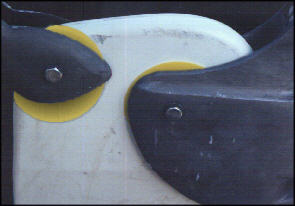 |
|
degrees down. Now check to see whether you can push the rudder down by pushing on the tiller connector
from on the boat. You should be able to. If you can't, loosen it a little more. You should have to
push a little to get the rudder down. Once the rudder is down, lock it in place with a click of the
cam.
Do this to the second rudder and you're ready to adjust toe in. The standard recommendation is to make sure the front and back of the rudders are pointed the same direction. I've always done this with the rudders up, but I'm the only one I know who does that. Everyone else does this with the rudders down. Whatever your preference, set it now. The adjustment is on the tiller crossbar at the tiller connector. I set mine with zero toe in. With that set you're ready to test on the water. What you're testing for is helm - the tiller should pull slightly when you're sailing upwind. The helm adjustment is the subject of another article. Chances are if you were happy with your helm before you started this, you'll be happy with it now. The reason your helm needs to be right is the next step in eliminating your slop will literally cast your helm adjustment in rubber. |
| Lower your rudders and look at where they fit into the lower rudder casting. Mark the castings on the rudders so you can tape some plastic wrap on them. You'll need some black RTV, also known as silicone rubber, plastic wrap, and any kind of tape. Use black RTV because it is not affected by sun light. Tape the plastic wrap onto the rudders to cover the area where the rudder fits into the lower casting. Double check that the rudder is completely covered in the lower casting. Now raise the rudder and glop some RTV into the lower casting | 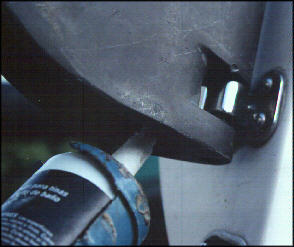 |
|
where the rudder will fit and lower the rudder
immediately into the casting. Don't forget to lock it down. Leave it at least overnight to set
the rubber, and don't sail for a week. After the mold is set you can remove the plastic wrap from
the rudder. With this done, your rudders will always lock into the same place on the casting,
every time. With the shims and the molding, your rudders cannot move.
That covers everything you need to stiffen your rudders, but, since I'm talking about the entire steering system, there are two more tips to help eliminate slop. The boat comes with a bolt through the round tiller cross bar where your tiller extension connects. That fitting is sloppy from the first day because you can't tighten the stainless bolt on the aluminum tube. What you need is to stiffen that fitting. An easy way to do this is with two molded plastic spacers. They're quarter round with holes and fit on each side of the cross bar where the bolt goes through. With these parts you have a firm grip on the round bar and a flat surface upon which you can tighten the nut to the through-bolt. The last tip is to tighten your tiller connectors where the tiller connects to the cross bar on each side. The old stock Hobie parts were a sloppy solution to a problem with their design. KISME solved the problem with their TLCs back in the 80's, and Hobie came up with something a few years ago. Either of these new systems is preferable to the original sloppy connector. If you've followed all these directions, you now have the stiffest steering system you can have. Your rudders will lock down with a click and stay down, and since you will always be locking and unlocking your rudders in exactly the same way, your cams will never break (just keep the cam plunger lubricated with something oily, NOT WD-40 because it washes out in the turbulence). As I said above, having a stiff rudder system makes all the difference in the world as far as enjoying your Hobie. It took me about 2 seasons of sailing, after I eliminated all the slop, to really believe that my rudders always worked perfectly. No more cussing and swearing, no more banging my tiller arms to lock them down, no more rudder tips worn off against the rocks, and no more broken cams. This is a fun little project (eating the Cool Whip, I mean) and you won't believe the results are as good as I say, but give it a try. Sailing a Hobie is fun, but sailing a fun Hobie is a LOT more fun. David Hall
Back to Features |